Saltar al contenido principal

Esta guía ha sufrido modificaciones. Revisa la última versión sin revisar.

Dell Inspiron 13-7353 Motherboard Replacement

Qué necesitas

  1. Dell Inspiron 13-7353 Motherboard Replacement, Flip the Computer: paso 1, imagen 1 de 1
    • WARNING: Please read the safety information shipped with your computer and follow recommended steps before working inside your computer. When finished working inside your computer, follow the instructions included in the safety information.

    • Close the computer display and turn the computer over so that the base of the computer is facing up.

  2. Dell Inspiron 13-7353 Motherboard Replacement, Secure the Base: paso 2, imagen 1 de 1
    • Remove the ten screws that secure the base cover to the base of the computer.

  3. Dell Inspiron 13-7353 Motherboard Replacement, Pry the Base cover: paso 3, imagen 1 de 1
    • Using a plastic scribe (plastic opening tool), pry the base cover off of the base of the computer.

  4. Dell Inspiron 13-7353 Motherboard Replacement, RAM: paso 4, imagen 1 de 2 Dell Inspiron 13-7353 Motherboard Replacement, RAM: paso 4, imagen 2 de 2
    • Before opening your device, ensure that all data is backed up on a hard drive to prevent data loss.

    • Loosen and then unplug the hard drive cable.

  5. Dell Inspiron 13-7353 Motherboard Replacement: paso 5, imagen 1 de 2 Dell Inspiron 13-7353 Motherboard Replacement: paso 5, imagen 2 de 2
    • Remove the two M2 3mm screws attaching the battery using the Phillips #1 screwdriver.

    • Remove the battery.

  6. Dell Inspiron 13-7353 Motherboard Replacement: paso 6, imagen 1 de 3 Dell Inspiron 13-7353 Motherboard Replacement: paso 6, imagen 2 de 3 Dell Inspiron 13-7353 Motherboard Replacement: paso 6, imagen 3 de 3
    • Pry open the two clips.

    • Gently lift the RAM stick and pull it out of the motherboard.

  7. Dell Inspiron 13-7353 Motherboard Replacement, Fan: paso 7, imagen 1 de 3 Dell Inspiron 13-7353 Motherboard Replacement, Fan: paso 7, imagen 2 de 3 Dell Inspiron 13-7353 Motherboard Replacement, Fan: paso 7, imagen 3 de 3
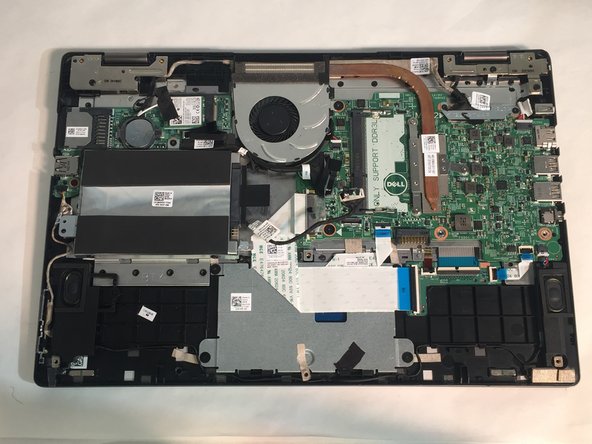
    • Unplug the daughterboard cable in two places, then remove the daughterboard.

    • Unplug the fan cable.

  8. Dell Inspiron 13-7353 Motherboard Replacement: paso 8, imagen 1 de 2 Dell Inspiron 13-7353 Motherboard Replacement: paso 8, imagen 2 de 2
    • Remove two 3mm screws from the cooling fan using the Phillips #1 screwdriver.

    • Remove the cooling fan from the laptop.

  9. Dell Inspiron 13-7353 Motherboard Replacement, Heat Sink: paso 9, imagen 1 de 3 Dell Inspiron 13-7353 Motherboard Replacement, Heat Sink: paso 9, imagen 2 de 3 Dell Inspiron 13-7353 Motherboard Replacement, Heat Sink: paso 9, imagen 3 de 3
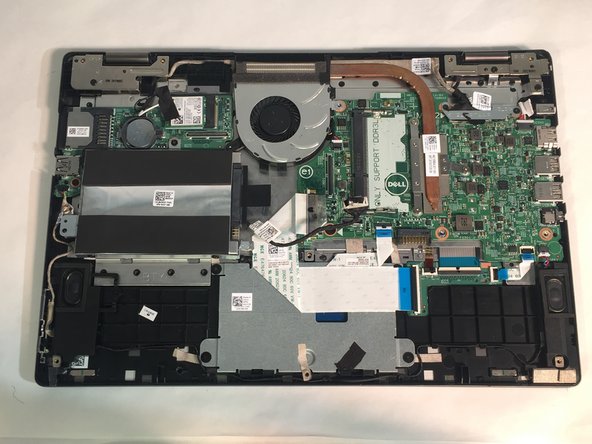
    • Remove three 2mm screws from the heat sink using a Phillips #0 screwdriver.

    • Remove the heat sink.

  10. Dell Inspiron 13-7353 Motherboard Replacement, Motherboard: paso 10, imagen 1 de 3 Dell Inspiron 13-7353 Motherboard Replacement, Motherboard: paso 10, imagen 2 de 3 Dell Inspiron 13-7353 Motherboard Replacement, Motherboard: paso 10, imagen 3 de 3
    • Remove 2 M2 3mm bracket screws, using the Phillips 1 screwdriver, on the LCD cable bracket.

    • Remove the LCD cable bracket.

  11. Dell Inspiron 13-7353 Motherboard Replacement: paso 11, imagen 1 de 3 Dell Inspiron 13-7353 Motherboard Replacement: paso 11, imagen 2 de 3 Dell Inspiron 13-7353 Motherboard Replacement: paso 11, imagen 3 de 3
    • Unplug the LCD cable.

    • Unplug the touchscreen cable.

  12. Dell Inspiron 13-7353 Motherboard Replacement: paso 12, imagen 1 de 3 Dell Inspiron 13-7353 Motherboard Replacement: paso 12, imagen 2 de 3 Dell Inspiron 13-7353 Motherboard Replacement: paso 12, imagen 3 de 3
    • Unplug the DC Jack cable.

    • Unplug the speaker cable.

  13. Dell Inspiron 13-7353 Motherboard Replacement: paso 13, imagen 1 de 2 Dell Inspiron 13-7353 Motherboard Replacement: paso 13, imagen 2 de 2
    • Be gentle and slow when loosening the keyboard cable tape.

    • Loosen the top of the keyboard tape.

    • Loosen the keyboard cable latches with a screwdriver for easier access.

    • Unplug the keyboard cable.

  14. Dell Inspiron 13-7353 Motherboard Replacement: paso 14, imagen 1 de 3 Dell Inspiron 13-7353 Motherboard Replacement: paso 14, imagen 2 de 3 Dell Inspiron 13-7353 Motherboard Replacement: paso 14, imagen 3 de 3
    • Unplug the touchpad cable.

    • Unplug the keyboard backlight cable.

  15. Dell Inspiron 13-7353 Motherboard Replacement: paso 15, imagen 1 de 2 Dell Inspiron 13-7353 Motherboard Replacement: paso 15, imagen 2 de 2
    • Remove 1 M2 2mm wafer screw, using the Phillips 1 screwdriver, from the motherboard.

    • Remove the motherboard.

Conclusión

To reassemble your device, follow these instructions in reverse order.

2 personas más completaron esta guía.

0 comentarios

Agregar Comentario

Ver Estadísticas:

Ultimas 24 horas: 0

Ultimos 7 días: 4

Ultimos 30 días: 13

Todo El Tiempo: 954