Introducción
This guide will remove the battery from your ASUS Chromebook Flip C302 and allow for installing a new battery.
Qué necesitas
-
-
Turn the Chromebook upside down. You may want to place paper or another soft material between the lid and your work surface, so as not to scratch it.
-
Remove the 10 (6.14 mm) case screws with a T4 Torx driver.
-
-
-
Using a spudger (or prying tool, or fingernail), gently lift the feet at the rear of the laptop (near the hinges). Get underneath the pad, then release the adhesive by sweeping in a circular motion.
-
Store the feet upside down and not sticking to anything―you can likely re-adhere them after replacing the cover.
Do NOT try to remove the other (front) two feet! They attach differently and are not designed to be removed. There are no screws hidden below them.
Wish I’d read this comment before I tried prying one of the two front feet off. I didn’t break it, but now it won’t go completely back in place. This is in the original instruction above, but I wasn’t reading carefully…
-
-
-
Using a plastic prying tool (avoid metal, as the case is easily scratched), lift the back cover from the case. The underside of a hinge is a good place to start.
-
You'll feel the cover give way, but there are loose clips holding the lid on. Work gently around the lid, prying and moving beyond clips when you encounter them.
-
-
-
-
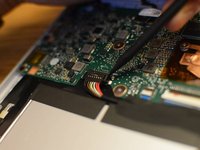
Locate the battery connector. With the large silver/black battery facing you, the connector is just above it, in the middle-left. But first we must remove some tape.
-
-
Herramienta utilizada en este paso:Tweezers$4.99
-
Using a spudger or other ESD-safe plastic tool, pry the thick plastic tape and foam top off the connector, just above the multi-colored leading to the connector.
-
You may use tweezers, or fingers, to get a better grip on the tape, but be cautious not to touch metal or electrical components, as the battery is still attached.
-
-
-
Using a spudger or prying tool (but no metal), gently pry one side of the connector up from the board.
-
After one side has popped loose from its socket, repeat the procedure with the other side, until the connector is loose.
Some connectors has a metal bracket on the board side of the connector, Slide the metal bracket ~3mm away from the wires to release the clip, then the wire assembly lifts up.
-
-
-
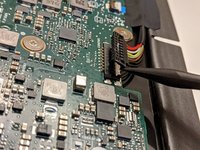
Following the wires from the connector back to the battery, you'll find a piece of thick electrical tape about halfway up the wires. Using tweezers, peel up and remove this sticky tape with slow, even force.
The blue cable (pictured above) is the keyboard connector cable. If keys are not registering when pressed, make sure the white line is parallel to the beige-white connector and the blue cable is fully seated. The tape on the battery can often pull the blue keyboard ribbon cable partially or entirely out, if the battery has shifted due to case damage.
-
-
-
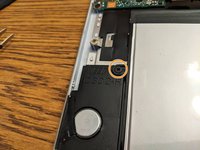
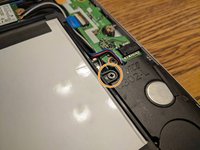
Look for Phillips #0 screws to the left and right of the battery, in small bump-outs to attach the battery to the speakers on both sides. Remove these screws.
I think the empty threaded holes you saw on the bottom of the battery will be filled by case screws once you put the cover back on.
-
-
-
Pulling from the bottom (near the hinges), gently lift and pull the battery out.
Many thanks - very easy to follow and it worked perfectly.
Thank you, it worked perfectly for my C302C !
-


To reassemble your device, follow these instructions in reverse order. Be sure to replace all the tap and foam pads―they help protect delicate cables and components from impacts.
To reassemble your device, follow these instructions in reverse order. Be sure to replace all the tap and foam pads―they help protect delicate cables and components from impacts.
Cancelar: No complete esta guía.
38 personas más completaron esta guía.

20 comentarios
Thank you so much for this guide - worked great. My repair might not have been successful without this guide.
This was my first experience trying anything like this and it was PERFECT - AWESOME experience. This saved me over $500 from buying a new Chromebook. Thanks again!!
Me too - very straightforward, worked perfectly. Many thanks!
So I needed to replace the battery and the one on your link did nnot give any results so I found a battery online to buy- whihc arrived and I replaced using your guide.But the chroebook says battery doe snot exist, there is noicon.I have tried a frimware update, hard reset everything. when I put back theold battery it finds it, but the replacement it does not recognise. Now I am worried the battery I bought they sent me was faulty? as when I run a battery_firmware check it gives :
Battery info:
OEM name:
Model number:
Chemistry : OTD0
Serial number:
Design capacity: 5065 mAh
Last full charge: 0 mAh
Design output voltage 7700 mV
Cycle count 1
Present voltage 0 mV
Present current 0 mA
Remaining capacity 0 mAh
Flags 0x00
So now I am at a loss at what to do other than chuckitall in the bin and buy a new one? any ideas greatfully recieved. Thanks,
I have the same problem. I bought a refurbished chromebook, it has a battery that the chromebook itself does not see. It is inside, everything is connected correctly, but the device does not see the battery. knows what to do with it?
Hi, i replaced the battery with success as described above. But now my asus chromebook flip c302-c009 is so slooooooow. How is that possible? I did a powerwash, a complete format and reset chrome OS but still, no where near the speed it had. Did I hit the display cable in step 9? I don´t think so but ..
Any suggestions?
Once I had the right size torx bit, things went smoothly. I did have a problem with the cheap spudger that came with the replacement battery. Ended up using an X-acto knife to lift the pads. Would advise ordering replacment pads.
Thanks for this guide! Small point of attention: in the tools you list T5 torx, but in step 1 you need T4 torx, so tools should also say T4 (T5 is too big).
Great guide helped me successfully replace my Chromebook battery.
A couple of points worth adding for stupid people like me!
- Before Step 1, shut down your Chromebook completely. (I’d just closed lid and only noticed it was still in standby after I had the back off!)
- In step 3, it’s worth emphasising that it’s *only* the two rear feet (by the hinges) that have screws underneath. I skimmed the instructions (my fault) and wrongly assumed screws were under all four feet. The front feet look almost identical and I nearly broke one trying to lever it off before rereading and realising my mistake!
Does anyone have a link to the C302C battery from a reputable seller? I can’t find it here on iFixit. Any recommendation is appreciated. Thanks.
Thank you! Looking forward to purchasing the tools and replacing the battery in this device
Thank you! Worked like a charm.
Worked like a charm. Thank you very much! Tell folks not to buy cheap screwdriver bits…they don't even last as long as the project :/
Whooo Hooo!
For the people who say "ChromeOS doesn't see my new battery!"... make sure the connector is correctly attached. Installing mine, there was no subtle positive click in place, and Chrome wouldn't say anything about the battery. (I was feeling antsy about the connector and didn't screw the back down.) Sure enough, I removed the back again and inspected the connector very closely. Mine was upside down. When properly oriented, you can actually see more copper on the top than the bottom where it mates with the socket on the motherboard. And there will be two very subtle clicks as you push it into place; the second click is almose imperceptible.
Thank you so much. This is my first time replacing a computer battery and you made it easy. You kept one more item away from the landfill. One suggestion for improvement is to note you only need to remove the two "feet" closest to the hinge. The bottom two feet do not need to be removed
Thanks for these instructions. Worked great. Laptop booted up, and replacement battery Anepoch C21N1613La showed 10% on laptop display.
So now charging Chromebook.
I'm not sure how long this Laptop had been used only with plug, doing this for a friend who owns the Chrome book. I was also worried the CMOS battery might be dead, but didn't replace it yet.
Detailed and precise. High resolution photos were very helpful. I would not have managed without your instruction.
Small comment about step 10 - battery and the screws. The "missing" two screws were unscrewed in step 1 - the battery is screwed also to the back cover.
On my machine, an Asus C302C Chromebook, a T4 Torx driver was required. A T5 Torx driver was too large.
Paul - Contestar
I concur - T5 too big
Kevin Pierce -
With mine, the T4 supplied with the battery was too small. I was able to use a T5.
rob wilson - Contestar
Noted! I’ve updated the guide.
Kevin Purdy - Contestar
My screws just spin I will not come out
granyjane - Contestar
T5 worked for me
RonWan - Contestar
T5 Torx was the one that worked for me. T4 was too small. ASUS Chromebook C302C. Screws came out fine with a T4, but I couldn’t get them back in until I realized that the T5 fit better and was able to get the screws back in.
Wayne Lunsford - Contestar
On ours a T5 was needed. Maybe some machines were built with T4s and some with T5s.
MaggieL - Contestar