Introducción
This guide will remove the battery from your ASUS Chromebook Flip C302 and allow for installing a new battery.
Qué necesitas
-
-
Turn the Chromebook upside down. You may want to place paper or another soft material between the lid and your work surface, so as not to scratch it.
-
Remove the 10 (6.14 mm) case screws with a T4 Torx driver.
-
-
-
Using a spudger (or prying tool, or fingernail), gently lift the feet at the rear of the laptop (near the hinges). Get underneath the pad, then release the adhesive by sweeping in a circular motion.
-
Store the feet upside down and not sticking to anything―you can likely re-adhere them after replacing the cover.
-
-
-
Using a plastic prying tool (avoid metal, as the case is easily scratched), lift the back cover from the case. The underside of a hinge is a good place to start.
-
You'll feel the cover give way, but there are loose clips holding the lid on. Work gently around the lid, prying and moving beyond clips when you encounter them.
-
-
-
-
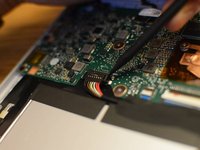
Locate the battery connector. With the large silver/black battery facing you, the connector is just above it, in the middle-left. But first we must remove some tape.
-
-
Herramienta utilizada en este paso:Tweezers$4.99
-
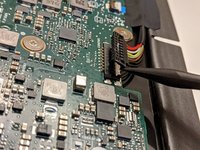
Using a spudger or other ESD-safe plastic tool, pry the thick plastic tape and foam top off the connector, just above the multi-colored leading to the connector.
-
You may use tweezers, or fingers, to get a better grip on the tape, but be cautious not to touch metal or electrical components, as the battery is still attached.
-
-
-
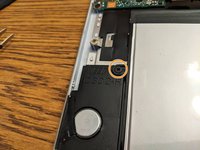
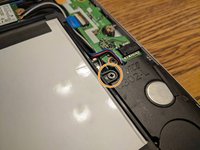
Pulling from the bottom (near the hinges), gently lift and pull the battery out.
-


To reassemble your device, follow these instructions in reverse order. Be sure to replace all the tap and foam pads―they help protect delicate cables and components from impacts.
To reassemble your device, follow these instructions in reverse order. Be sure to replace all the tap and foam pads―they help protect delicate cables and components from impacts.
Cancelar: No complete esta guía.
38 personas más completaron esta guía.

19 comentarios
Thank you so much for this guide - worked great. My repair might not have been successful without this guide.
This was my first experience trying anything like this and it was PERFECT - AWESOME experience. This saved me over $500 from buying a new Chromebook. Thanks again!!
Me too - very straightforward, worked perfectly. Many thanks!
So I needed to replace the battery and the one on your link did nnot give any results so I found a battery online to buy- whihc arrived and I replaced using your guide.But the chroebook says battery doe snot exist, there is noicon.I have tried a frimware update, hard reset everything. when I put back theold battery it finds it, but the replacement it does not recognise. Now I am worried the battery I bought they sent me was faulty? as when I run a battery_firmware check it gives :
Battery info:
OEM name:
Model number:
Chemistry : OTD0
Serial number:
Design capacity: 5065 mAh
Last full charge: 0 mAh
Design output voltage 7700 mV
Cycle count 1
Present voltage 0 mV
Present current 0 mA
Remaining capacity 0 mAh
Flags 0x00
So now I am at a loss at what to do other than chuckitall in the bin and buy a new one? any ideas greatfully recieved. Thanks,