Saltar al contenido principal

CASIO fx-300ES Plus Scientific Calculator Battery Replacement

Qué necesitas

  1. CASIO fx-300ES Plus Scientific Calculator Battery Replacement, Battery: paso 1, imagen 1 de 1
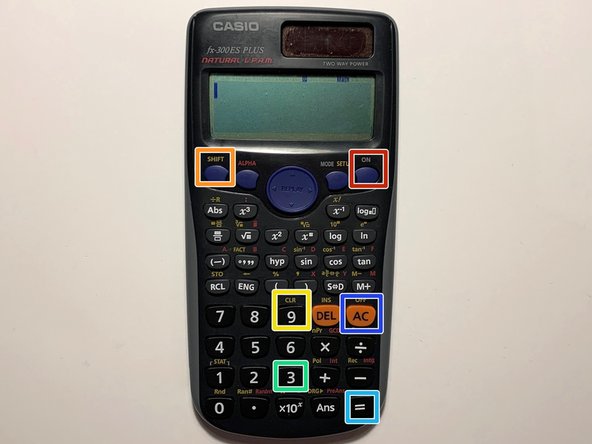
    • Turn off the calculator by pressing the [Shift] button.

    • Press the [AC][OFF] button.

  2. CASIO fx-300ES Plus Scientific Calculator Battery Replacement: paso 2, imagen 1 de 1
    • Flip the calculator over so that the back panel faces forward.

    • Use a Phillips #0 screwdriver to remove the screw in the upper right corner.

    • If the screw is not unfastening, do not force it because it can strip the screw. If the screw is already stripped see the Cómo quitar un tornillo barrido guide.

  3. CASIO fx-300ES Plus Scientific Calculator Battery Replacement: paso 3, imagen 1 de 1
    • Remove the battery cover.

  4. CASIO fx-300ES Plus Scientific Calculator Battery Replacement: paso 4, imagen 1 de 1
    • Insert the spudger in the available slot in the middle of the right side.

    • Use the spudger to pry out the battery.

    • Be gentle when removing the battery to avoid damaging it.

  5. CASIO fx-300ES Plus Scientific Calculator Battery Replacement: paso 5, imagen 1 de 2 CASIO fx-300ES Plus Scientific Calculator Battery Replacement: paso 5, imagen 2 de 2
    • Place the new LR44 alkaline battery into the calculator.

    • Be sure that the + sign is at the bottom.

  6. CASIO fx-300ES Plus Scientific Calculator Battery Replacement: paso 6, imagen 1 de 1
    • Reattach the battery cover.

    • Insert the screw for the battery cover using a Phillips #0 screwdriver.

  7. CASIO fx-300ES Plus Scientific Calculator Battery Replacement: paso 7, imagen 1 de 1
    • Reset the calculator by pressing [ON].

    • Press the [shift] button.

    • Press the [9] [CLR] button to clear the data.

    • Press the [3][ALL] button option.

    • Press [=] [yes] button to agree.

    • Press [AC] key to reset.

Conclusión

You have now successfully replaced a Casio FX-300ES battery.

2 personas más completaron esta guía.

Maha

Miembro Desde 07/08/20

255 Reputación

1 Guía escrita

Equipo

Un comentario

Below is a detailed video showing the battery replacement process.

https://youtu.be/I7pR-_Ra5W8

Tomatoman - Contestar

Agregar Comentario

Ver Estadísticas:

Ultimas 24 horas: 9

Ultimos 7 días: 153

Ultimos 30 días: 593

Todo El Tiempo: 29,005