Saltar al contenido principal

Atari Flashback 6 Controller Board Repair

Qué necesitas

  1. Atari Flashback 6 Controller Board Repair, Atari Flashback 6 Controller Board Repair: paso 1, imagen 1 de 3 Atari Flashback 6 Controller Board Repair, Atari Flashback 6 Controller Board Repair: paso 1, imagen 2 de 3 Atari Flashback 6 Controller Board Repair, Atari Flashback 6 Controller Board Repair: paso 1, imagen 3 de 3
    • If the controller currently contains batteries, please remove them before starting the repair.

    • Use a Phillips #1 screwdriver to remove single 1.5 mm-long screw securing the battery cover.

    • Lift the battery cover off.

    • Depress the spring that is in contact with the negative side of the battery to remove the batteries. Push down, and then remove batteries one at a time.

  2. Atari Flashback 6 Controller Board Repair: paso 2, imagen 1 de 3 Atari Flashback 6 Controller Board Repair: paso 2, imagen 2 de 3 Atari Flashback 6 Controller Board Repair: paso 2, imagen 3 de 3
    • Use a Phillips #1 screwdriver to remove the four 2 mm screws from the bottom of the Atari controller.

  3. Atari Flashback 6 Controller Board Repair: paso 3, imagen 1 de 2 Atari Flashback 6 Controller Board Repair: paso 3, imagen 2 de 2
    • Open the bottom case gently.

    • Do not rip it open as it is connected by a ribbon cable to the top case.

    • Remove the single 2 mm-long Phillips #1 screw securing the motherboard to the top case.

    • Use a spudger to gently remove the motherboard from the top case.

    • Be careful to avoid bending the board or the LED light.

  4. Atari Flashback 6 Controller Board Repair: paso 4, imagen 1 de 3 Atari Flashback 6 Controller Board Repair: paso 4, imagen 2 de 3 Atari Flashback 6 Controller Board Repair: paso 4, imagen 3 de 3
    • Separate the button board from the back panel.

    • Like a car battery, the negative terminal attaches to the black wire and the positive with the red wire.

    • You may have to strip the wires to expose the internal copper wiring.

    • Use a wire stripper to expose the internal wiring to secure a proper connection in the next step.

  5. Atari Flashback 6 Controller Board Repair: paso 5, imagen 1 de 2 Atari Flashback 6 Controller Board Repair: paso 5, imagen 2 de 2
    • Using a soldering iron can be dangerous. Because of the high temperature, please be sure to exercise caution when using this tool.

    • Attach the red wire to the positive terminal using the soldering iron, melting the solder to create a connection.

    • Attach the black wire to the negative terminal using the soldering iron, melting the solder to create a connection.

  6. Atari Flashback 6 Controller Board Repair: paso 6, imagen 1 de 2 Atari Flashback 6 Controller Board Repair: paso 6, imagen 2 de 2
    • Use a Phillips #1 screwdriver to replace the 2 mm screw that secures the motherboard to the top case.

    • Make sure to not pull on wires that are now attached.

  7. Atari Flashback 6 Controller Board Repair: paso 7, imagen 1 de 2 Atari Flashback 6 Controller Board Repair: paso 7, imagen 2 de 2
    • Reinsert the front panel into the groove of the outer shell.

  8. Atari Flashback 6 Controller Board Repair: paso 8, imagen 1 de 2 Atari Flashback 6 Controller Board Repair: paso 8, imagen 2 de 2
    • Replace the 2 mm Phillips #1 screws in the back panel to reassemble the controller.

    • After the back panel is secure, re-install the batteries, and replace the 1.5 mm Phillips #1 screw.

  9. Atari Flashback 6 Controller Board Repair: paso 9, imagen 1 de 1
    • Make sure to test the product by playing an Atari game. If buttons or directional toggle are not working, repeat steps 1- 8.

Conclusión

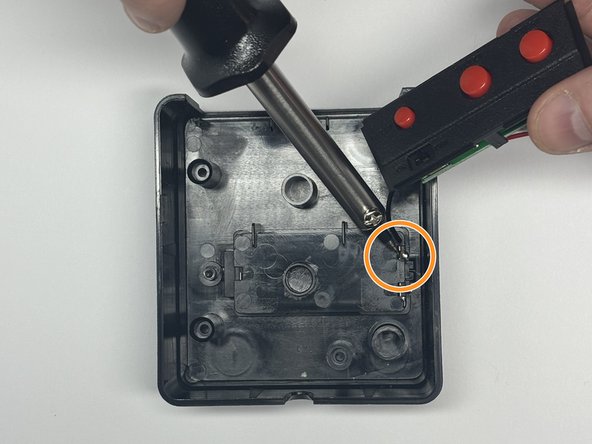
Ensure you test your controller when finished to verify the proper connection.

Kyle Albright

Miembro Desde 02/26/24

169 Reputación

1 Guía escrita

0 comentarios

Agregar Comentario

Ver Estadísticas:

Ultimas 24 horas: 0

Ultimos 7 días: 1

Ultimos 30 días: 7

Todo El Tiempo: 51