Saltar al contenido principal

Amazon Echo Show 10 3rd Gen Microphone Replacement

Qué necesitas

  1. Amazon Echo Show 10 3rd Gen Microphone Replacement, Display: paso 1, imagen 1 de 2 Amazon Echo Show 10 3rd Gen Microphone Replacement, Display: paso 1, imagen 2 de 2
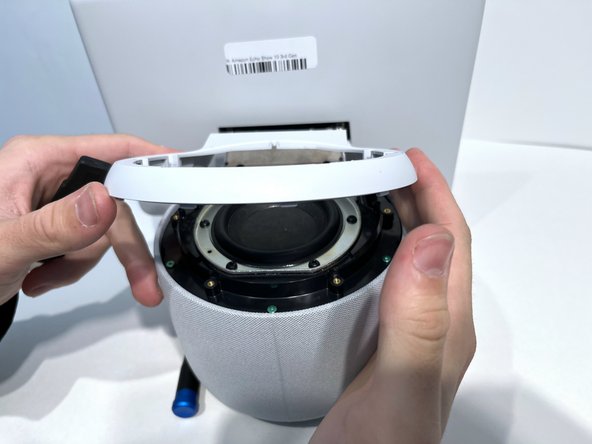
    • With the Echo device standing upright, firmly grip the base and use the blue opening tool to gently pry the lid from the mesh speaker base.

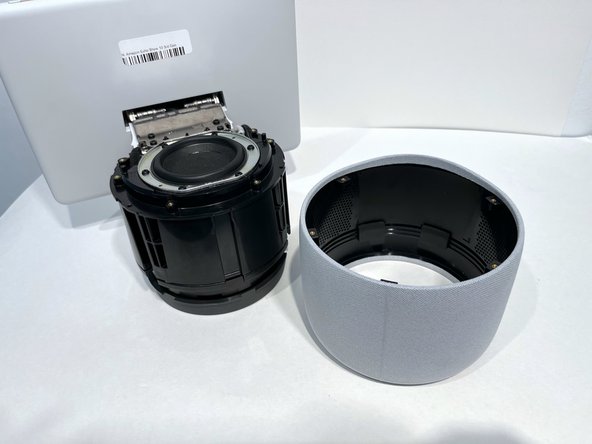
    • Remove the lid and set aside.

  2. Amazon Echo Show 10 3rd Gen Microphone Replacement: paso 2, imagen 1 de 1
    • Use a TR8 Torx Security screwdriver to remove the six 9 mm screws from the perimeter of the plastic bezel on the top edge of the device.

  3. Amazon Echo Show 10 3rd Gen Microphone Replacement: paso 3, imagen 1 de 2 Amazon Echo Show 10 3rd Gen Microphone Replacement: paso 3, imagen 2 de 2
    • Release the adhesive seal connecting the bezel to the main base by inserting a Jimmy underneath the edge, and gently sliding from one side to another.

    • Lift up the outermost edge of the plastic bezel (furthest from the display) to remove it and set it aside.

    • After removing the screws in the previous step, the only thing holding this component in place is glue. You may need to apply a little force to break the seal created by any remaining glue to remove the bezel component. You could also apply a little heat with the iOpener to loosen the adhesive.

  4. Amazon Echo Show 10 3rd Gen Microphone Replacement: paso 4, imagen 1 de 1
    • Use a Torx T6 screwdriver to remove the five 10 mm screws from the perimeter of the top surface of the base.

  5. Amazon Echo Show 10 3rd Gen Microphone Replacement: paso 5, imagen 1 de 2 Amazon Echo Show 10 3rd Gen Microphone Replacement: paso 5, imagen 2 de 2
    • With one hand securely holding the neck of the display and the other holding the device base, gently lift the device out of the mesh shell.

    • Place the shell aside.

  6. Amazon Echo Show 10 3rd Gen Microphone Replacement: paso 6, imagen 1 de 1
    • Tilt the device so that the underside of the display and its neck are facing you.

    • You may need help holding it in this position. Alternatively, you could place the device on a soft surface so it doesn't get damaged.

    • Use a T6 Torx screwdriver to remove the two 5mm screws from the underside of the display neck.

  7. Amazon Echo Show 10 3rd Gen Microphone Replacement: paso 7, imagen 1 de 2 Amazon Echo Show 10 3rd Gen Microphone Replacement: paso 7, imagen 2 de 2
    • Lift the plate up to remove it from the neck of the device.

    • Set it aside for reassembly.

  8. Amazon Echo Show 10 3rd Gen Microphone Replacement: paso 8, imagen 1 de 1
    • Use an opening tool to flip up the small locking flap on the ribbon cable connector located in the center of the exposed underside of the display neck.

    • Gently pull the cable out.

  9. Amazon Echo Show 10 3rd Gen Microphone Replacement: paso 9, imagen 1 de 1
    • Tilt the device so it is in the upright position.

    • Use a TR10 Torx Security screwdriver to remove the four 11 mm screws from the top of the display neck.

  10. Amazon Echo Show 10 3rd Gen Microphone Replacement: paso 10, imagen 1 de 2 Amazon Echo Show 10 3rd Gen Microphone Replacement: paso 10, imagen 2 de 2
    • Gently lift the display and its connecting neck off of the base.

  11. Amazon Echo Show 10 3rd Gen Microphone Replacement, Microphone: paso 11, imagen 1 de 1
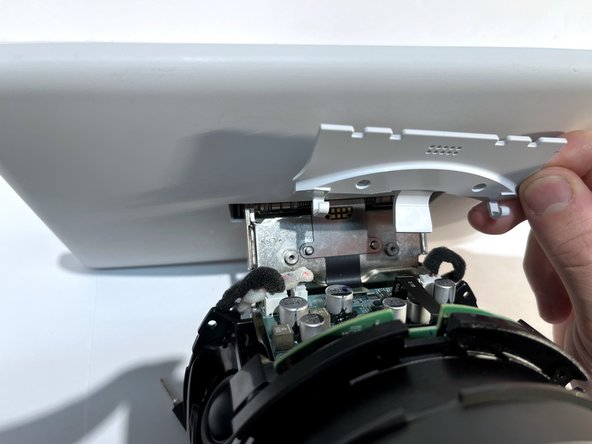
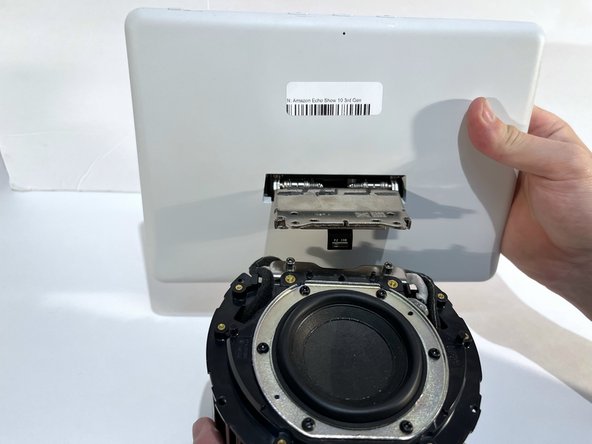
    • Insert a Jimmy along the seam of the screen and the shell and slide it along the length to separate the two sides.

    • For this particular step, a careful amount of force may be needed to separate the two parts. The connection is especially tight at the four corners. Use the iOpener to loosen the small amount of adhesive.

  12. Amazon Echo Show 10 3rd Gen Microphone Replacement: paso 12, imagen 1 de 1
    • Gently separate the display from the base.

    • There is a small amount of glue holding the two components together in the top corner, which may require the user to apply more force when separating.

    • Don't yank the display off as it is connected by a cable.

  13. Amazon Echo Show 10 3rd Gen Microphone Replacement: paso 13, imagen 1 de 2 Amazon Echo Show 10 3rd Gen Microphone Replacement: paso 13, imagen 2 de 2
    • Hold the display away from the board at an angle to ensure a clear view while keeping the ribbon cable slack.

    • Place the tip of your opening tool under the edge of the display connector, and pry the connector straight up from its socket.

    • Be very careful to pry only under the edge of the connector, and not under the socket itself. If you pry under the socket, you will separate it from the circuit board, which requires specialized microsoldering skills and equipment to repair.

    • Set aside the display.

  14. Amazon Echo Show 10 3rd Gen Microphone Replacement: paso 14, imagen 1 de 1
    • Place the tip of your opening tool under the edge of the orange connector, and pry it straight up from its socket.

    • To reconnect, align the connector carefully over its socket and press down with your fingertip—first at one side, then the other—until it clicks into place.

  15. Amazon Echo Show 10 3rd Gen Microphone Replacement: paso 15, imagen 1 de 1
    • Use the T5 Torx screwdriver to remove the two 4 mm screws from the bracket covering the microphone board and the one 4 mm screw holding down the board itself.

  16. Amazon Echo Show 10 3rd Gen Microphone Replacement: paso 16, imagen 1 de 3 Amazon Echo Show 10 3rd Gen Microphone Replacement: paso 16, imagen 2 de 3 Amazon Echo Show 10 3rd Gen Microphone Replacement: paso 16, imagen 3 de 3
    • Use a spudger to pry under the microphone board. and gently wear away at the connecting glue.

    • The board is glued on so use the spudger to release the glue. It may take some time but be patient to avoid damaging the device.

    • The microphone component is delicate and relatively flimsy, so a gentle approach to breaking the adhesive is recommended.

    • After the adhesive seal has been broken, gently lift and remove the microphone board.

Conclusión

To reassemble your device, follow these instructions in reverse order.

0 comentarios

Agregar Comentario

Ver Estadísticas:

Ultimas 24 horas: 0

Ultimos 7 días: 6

Ultimos 30 días: 17

Todo El Tiempo: 89