Introducción
Note I have replaced rotors and pads on my Celica and our old Mk1 CR-V and these rear Nissan brakes were by far the hardest to remove. Allow time so you don't feel rushed and apply a bit too much force ;)
Qué necesitas
-
-
If you have the Tin wheel version like me; remove the plastic covers. Then loosen the lug nuts, mine was really tight I even applied some heat to a couple to get them loose! Maybe the alloy wheel lug nuts are always easier?
-
Jack the car up and put it on axle stands, you can seen where I placed my stands there did not seem to be a clear single place...
-
-
-
Firstly Pop the Hood and open the brake fluid reservoir. Then using a screwdriver or similar tool inserted between the inner pad and the rotor, compress,(push in) the caliper piston as soon as your done close the brake fluid reservoir (the fluid is hyroscopic).
-
The Caliper is held by slider pins with a 14mm head. The top pin is directly in line with the brake hose,(sadistic design Engineer?). I needed to apply a lot of heat with a blow torch to get these loose. So I used a cheap locking wrench to shield the brake hose from heat!
-
Remove the pins with a 14mm socket, note the pin with the rubber at the end is the lower pin. Place the Caliper safely way where the hose will not be strained.
-
The Carrier for the Pads is held by two 17mm bolds, they needed a good deal of heat too before they came loose.
-
-
-
-
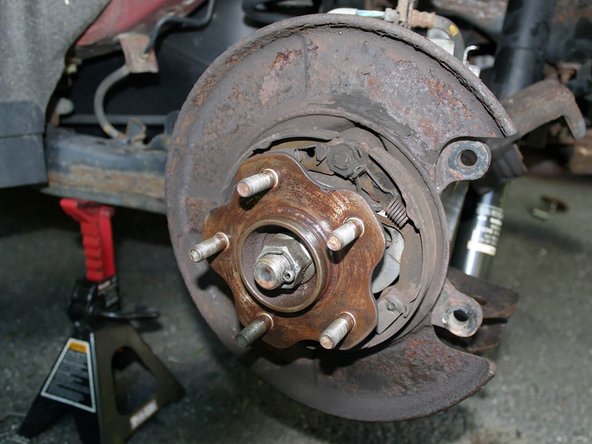
Most Rotors I had dealt with a couple of taps and they could be pulled off. Not These!
-
The rotors seem to have a rust bond to the lugs and the wheel hub. I wasn't going to hit the rotors hard as it could damage the lugs and the wheel bearing.
-
I used a wire brush attachment on a cordless drill to remove as much rust as I could, a screwdriver to chisel off rust where the rotor met the wheel hub and heated the areas with a blow torch then sprayed them with PB Blaster. Then did the same to the other side.
-
When I could see a gap around the lugs I tapped the rotors loose with a mallet and pulled them off.
-
-
-
Once I had the old stuff off. I brushed the rust of the metal shield and spayed it with rust converter, then enamel paint I sprayed everything down with brake cleaner.
-
I ground the rust off the places where the pad tins sit and applied a little brake grease to prevent more corrosion from developing under the tins.
-
I cleaned the sliding pins and the holes they sit in with wet and dry, then spayed them clean with brake cleaner. I re-greased the pins and put them back in place (rubber tipped pin at the bottom!) with new boots.
-
I placed a little grease on the contact points of the shoes of the e-brake.
-
I clipped in the pins and reassembled, The job had taken way longer than I thought due to the rust. But this was in upstate NY.
-
I did not have any, but if you have tin wheels may want to put anti-seize grease on the lugs. I just sprayed them with lithium grease once they were fully tightened to help keep the water out.
-
Once the car was back on the ground I applied and unapplied the e-brake a few times to work in the grease at the contact points.
-


To reassemble your device, follow these instructions in reverse order.
To reassemble your device, follow these instructions in reverse order.
