Introducción
Aunque no se lanzó en los Estados Unidos hasta el 27 de marzo, la 3DS de Nintendo se lanzó en Japón el 26 de febrero. Movimos algunos hilos para adquirir este modelo japonés, y no podemos esperar a ver qué hace funcionar a la 3DS. Únete a nosotros hoy mientras desmontamos el dispositivo portátil más nuevo y radical de Nintendo hasta el momento.
Qué necesitas
-
-
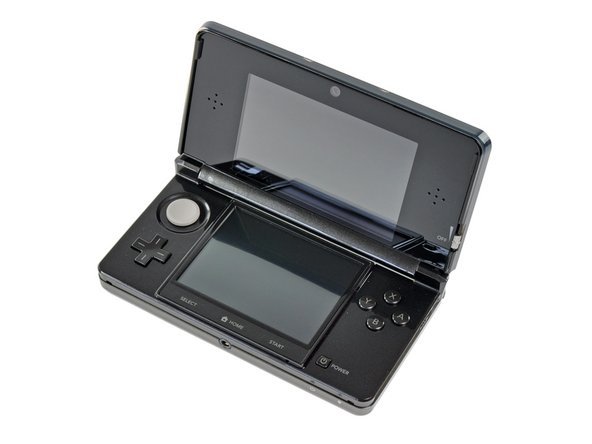
¡Recién llegado de la Tierra del Sol Naciente llega la tan esperada Nintendo 3DS! Es un gran dispositivo pequeño, y se siente de alta calidad cuando lo tienes en tus manos.
-
Las nuevas incorporaciones al exterior de la última unidad de la línea DS incluyen:
-
Pantalla superior 3D (duh)
-
Cámaras duales para imágenes/juegos en 3D
-
Joystick "Círculo Pad"
-
Puerto de infrarrojos
-
Lápiz metálico
-
Botones de inicio/selección revisados y un nuevo botón de inicio
-
-
-
Así es como se compara con la Nintendo DSi XL. Ten en cuenta que cambia una huella más pequeña por una carcasa un poco más gruesa.
-
Nintendo ha cambiado el diseño en la parte superior de la 3DS en comparación con la DSi XL.
-
El puerto de carga se movió hacia el lado derecho y se agregaron contactos presumiblemente para la base de carga, el orificio del lápiz óptico ahora está al lado de la ranura del cartucho del juego, se agregó una ventana de sensor IR y se eliminaron los orificios para una correa.
-
-
-
El ajustador 3D. Puedes seleccionar la profundidad de un campo de visión 3D que te gustaría ajustando este control deslizante hacia arriba o hacia abajo.
-
Según los informes, la pantalla superior de la 3DS produce imágenes en 3D mediante el uso de paralaje. Una capa en la pantalla LCD superior responde a los ajustes en el control deslizante 3D y cambia la imagen ligeramente entre cada uno de sus dos ojos. Cuando se ve desde la distancia recomendada, la imagen parece ser 3D.
-
Nintendo no es ajeno a los juegos en 3D, teniendo en cuenta su experiencia pasada con el Virtual Boy ridículamente genial y subestimado que utiliza medios ligeramente diferentes para lograr un efecto 3D similar.
-
-
-
Encontramos una pequeña característica interesante del 3DS por accidente mientras quitamos un poco de polvo con aire comprimido.
-
Los micrófonos externos de la 3DS captan el ruido característico del viento que sopla en el dispositivo y hacen girar los íconos en vivo en el fondo de cada menú como si estuvieran en un tornado.
-
-
-
Resulta que el 3D no se ve muy bien cuando intentas tomarle una foto. Sin embargo, aún puedes obtener una buena vista de la pantalla inferior sensible al tacto y el lápiz óptico de metal de nuevo diseño.
-
Dado que ninguno de nosotros en la oficina habla japonés con fluidez, tendremos que esperar hasta finales de este mes para obtener una 3DS que podamos disfrutar plenamente.
-
-
-
Un par de tornillos Phillips es todo lo que se interpone entre nosotros y el precioso.
-
A diferencia de las consolas DS anteriores, toda la tapa trasera de la 3DS se quita como una sola pieza en lugar de tener una pequeña puerta para acceder a la batería. Esto hace que se vea más limpia, pero también significa que reemplazar la batería llevará un poco más de tiempo.
-
-
-
La batería de iones de litio de 3,7 V, 1300 mAh y 5 Wh proporciona unas míseras 3-5 horas de duración de la batería. La suave acción en 3D tiene un precio. Incluso cuando se juegan juegos originales de DS, la 3DS dura solo de 5 a 8 horas con una sola carga.
-
Lo más probable es que la duración de la batería se vea disminuida por el procesador más rápido informado, los elementos LCD duales en la pantalla superior (para controlar el efecto de paralaje) y los programas más intensivos en hardware.
-
Teniendo en cuenta la corta duración de la batería, Nintendo envía la 3DS con una base de carga para una carga conveniente. Según ellos, una carga completa tarda 3,5 horas.
I cannot find replacements for this backplate anywhere! Does anyone know?
-
-
-
Un lápiz óptico telescópico fresco se almacena en una ranura a la izquierda de la ranura del cartucho del juego.
-
Su construcción de metal hace que se sienta de mayor calidad que el lápiz óptico moldeado por inyección de una sola pieza que se encuentra en las revisiones anteriores de DS
-
-
-
-
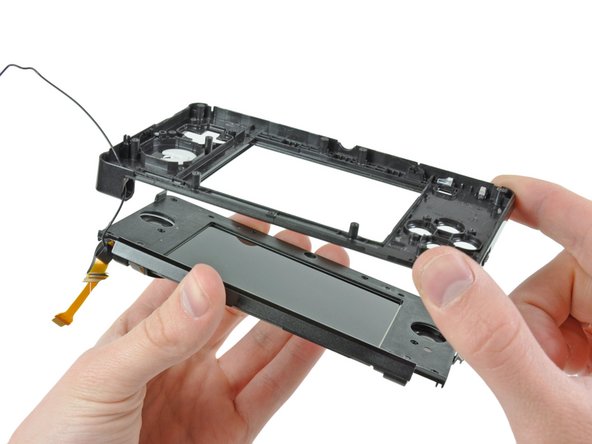
Se quitan algunos tornillos Phillips con nuestro confiable kit de 54 piezas y la caja inferior se levanta de inmediato.
-
Con la caja minúscula apagada, podemos ver bien la placa base y sus muchos componentes adjuntos. Tener elementos como el joystick y el lector de tarjetas SD en placas separadas hace que su reemplazo sea menos costoso si se rompen en el futuro.
These screws strip INCREDIBLY easily. PH00 works, but you need to press down fairly hard and sorta jerk the screwdriver around a few degrees at a time. Even after working this out (by stripping the first one) I accidentally stripped the next-to-last screw I was removing, requiring me to cut the screw well.
Another vote for using a PH000 bit for the smaller internal screws, it is a much better fit. Apply downward pressure to the bit as you turn.
what are each ribbon cables on this bottom? the one behind the battery broke and i dont know if its worth replacing, ds works fine without
-
-
-
La placa Wi-Fi se puede quitar fácilmente de la placa base con una herramienta de apertura de plástico.
-
Tras desconectar su singular antena, queda libre de la 3DS.
-
La parte posterior de la placa tiene una pegatina con la etiqueta Mitsumi DWM-W028, pero en el centro se encuentra un Atheros AR6014 IC para conectividad 802.11 b/g.
-
-
-
Continuando, la minúscula placa IR se puede sacar de la placa a continuación.
-
Nadie está realmente seguro de lo que hará el puerto de infrarrojos en el 3DS todavía, pero estamos pensando que es para algunas comunicaciones de línea de visión de 3DS a 3DS.
-
El controlador IR IC está fabricado por NXP y tiene las marcas:
-
S750 0803 TSD031C
The guide skims over this part - though it's one of the most important.
-
The speaker ribbon cable (first picture, lower left, topmost cable/smallest of the 3 ribbons in this area) connects to the mobo goldteeth facing away from keyboard (damage/improper assembly will result in a non-bootable 3ds that has the power LED flash for less than a second before turning off). The white line shows where a fold should be.
-
The camera cable (directly underneath speaker cable, largest of the 3 ribbon cables) connects with goldteeth facing the mobo.
The top LCD (non-touchscreen) cable (opposite side of mobo, medium in width) connects with goldteeth away from mobo. This should be the last cable removed in disassembly, and the first reattached.
-
If you plan on removing the top part of the 3ds, note of how the 3 cables are oriented (what direction goldteeth face) and layered (which cable is on top of which cable). Doing this incorrectly will likely result in cables not reaching where they need to go (see step 18).
Removing the cables must come after step 13 (step 12 if you fudge things) - but the pictures in step 11 are better suited to showing cable order.
Tai -
-
-
-
La parte inferior del Circle Pad y la ranura de la tarjeta SD se colocan una al lado de la otra y salen con poco esfuerzo.
-
Esta es la primera vez que una consola portátil de Nintendo tiene botones direccionales además del D-pad, mientras que la Sony PSP ha presentado un joystick analógico desde su debut a fines de 2004.
-
Una tarjeta SD de 2 GB viene de serie con la 3DS y se puede actualizar fácilmente a una tarjeta SD o SDHC de mayor capacidad, una opción importante si planeas tomar muchas fotos en 3D y comprar juegos en Nintendo eShop.
on some models i think the sd slot is soldered on to the mother board so be careful
-
-
-
Quitar los molestos tornillos restantes que sujetan la placa base a la carcasa inferior.
-
Placa base casi fuera... esto parece un poco familiar...
-
-
-
Chips que hemos encontrado dentro de la placa base 3DS (haga clic aquí para ver la versión de alta resolución):
-
CPU ARM Nintendo 1048 0H
-
Fujitsu MB82M8080-07L 128MB FC-RAM
-
Toshiba TGBM2G3P1FBAI8 2 GB memoria flash NAND
-
Texas Instruments PAIC3010B 0AA37DW
-
UC CTR 041KM73 KG10
-
Giroscopio Invensense ITG-3270 MEMS
-
ST Micro 2048 33DH X1MAQ Acelerómetro Modelo LIS331DH
The card reader pad to the bottom right of the red chip. Can that be jumper wired to the trace line, if that pad was ripped off when removing the card reader??
-
-
-
El conjunto inferior de la pantalla LCD se levanta sin ningún problema.
-
La pantalla LCD de 2,42" x 1,81" con resolución de 320 x 240 píxeles es capaz de mostrar 16,77 millones de colores.
-
El digitalizador en la pantalla inferior es mucho más grueso que los que se encuentran en la mayoría de los teléfonos celulares, muy probablemente debido al hecho de que la pantalla táctil se usa con un lápiz óptico, en lugar de la yema del dedo.
-
Además, el micrófono inferior se puede sacar del estuche en este punto.
-
-
-
Mientras que las versiones anteriores de DS tenían cuatro cubiertas de goma para tornillos en el bisel de la pantalla frontal, Nintendo optó por un enfoque más elegante para su nuevo sistema al adherir un panel frontal al bisel para ocultar los tornillos.
-
Un poco de ayuda de una pistola de aire caliente y una herramienta de apertura de plástico nos brinda un acceso bastante fácil a la pantalla superior.
-
-
-
El bisel trasero se levanta de la pantalla después de quitar seis tornillos Phillips para revelar los altavoces, la antena Wi-Fi y la pantalla LCD superior.
-
Para continuar con el desmontaje, tenemos que separar las bisagras y enhebrar un montón de cables planos a través de las bisagras huecas.
-
Pasar la pantalla superior y los cables de la cámara a través del pequeño tubo de la bisagra es algo que, sin duda, Nintendo logra mediante el uso de maquinaria robótica.
This is not shown well - but to separate the top part of the 3DS from the bottom (sorta as shown in step 21 but not done in step 18) - refer to step 18's picture of the circuitry, LCD, and speakers. Be careful, damaging a cable here = potentially dead 3DS.
-
First, the 3 ribbon cables from step 11 must fed through a plastic slot in the bottom part (where the cutouts of the d-pad + buttons are), then GENTLY coiled sideways like an ice cream cone through small hollow silver cylinder (that's narrower than the cables are wide) and through a cylinder on the top part (where the non-touchscreen is), pictured in step 18 near where the brown/black ribbon cables intersect.
-
On the opposite side, left of the notification LED, there is a removable silver dowel (solid cylinder). With a T-pin (or a sturdy needle), pry the dowel to the left, "toward" the LCD. There is a little notch on the dowel that will help. Once the dowel is fully to the left, the two halves of the 3DS can be separated, and the dowel removed.
-
-
-
El conjunto de altavoces estéreo proporciona los graves ajustados y los agudos nítidos adecuados, los sonidos metálicos que la gente espera de los dispositivos portátiles.
-
Estos altavoces reproducen más que solo sonidos de juegos; Nintendo 3DS es compatible con archivos MP3 y AAC, pero dudamos que reemplace al iPod de alguien en el futuro previsible.
-
El cable plano del conjunto del altavoz también contiene el control deslizante de ajuste del campo de visión 3D y el LED de estado de la cámara dual.
Whaere can i get this my 3D slider is broken but I wol dbuy from here but ifixet dos not have it?
-
-
-
Después de quitar los altavoces, el módulo LCD superior sale directamente.
-
Hay tres conectores de cable para esta pantalla LCD: para mostrar la imagen, así como para la barrera de paralaje que da el efecto "3D" en los juegos de 3DS.
-
Nuestros amigos de Tech-On de Nikkei Electronics desarmaron el panel LCD un poco más que nosotros y encontraron seis discretos elementos ópticos.
-
-
-
Puntuación de reparabilidad de Nintendo 3DS: 5 de 10 (10 es lo más fácil de reparar)
-
La batería se cambia fácilmente quitando la tapa trasera.
-
No se utilizaron tornillos Tri-Wing patentados, solo Phillips #00.
-
Los cables de la pantalla superior están enrutados de tal manera que es bastante frustrante quitarlos sin arrancarlos, y es igual de difícil volver a colocarlos correctamente durante el montaje del dispositivo.
-
Hay toneladas de pequeños componentes dentro de la 3DS, que pueden causar problemas si pierdes uno mientras realizas una reparación.
-
La mayoría de los conectores son ZIF y es difícil asegurarse de que cada uno esté conectado correctamente sin volver a ensamblar todo y poner en marcha el dispositivo.
-
El conector para auriculares y el conector de carga están soldados a la placa base, lo que significa que debes sacar el soldador si los rompes accidentalmente.
-


Un agradecimiento especial a estos traductores:
100%

¡ Francisco Javier Saiz Esteban nos está ayudando a reparar el mundo! ¿Quieres contribuir?
Empezar a traducir ›

18 comentarios
Lack of details : "Removing the remaining pesky screws securing the motherboard to the lower case." (where and how many?)
********Note: If your top or bottom screen was working before disassembly and doesn't work after reassembly, then it's likely that the connector is loose or dirty or damaged or not clipped or PLACED UPSIDE-DOWN. I had this issue with my Super3DS XL(2015 New3DS XL) and it turns out that the reason why my top screen wasn't working after put together, was because I had the top LCD connector upside-down. After I correctly put the connector in, It worked again! :) ********
Thanks for great guide - I could'nt find the access to the screws on the top screen until I read your guide.
Only problem I had was that I rounded out 2 of the screws in Step 9 and had to carefully drill the heads off and remove the shanks later. So I strongly recommend using the correct and good quality screwdriver as these are very tight
********Note: If your top or bottom screen was working before disassembly and doesn't work after reassembly, then it's likely that the connector is loose or dirty or damaged or not clipped or PLACED UPSIDE-DOWN. I had this issue with my Super3DS XL(2015 New3DS XL) and it turns out that the reason why my top screen wasn't working after put together, was because I had the top LCD connector upside-down. After I correctly put the connector in, It worked again! :) *********
Where does that black plastic piece directly above the blue SD card go? I can't seem to find a picture of it in place
This is a great tutorial. Do you have one for removing and replacing the cartridge reader?
Hey there! This is a teardown, not a real repair guide, you should check out the 3DS repair manual! We don't have a guide for replacing the reader itself, as that requires some very specialized soldering, but you can follow the motherboard replacement guide, and if you are a microsolderer, you can replace the reader itself! Best of luck!
Is there a similar guide for the 3DS XL? I am replacing the middle part of the case after the hinge broke, and it seems that I have to pull the whole thing to pieces just to replace it...
Hey there! This is a teardown, not a real repair guide. I'm not sure which middle piece you're looking to replace, but we have lots of 3DS XL repair manuals on its device page!
@sam I've tried several of these manuals, and as helpful as they are, none of them separate the hinge from the 3DS XL, what I need to do to replace the top-part of the lower half of the case, where it has split from the notification (StreetPass/SpotPass) light to the Wifi connection light, and every time the 3DS XL is closed, the crack gets bigger.
Hi, I'm going to have to take out the cable from the battery placement that leads to the board to remove static buildup. Is there any way I can do that, like is there any cables that connect to it? I haven't taken the 3DS apart yet.
UPDATE: there was no static, had it looked at by a repair guy. I’ve been looking at the board components, and I’m starting to wonder if the power cable connector is loose or out, if not, the board or other components. While I am at it, figuring out (this may be for a year or so, don’t have a job yet :( ) why my Nintendo is not turning on (replaced the battery, nothing happens), I’m almost considering upgrading the speakers to a higher-quality speaker, if not, at least louder and more efficient. Anyone toyed around upgrading components, and have any advice how to and how not to do it? I would greatly appreciate it, as Nintendo no longer performs repairs on my model (original CTR type)
The stupid screw right below where the battery goes is totally jammed in there and none of my screwdrivers fit it. What do I do I'm so lost
Does anyone know the manufacture and type of the zif connector that is used for the bottom lcd.
NOT the digitiser and power.
For the old 3ds(first)
Is it possible to do a simple teardown to get just the casing that is showing externally? I'm looking to do a custom paint job on my n3ds(not xl) from the chromatic red I got it as into a dark chromatic purple and would like to tear down just enough to get only the outer shell off.
so my volume slider is broken and the actual slider inside works its just the plastic pice you slide that is in the outside, where can i buy one. now if i need to adjust the volume i have to open it and slide the volume with twisers.
I give up on my 3ds, when trying to repair it more components got broken than before.
The power adapter didnt worked, so when exchanging it the replacement broke into half when I put the cover on it. Then when lifting up the cover the conection from curcuit board to sholder button ripped. And then when exchaning the next power adapter and shoulder button. Well both got destroyed, the adapter broke into two parts, and the wire of the button ripped.