Introducción
In case you missed it, we tore apart the new MacBook Pro 15" Retina Display Mid 2012 last week. Inside, we found a whole mess of pretty, yet difficult to access components. In fact, the MacBook Pro with Retina display earned our lowest repairability score ever, with 1 out of 10 points.
What we didn't look at earlier, however, is the MacBook Pro's namesake: the Retina display. Apple claims that the Retina display in the MacBook Pro is the most stunning display to ever grace the lid of a notebook computer. "But at what cost?" we find ourselves asking. Being the repair-minded folks that we are, we feel that the only fair way to answer that question is to give this new display "the iFixit treatment": open it up and look! We may not be opthalmologists, but we are excited to be doing surgery on a Retina display. Join us as we investigate the intricacies of Apple's most stunning display.
Do you wake up in the middle of the night, tossing and turning in anticipation for iFixit's next teardown? Follow us on Twitter and get some rest. We'll keep you up to date with all the hottest gadget teardowns!
Qué necesitas
-
-
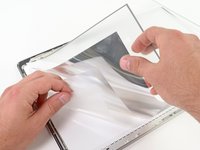
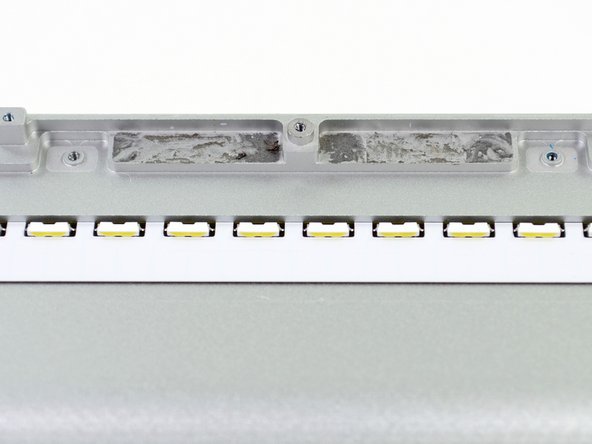
Here it is: the impenetrable fortress of pixels known as the Retina display.
-
Despite our initial apprehension about tearing down such an impressive (and expensive) piece of equipment, we are very curious to see for ourselves just how Apple managed to squeeze more than an entire HDTV inside a 15" display.
-
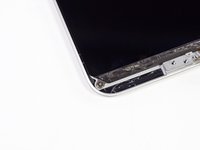
At first glance, it looks like a normal MacBook Pro display assembly with a skinnier bezel and no logo at the bottom.
-
-
-
Would you call us crazy if we told you that the display assembly from the latest MacBook Pro is the same size as its predecessor?
-
You caught us; we lied. The new display is actually a fraction of a millimeter smaller than the old one. Neat!
-
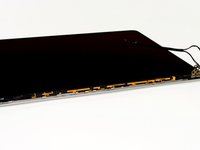
At its fattest point, the display assembly is a hair over 7 mm thick, and all the way down to just over 3 mm at the edges.
-
What's astounding is that Apple's engineers managed to cram four times the pixels of the previous 15" MacBook Pro into a display assembly that is (nearly) the same size.
-
The big savings here is weight, not thickness. The Retina display weighs in at 673 grams, while a standard 15" MacBook Pro display tips the scale at 908 grams. That's a solid 25% weight savings!
Apple didn't engineer the display, Samsung did. Put the credit where it belongs.
Any source for that? Last I heard Samsung was only one in a group of the companies handling the manufacturing, not the engineering, of the iPad Retina display.
For this this one the manufacturing is stated as being LG Philips.
Re engineering apparently there's stuff from Sharp, an Apple engineer and possibly others.
Jose -
-
-
-
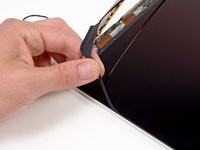
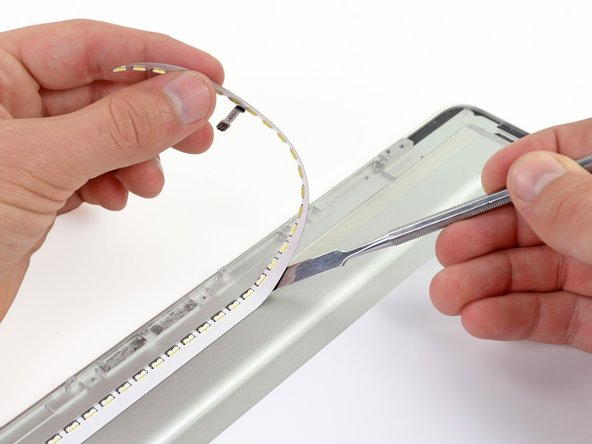
The disassembly begins pretty routinely. Like most Apple laptops, the clutch cover pries off fairly easily with a plastic opening tool.
-
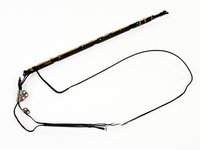
But differences start popping up as soon as the clutch cover comes off. The array of antennas underneath the clutch cover looks a lot more involved than in previous generations.
Instead of prying the clutch cover off: Looking at the display from the front with the hinges at the bottom (Like you are using the screen.) Simply slide the cover to the right, all the way to the hinge. Then it may be removed without tools. Just lift the bottom. be carefull of the end covers. they are held in by a snap pin and a dab of adhesive tape. Install is reverse.
Your technique worked well! Thanks!
I also noticed the end covers.
Louie -
Hello, i’ve just try to repair this LCD (I hope), this plastic cover it’s very silly to remove, in this foto show a wrong way, there are inside a three little teeth, first remove two cap on beside (near metal joint), and second, simply translate (I don’t remember exactly) on the left, and the plastic cover go up very very simply. I hope this advice is appreciated!!!
-
-
-
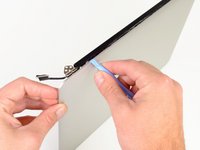
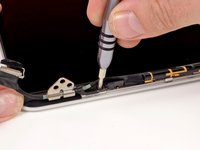
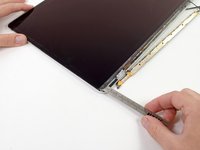
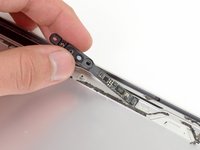
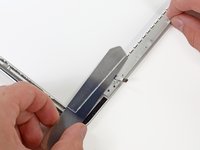
The left display hinge comes out with no issues, but good luck separating it from the display data cable.
-
Devices with cables fed through hinges can be a real bear to work on. None of that will be an issue with this machine, though, as the display hinge is pretty much sealed shut at the factory. Rather than routing the cable under a cable retainer -- as it's done in non-Retina MacBook Pros -- you just have to replace both cable and hinge together.
-
Don't think that the guys (and gals) who designed this machine are just out to get you. Routing the cables through the hinge is a way to save space and weight in the laptop.
Hi guys, do you have an idea what kind of screws are used to connect the hinge to the display assembly? These are missing in one of my colleagues MBP. Don't know how he did this but I would like to repair it. Is there a screw-set I can buy?
Were you able to find it? I need to find those screws as well. Thanks!
The screws are 4.8 mm long (total) and 2.4mm wide(the thread part). Torx T8H.
Slide the Black cover about a 1/4 inch to the right and then it pops off.
I cut the black tape on the antenna holding the data connector.
I removed two of the screws holding the antenna assembly down and lifted it enough to pull the data connector off.
-
-
-
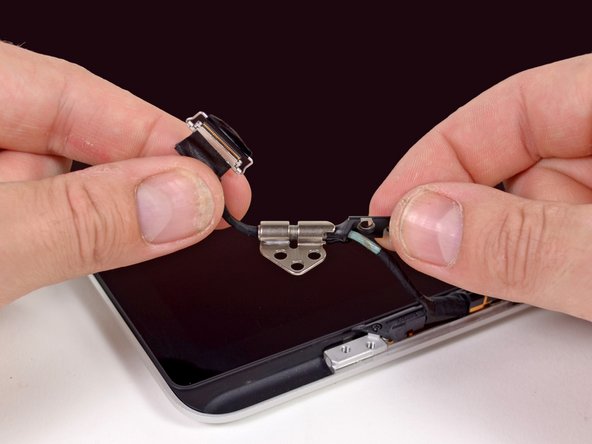
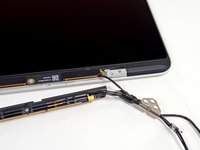
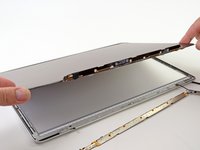
In the opposite corner we find another hinge that holds the antenna and FaceTime cables captive.
-
Again, if you need to replace these cables, the hinge has got to go, as well. That might not be so bad, but having to replace all of those cables just because a hinge breaks would be less than ideal.
-
Markings on the inverter board read LP154WT1 (SJ) (A1) GD. Given that the board is soldered to the rest of the display, it appears to be a display manufactured by LG Display.
This is a good time to ask something that has puzzled me for a long time. What is the significance of the parenthesized sections of an LG Phillips display code? Here we have LP154WT1 (SJ) (A1) GD. I suspect that LP means LG Phillips, 154 is 15.4 inches, and W means Widescreen. Pretty simple. I'll ignore T1 and again ask, what does (SJ)(A1) stand for.
Bottom line here is that I am trying to figure out whether screens with the same MAIN code but different "parenthesis codes" are interchangeable.
-
-
-
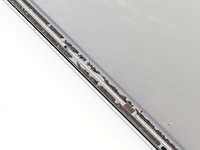
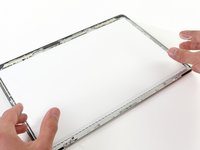
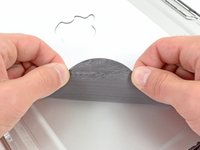
Things go back to being a little more familiar as we begin pulling off the rubber display gasket.
-
We were pleasantly surprised to find Phillips screws holding the Retina display in place. If you are trying to repair your Retina display and made it this far, you have earned the right to lay down your pentalobe and Torx bits and dust off your Phillips drivers.
-
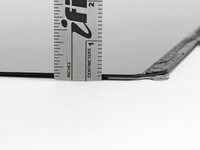
The 1 mm gap between the aluminum panel and LCD layers might not seem very large, but to dust and debris it's a gaping hole.
-
-
-
-
Q: What happens when you hand over a groundbreaking notebook display to a group of careful, highly trained technicians?
-
A: They break it.
-
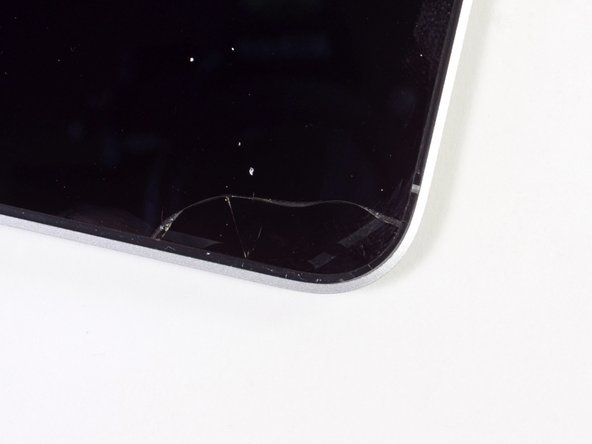
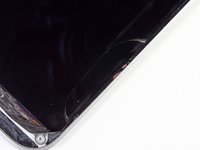
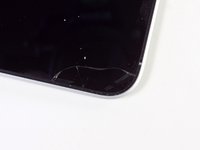
We were as careful as we could possibly be, but the glass on the Retina display is just too fragile.
-
So, how badly did we break it? Well, upon closer inspection we noticed two very distinct lines running around the perimeter of the display, the inner of which was filled with tiny bubbles.
-
Could those be the LCs of our LCD?
use a propane cartridge for filling a cigarette lighter and spray it underneath a display and it will slowly eat adhesive and will make your lcd free like a bird. :-D
beware! dont spray it on any other electronic parts or it can be disasterous.
butane will eat adhesive but not a foam which you must replace but dont know where to find it. i just used ESD protective textile to replace foam. and some industrial adhesive.
simple: just dont open it! :-D it can be really messy to put together.
Hi James, I'd be curious to know if you tried that tactic with this screen and/or how you'd make sure not to let the propane touch the LCD itself (or can it touch that without consequence, just not the electronics in the display?)
Any advice would be much appreciated!
cheers, Victor
-
-
-
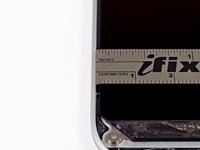
Once we got over the fact that obliterating the front panel of the display was the only way to get it out, we grabbed the skinniest tool we could find—an iFixit 6" ruler—and started prying.
-
With the top and sides of the display panel freed, we were able to slide the shattered remains out of the display assembly.
-
There were two thin strips of adhesive underneath the glass holding it in place, with a pattern that closely matched our trail of bubbles.
-
So, what's the lesson here? If you want a world-class laptop screen that doesn't take up much real estate, don't expect to be able to pop it out and back in at will.
-
-
-
Unfortunately, the Retina display is not nearly as impressive when it's been beaten and broken, but it is still impressively thin.
-
The glued layers are about 1.5 mm thick, and that includes the metal mounting plates.
-
TL;DR: The entire display assembly is an LCD panel.
I wouldn't call that exceptional any more than stupid as it makes the display much more fragile and apt to break under daily use. Exceptionally stupid. And definately not a first for using this style LCD panel construction.
"[...]they used the aluminum case itself as the frame for the LCD panel and used the LCD as the front glass."
How does this differ from "normal" lcd without additional bulky glass?
Like the matte version of MBP-early2009 I'm typing this?
So does that mean the display is stronger or weaker than the previous macbook pro?
2022 chiming in.. this design makes the screen more susceptible to damage, more expensive to replace, and impossible to repair other components like the back lights and camera without obliterating the lcd glass in the process.
-
-
-
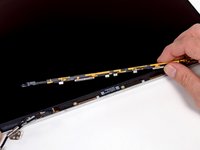
At last! With the LCD removed, we can remove the antenna and FaceTime cables from the display assembly.
-
The camera cable is routed along the outside edge of the display assembly, making replacement very difficult and costly. Thankfully the cameras fail very infrequently, if at all.
-
If the FaceTime camera were placed at the bottom of the display, it would likely be much easier to replace, but we wonder what kind of awkward side effects that would cause.
-
-
-
iSight, uSight, we all sigh at lame jokes. Anyway, iSight is a thing of the past. This MacBook Pro has a FaceTime camera, allowing you to video chat with your grandmother in full HD.
-
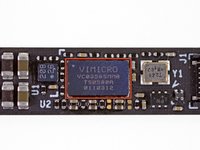
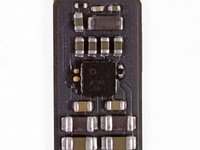
The camera board comes out easily enough, considering the work it took to get there.
-
The camera interfaces with the rest of the computer via the Vimicro VC0358 USB camera interface IC.
The strange detail about the web cam is that it has a connector to attach the cable. This would be logical design decision if it (the cam) could be a replaceable device, but since in order to get to it one would need to separate two parts glued together (this doesn't look like designed to be disassembled or couldn't be disassemble by design if you will). My conclusion is, that it's either a bug in design or this same part is used in other models where it can easily can be accessed/replaced (Apple just saving on making two different versions of the same part). Or... there is a way to separate the glued parts Apple know aware of...
-
-
-
Underneath the top layer of the LCD, we find a series of films and sheets that manipulate light before sending it to the user's eye.
-
Diffuser and prism films evenly spread the light to create an even backlight for the display panel. A stationary polarizing sheet then works in conjunction with the liquid crystals to block or allow light for each pixel, all 5+ million of them.
-
-
Herramienta utilizada en este paso:iSesamo Opening Tool$9.99
-
The light guide plate is held down by a small strip of mild adhesive—nothing like we saw before.
-
Erring on the side of caution, we proceded very slowly with our modified iSesamo opening tool and removed the plate.
-
Backlight bounces through the plate due to total internal reflection until it hits one of those tiny dots, which sends the light up and out of the front of the plate.
-
By the way, the third picture is an image of the grid found in the clear plastic plate being removed in the second picture. We had to coerce it a bit in Photoshop in order to make it show its grid.
-
-
-
There's no real reason to pull the foam off the inside of the back case, but this is a teardown, so we're doing it.
-
We suspect that the foam is there to provide a flat, even surface for the LCD glass to brace against. But there is one thing that we do know about it: it is super sticky.
-
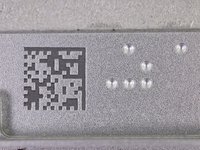
The bottom edge of the case has two features that we found pretty neat: a laser engraved data matrix code and a nifty arrangement of round indentations.
-
Upon further inspection and with the help of some keen-eyed readers, it appears that those dots form the pattern of a glider from Conway's Game of Life, the universal symbol for hackers.
-
That sixth dot to the right, though? Apparently, if you were to place that dot while playing, it would lead the glider into a state of death. Is Apple trying to send us a message?
That data matrix code says "DWN0100000573359". Most probably just a running number used in production to keep track of the part.
That's not Braille, it's an invitation...
x|0|x|x|0
x|x|0|x|x
0|0|0|x|x
if you add the intentional extra space that they did it actually turns into a "Boat" Still life
http://en.wikipedia.org/wiki/Conway's_Ga...
much more confusing and certainly not as foreboding ;)
id agree that i think the dots are actually a serial number of some kind:
04404
00220
11110
SN#:
15734
ive got one of those binary clocks on my desk at work:
Serial number and product date. Gees guys it ain't rocket science.
Question: So after having read your teardown carefully and analyzing the pictures it seems clear that the display assembly cannot/should not be taken apart in order to fix the facetime-camera etc.
Now in case the actual display breaks (e.g. by closing the lid with the MacSafe plug under the screen), can anyone tell me whether it is possible/recommendable (for someone with proficient tinkering skills) to repair the assembly by just replacing the display?
Both the display & the assembly have started appearing on several websites but the price difference is pretty significant at this point (USD 300 for the plain display, USD 800 for the assembly), thus my question.
Thanks for any replies!
-
-
-
And there you have it, the Retina display from the new MacBook Pro.
-
Normally we would provide you with a repairability score at this point, but since this display is part of another device, that's not really appropriate.
-
What we can tell you is that if anything in the display assembly breaks, you'll need to replace the whole thing. It will be more expensive than just replacing the LCD inside a regular MacBook Pro, but it will also make the choice (of whether to replace just LCD or entire display assembly) very easy.
-


28 comentarios
That is a glider http://en.wikipedia.org/wiki/Glider_(Con...)
I'm the president of Ophthalmology Interest Group at my medical school, and I always spelled "Ophthalmologist" wrong before this year. It has an L in the middle of it! In the first paragraph of this guide, there is a mess up of the spelling.
Krupa -
Any idea who actually manufactures the panel?
Mostly a glider, but if we add the one cell that apple did, the game enters a state of death (nothing moving at all)... Maybe it is a warning and less of an invitation...
We may not be opthalmologists, but we are excited to be doing surgery on a Retina display.
opHthalmologists -- I am one.
wow,thats really cool, but i will not risking destroying my Pro, maybe before u doing this u should take thousands of something cheap super slim pc like this http://t.co/5Y69c1FJ for exercises.
The glider turns into a boat. A boat symbolizes a journey to the underworld. A final resting place. It's a tribute to Steve Jobs.
To the ifixit-crew:
Just out of curiosity, would it be possible to mod one of the 2012 "thick" MBPs, attaching the Retina display unit to it or does it have completely different size/connections?
I'd rather have a regular MBP with Retina display and am pretty frustrated with the lack of upgradeability of the new Retina MBP as much as it seems like all Apple products are becoming one way-use products. Thanks, Apple, the environment will like this (what a waste of resources)!
Question: So after having read your teardown carefully and analyzing the pictures it seems clear that the display assembly cannot/should not be taken apart in order to fix the facetime-camera etc.
Now in case the actual display breaks (e.g. by closing the lid with the MacSafe plug under the screen), can anyone tell me whether it is possible/recommendable (for someone with proficient tinkering skills) to repair the assembly by just replacing the display?
Both the display & the assembly have started appearing on several websites but the price difference is pretty significant at this point (USD 300 for the plain display, USD 800 for the assembly), thus my question.
Thanks for any replies!
What did you do with step 7? Remove glass or screen itself?? my wifi antenna is bad so I need to replace it. I am afraid to replace it because i HAVE to remove screen which is fragile. My screen is new as replacement as well. Does there is any way to replace wifi antenna and camera wire without break screen? Thanks!!
Khernya vash obzor! Аргументируя наед: Когда я снимал пластмассовый кожух с дисплея действительно думая, что он на клипсах как это показано у вас, я испоганил край этого самого кожуха пока потом не додумался поискать еще в интернете инфы, и что бы вы думали? этот кожух просто смещается в бок и легко так выходит с полозьев! Нет бы объяснить на картинке по человечески, хрен там, пусть все себе маки уродуют!
The article says that the back side of display is actually the aluminum case/lid. But the pictures on the step 14 suggest that there is one more plate mounted on the aluminum case or is it just me?
Anyone have an idea if this design means that small amount of pressure (like a cat jumping on the closed lid) on the lid could damage the lcd? Or it is not that sensitive?
I was wondering about the same.
Kamil -
Could it be possible to swap a 13" MacBook Pro display (not the bezel with it) with a 13" MacBook Air display?
Sorry, no...
Obviousy this thread is seven years old. s don’t know if anyone will see this or care if they do. lolZ! I burned out the power from my mother board to my MacBook Pro display. I am wondering why I can’t just cut into the aluminum behind the screen to let ambient light in or if I can rig up external power to the led lights at the bottom.
Obviously an external monitor is the proper solution but it also ruins the portability of the laptop. Any ideas of how to do this or reasons why my idea won’t work?
Cutting into the aluminum casing behind the screen is going to be a very delicate process and a waste of energy if it won’t work.
As a trauma doc I can find shrapnel inside you,remove it, and get the most exquisite “machine “ working again UNLESS the spinal cord has been severed, for now function is gone.
99% of us ONLY want a dependable computer and care NOTHING for “retinal display.” We need a solid WORKING computer!
NOT a Lamborghini but a 1972 Ford! Easy to fix.
Third time this has happened and it’s in my home office…NEVER moved! Adaptor Cord still $30 despite a one star outta 5 star as it breaks so easily so I use white electrical tape to reinforce easily broken proximal port. Apple engineers REFUSE to change it.
Apple became 1st trillion dollar company for ripping off basic customers who NEVER need bells and whistles!
I hate APPLE!
Yes I’m a surgeon but am poor as I work where most ppl live on <$2/day. Work for food and tent.
I need a machine that works every day! Not some filigree delicate display!
This is BS!
can this conversion done on the motherboard?