Saltar al contenido principal

Qué necesitas

Este desmontaje no es una guía de reparación. Para reparar tu MacBook Pro 15", utiliza nuestros manuales de servicio .

  1. MacBook Pro 15" Battery Teardown, MacBook Pro 15" Battery Teardown: paso 1, imagen 1 de 1
    • to see whether it makes sense to replace its exhausted six Lithium-Polymer cells.

  2. MacBook Pro 15" Battery Teardown: paso 2, imagen 1 de 1
    • Before you begin,

  3. MacBook Pro 15" Battery Teardown: paso 3, imagen 1 de 1
    • you can check the charge indicator:

    • Then, put on rubber gloves and the safety goggle because you will be handling dangerous stuff: Lithium-Polymer cells that may turn into bombs if electrically shorted or mechanically damaged.

  4. MacBook Pro 15" Battery Teardown: paso 4, imagen 1 de 1
    • Have kind of mobile vice ready for the battery to clamp into, so it doesn't try to tilt. With the right perspective, you can judge how bulged the battery is in order to know how much hazard to expect.

  5. MacBook Pro 15" Battery Teardown: paso 5, imagen 1 de 1
    • Take a slim knife and sink it into the gap in order to get a feeling how resistive the contact glue is.

  6. MacBook Pro 15" Battery Teardown: paso 6, imagen 1 de 1
    • The further action doesn't work without a heat blower to soften the glue before it gives way.

  7. MacBook Pro 15" Battery Teardown: paso 7, imagen 1 de 1
    • Patiently insisting in separating the aluminum sheet without permanently bending it yields success.

  8. MacBook Pro 15" Battery Teardown: paso 8, imagen 1 de 1
    • You see the plastic frame beneath the aluminum cover for the first time.

  9. MacBook Pro 15" Battery Teardown: paso 9, imagen 1 de 1
    • Don't lose the charge-indicator window and the switch lever.

    • Using some duct tape, you may pull the connector lock now or later.

  10. MacBook Pro 15" Battery Teardown: paso 10, imagen 1 de 1
    • With the collected practice so far, you can attack the battery pan.

  11. MacBook Pro 15" Battery Teardown: paso 11, imagen 1 de 1
    • It responds with an audible crack and surrenders. A sharp wide screwdriver helps to widen the gap

  12. MacBook Pro 15" Battery Teardown: paso 12, imagen 1 de 1
    • until it fully opens.

  13. MacBook Pro 15" Battery Teardown: paso 13, imagen 1 de 1
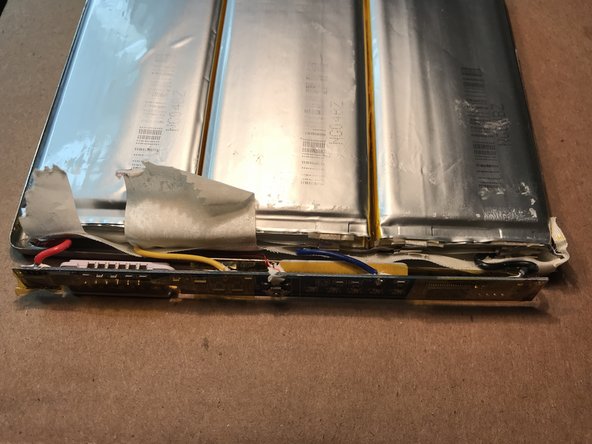
    • You can see the printed circuit board with all the electronics.

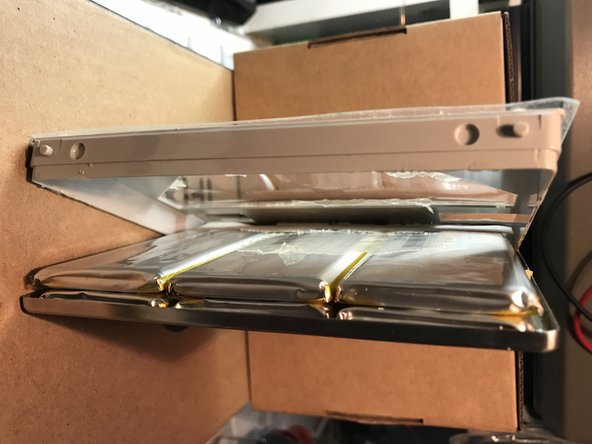
    • Always prevent the pan edge from scratching the isolation of the enameled wires between the yellow wire and the blue wire.

    • Do never go with conductive tools into the wiring maze between the cell heads and the electronic board, or you may cause a catastrophic firework that you may regret. Do not pinch or bend the electrical interconnection structure between the cell heads as long as you don't know what you're doing.

  14. MacBook Pro 15" Battery Teardown: paso 14, imagen 1 de 1
    • At latest now you will loosen the connector lock

  15. MacBook Pro 15" Battery Teardown: paso 15, imagen 1 de 1
    • and shift the connector out.

  16. MacBook Pro 15" Battery Teardown: paso 16, imagen 1 de 1
    • The electrical stuff is fully separated from the plastic frame.

  17. MacBook Pro 15" Battery Teardown: paso 17, imagen 1 de 1
    • You can start removing the sticky tapes now

  18. MacBook Pro 15" Battery Teardown: paso 18, imagen 1 de 2 MacBook Pro 15" Battery Teardown: paso 18, imagen 2 de 2
    • level by level and neutralize the residual glue.

  19. MacBook Pro 15" Battery Teardown: paso 19, imagen 1 de 1
    • One of the obstacles is just a label.

  20. MacBook Pro 15" Battery Teardown: paso 20, imagen 1 de 1
    • Mind all the transparent brown tapes that get lost easily and will hinder unsoldering of the wires. Before you do the latter, check the charge status with the electronic functionality for a last time.

  21. MacBook Pro 15" Battery Teardown: paso 21, imagen 1 de 1
    • After having cleared the solder spots from their silicone protection, you can desolder the power wires in that sequence:

    • 1. the blue 4-V wire and the yellow 8-V wire;

  22. MacBook Pro 15" Battery Teardown: paso 22, imagen 1 de 1
    • 2. the enameled wire that is closer to the yellow one (mark it with some duct tape as long its polarity is in doubt);

    • 3. the other enameled wire (now is opportunity for softening the pan edge with duct tape to no longer endanger the enameled wires);

    • 4. the red 12-V Wire and the black 0-V wire.

  23. MacBook Pro 15" Battery Teardown: paso 23, imagen 1 de 1
    • Eventually, you know the cells' part number NG04BZ

    • Unfortunately, the internet doesn't know this part, that is 95 mm x 43 mm x 6 mm long*wide*thick. Since these 6 cells go as three pairs that are connected in parallel each, and then connected in series (3S2P), just three cells of 95 mm x 43 mm x 12 mm would work too.

    • Neither the thin nor the thick cells are available in the required size, so the result of our endeavor is just ripe for the museum. Hopefully there will be more luck at a later time.

moise

Miembro Desde 09/07/13

453 Reputación

1 Guía escrita

0 comentarios

Agregar Comentario

Ver Estadísticas:

Ultimas 24 horas: 2

Ultimos 7 días: 19

Ultimos 30 días: 48

Todo El Tiempo: 430