Introducción
Tenemos nuestras manos en un MacBook Pro 13" Unibody y decidimos compararlo con un MacBook Unibody-desde el interior! síguenos en Twitter para obtener todas las actualizaciones ya que estamos haciendo el desmontaje!
Qué necesitas
-
Este paso está sin traducir. Ayuda a traducirlo
-
This just in: the new MacBook Pro 13" Unibody!
-
We'll be comparing it to the MacBook Unibody throughout the teardown.
-
We have a feeling it will be very similar in most regards.
-
-
Este paso está sin traducir. Ayuda a traducirlo
-
Contents of the box:
-
User's manual
-
Restore DVDs
-
60-watt AC adapter
-
AC adapter extension cable
-
Cleaning cloth
-
No video adapter, as usual.
-
-
Este paso está sin traducir. Ayuda a traducirlo
-
Some comparisons to the MacBook Unibody:
-
No access door for the battery on the bottom.
-
The addition of an SD card slot (and the omission of digital/mic port) is readily apparent.
-
FireWire is back!
-
Computer lock is now on the other side.
-
The SD card sticks out almost .5"! This is a cheeseball design for a MacBook "Pro" if you ask us.
-
-
Este paso está sin traducir. Ayuda a traducirlo
-
Let's get down to business.
-
There's no door latch, going along with the "not user-serviceable battery" theme.
-
We had to dig out a Phillips screwdriver for this step.
-
A quick flip of the lid and...
-
-
Este paso está sin traducir. Ayuda a traducirlo
-
...It's almost exactly the same as our old, "lesser" MacBook Unibody.
-
The battery compartment is identical to the one we uncovered in the MacBook Pro 17" Teardown. We'll venture a guess that it looks the same in the updated 15" Pro as well.
-
Remove two tri-wing screws and the battery is suddenly replaceable. The sticker comes right off, just as in the 17" Pro -- because it's adhered to just the battery and midwall, not to the optical drive.
-
-
Este paso está sin traducir. Ayuda a traducirlo
-
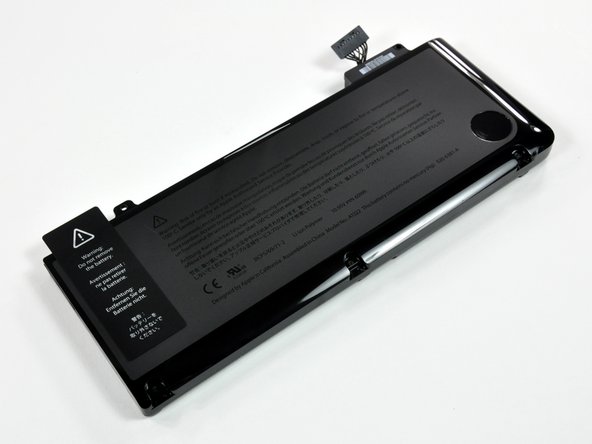
7-hour battery specifications:
-
Model A1322
-
10.95V
-
60Wh
-
"This battery contains no mercury (Hg)."
-
Although the batteries look similar, they're definitely not interchangeable. The MacBook Pro's battery is too large (and different in shape) to fit into the older MacBook Unibody.
-
-
-
Este paso está sin traducir. Ayuda a traducirlo
-
Removing the hard drive...
-
It's still considered user-replaceable by Apple, but replacement does require removing 10 more screws than on the MacBook Unibody.
-
First thing we'd do is replace the 160 GB Hitachi with something more meaty.
-
-
Este paso está sin traducir. Ayuda a traducirlo
-
The optical drive is attached via three Phillips screws.
-
The brackets and screw layout are identical to the older MacBook Unibody.
-
-
Este paso está sin traducir. Ayuda a traducirlo
-
Removing the optical drive exposes the right speaker.
-
It's held in place by adhesive. A quick pry with the spudger will loosen it.
-
-
Este paso está sin traducir. Ayuda a traducirlo
-
A connector, three Phillips screws, and bam -- the fan's out!
-
-
Este paso está sin traducir. Ayuda a traducirlo
-
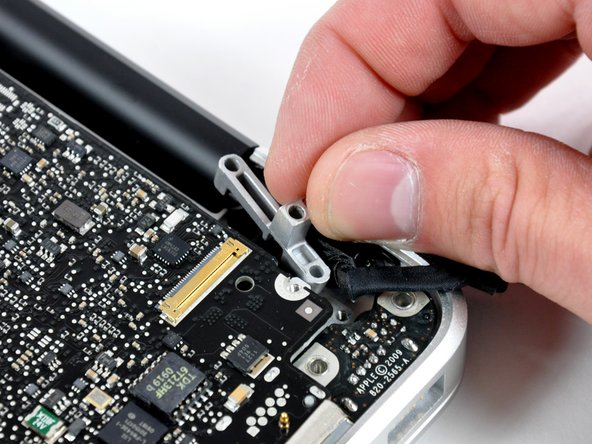
Disconnect the LVDS connector.
-
Remove 7 motherboard screws.
-
Remove 2 DC-in screws.
-
Disconnect trackpad, keyboard, and battery level indicator cables.
-
Remove LVDS cable retaining bracket.
-
And the logic board is almost out...
-
-
Este paso está sin traducir. Ayuda a traducirlo
-
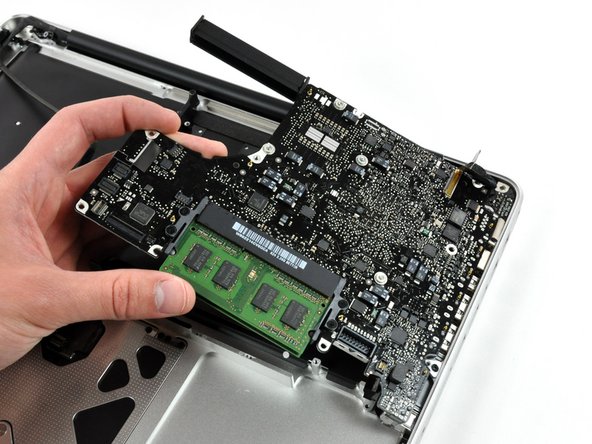
Pop out the microphone from its cave.
-
The logic board is finally free!
-
-
Este paso está sin traducir. Ayuda a traducirlo
-
A couple of images of the logic board, before we strip it naked...
-
Like the MacBook Unibody, the heat sink comes out along with the logic board.
-


Un agradecimiento especial a estos traductores:
11%

¡ Miguel nos está ayudando a reparar el mundo! ¿Quieres contribuir?
Empezar a traducir ›

10 comentarios
Hi. AMAZING walkthrough and I really love your website. I need HELP!
I bought a refurbished MBP 13-inch 2.26 GHz and I don't think it came with a wireless card (I think I got ripped!). Bluetooth is working but my airport says "No Airport card installed".
Anyway - is it possible to check if the wireless card is in there? If not, is it possible to replace it? Any help and advice would be greatly appreciated!!!
The AirPort card is hidden in the display. We don't have a guide specifically for it, but you can follow the display guide to remove the display and then use the clutch cover guide to access the AirPort card (you don't have to remove the front display glass to access the card; the clutch cover guide was part of another guide for the LCD but the steps are generally the same).
great guidelines.... I have a macbook pro mid2009 A1278. buzzing sounds coming out when I play any music. is there any fix?
Hi, I have a macbook pro Mid 2009, now it very slow. can it upgrade? If it must upgrade What I I do for it?
Give me some your opinion, Thank you very much!
Sicerely
Tao Nguyen
nnhattao@yahoo.com