Saltar al contenido principal

La actualización de Apple de marzo de 2019 de tu tableta iPad Air, con un procesador A12 Bionic y una pantalla de 10.5".

Preguntas 39 Ver todo

Alternative way to disconnect the battery on iPad Air 3

Hi guys,

I have a question on the battery replacement guide for the iPad Air 3. At step 12 the battery is disconnected. Since I haven't done this before, I have a little respect and don't want to break anything.


On Youtube, I found a video, where an alternative way of disconnecting the battery is described (Link, Minute 4:24). The guy in the video puts an opening pick beside the connector and not directly between the contacts of the connector.
For the iPad Air 3 this would mean, that an opening pick is put on the right side of the connector along the logic board.

What are your opinions on this method? Is it recommended or should I do it with the battery blocker?

Thank you very much for your help!

Maginos

Update (04/14/23)

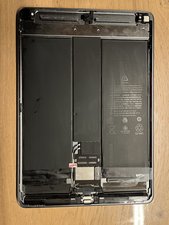
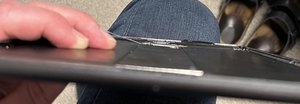
@strongbow Here’s a picture.

Block Image

Update (04/14/23)

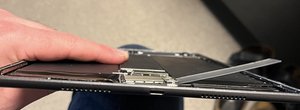
@strongbow

Block Image

Update (04/21/23)

Block Image

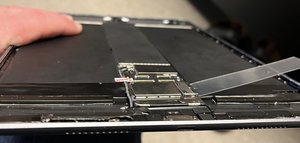
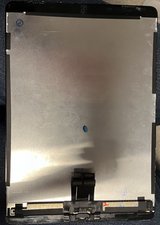
Here are some pictures, I hope you can find something useful for me.

Btw, the display shattered. I don’t know, how bad it is, I will see, when the problem with the slit is solved.

Contesta esta pregunta Yo también tengo este problema

Es esta una buena pregunta?

Puntuación 1
4 comentarios

@strongbow Here’s a picture.

[image|2923629]

- de

@maginos sorry, meant of the chassis under the screen. To see if something looks like it's not sitting correctly.

- de

@strongbow did you find anything that’s not in the place where it should be?

- de

[image|2933549]

[image|2933552]

[image|2933551]

[image|2933550]

[image|2933547]

[image|2933546]

- de

Agregar un comentario

3 Respuestas

Respuesta Más Útil

hello there,

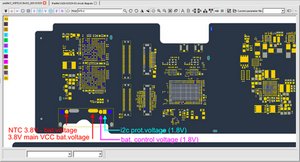
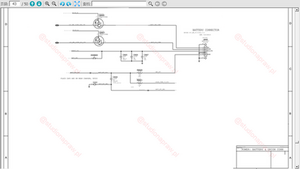
In my opinion (and I've worked with AIR 3 many times) it's a very debatable idea. In this case, maybe the pins of the contacts have lifted, in another - if they are less deformed, they will still be in contact. You can talk about it endlessly ... One thing is certain - you should check whether the disconnection was successful with a meter (it is better to check and possibly correct it than to look for another fault)

Hint: iPad battery ports typically have revision channels, and the Air-3 is no exception. The small holes on the battery port will accommodate a thin meter needle. Use it (sometimes I am surprised that other technicians do not use such facilities ... They do not know or how?)

Block Image

Block Image

Fue útil esta respuesta?

Puntuación 1

8 comentarios:

Thank you for your reply.

Unfortunately, neither have I a meter for checking a successful disconnection, nor have I ever measured something like this.

So what’s your recommended method for the disconnection? Do you do it like in the linked guide or how do you disconnect the battery?

- de

so do not replace the battery yourself, because it is very likely that the tablet will not turn on again. Take advantage of the offer of a good repair shop. This will be a faster and cheaper solution than repairing the tablet. (by the way: there are not many technicians in the world who can repair a damaged Air 3)

- de

Since I have bought everything for the change and I'm just waiting for the tesa strips to arrive, I would like to try it. I will do some further research on the internet on how to safely disconnect the battery and when the tesa strips have arrived, I will try it next weekend.

Thank you for your help!

- de

@tojaert :

So the battery was actually not the problem, I had more issues with the display. I also replaced the display because of cracks and when I tried to "reglue" it into place, I observed, that only three sides fit. The side with the home button has a slit of 3-5 mm and it took me brute force to fit it into the frame. Of course it did not stick to the frame. I removed the display and checked the display and also the iPad, but i was not able to figure out, what the problem was. It seems, that about 3 cm above the home button something is too high so that the display doesn't lay flat on the frame. I compared the replacement display with the original display but didn't find any difference.

Can you comment on that?

Thank you!

- de

@maginos add a picture of the problem area. Would help to see it.

- de

Mostrar 3 comentarios más

Agregar un comentario

Block Image

Try the pick method if you think its going to be easier for you. Heat the underneath of the ipad to soften the board adhesive so it lifts easier. Insert the pick and try turning the ipad on. If it doesn't turn on then you've disconnected the battery and safe to remove the screens.

Fue útil esta respuesta?

Puntuación 1

14 comentarios:

I think you mean the disconnect of the display, right? But my problem is with the reassembly. I don’t get this slit closed.

- de

Sorry pal, not well so don’t get on as much. The pic you posted didn’t show anything protruding stopping the screen sitting flush. Not sure if you have it done or not but if not post a pic from the top of the iPad pointing down to the bottom of the insides. Also a pic of the back of the screen.

- de

@strongbow I will post a picture of both parts hopefully on sunday.

Since the superglue is already loosening on the right side of the ipad, I will carefully try to disconnect the display one more time and hope, that I don't break the display. If you can't find anything unnormal, I will ask a local apple specialist, if they can solve this problem for me.

- de

The only thing that would be stopping it going back together would be a foreign object. A connector not seated correctly or the home button not locating back into its area in the iPad. Unfortunately it’s a lot harder to diagnose without physically seeing it.

- de

@strongbow I will check that on Sunday, if something is not were it should be and post some pictures.

The display should fit into the chassis without any pressure, right?

- de

Mostrar 9 comentarios más

Agregar un comentario

Ver contenido de la imagen:

Block Image

Block Image

Block Image

Block Image

Block Image

Block Image

Fue útil esta respuesta?

Puntuación 0

2 comentarios:

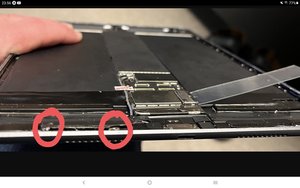
@maginos I have added a picture to my answer with looks to be rogue bits of glass hiding. If it's under a antenna or similar it'll be stopping the screen going down. I see a few more bits kicking about. Be sure to remove all the debris before closing it up.

- de

@strongbow I also thought of that. The thing is, the tape is just loose and can be pushed down easily. If it is pushed down, it is FLAT, so there is nothing underneath it.

AND: If I lower down the display from the "webcam side", it touches the chassis somewhere else. I assume in the region of the battery connector or the display connector. So the display does not touch the tape you marked in the picture. So this tape doesn't seem to be the problem. Additionally, I can press down the side of the home button with force and the whole side fits into the chassis, which wouldn't be the case, if there is something underneath this tape.

Do you see something else, what could be problematic?

- de

Agregar un comentario

Añadir tu respuesta

Maginos estará eternamente agradecido.
Ver Estadísticas:

Ultimas 24 horas: 0

Ultimos 7 días: 0

Ultimos 30 días: 1

Todo El Tiempo: 228