

Pinout guide to build a cable for Nacon Revolution Pro Controller v1
Hi,
There is some guide to build an adapter or cable to replace a faulty one for Nacon Revolution Pro Controller for PS4?
Thanks
Actualización (06/07/19)
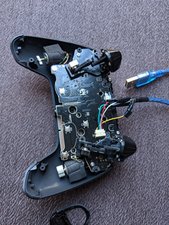
This is my working solution: a simple shielded USB printer cable, joining with soldering white-white, black-black, green-green, red-red cables and yellow cable to cable without plastic coating. Now works perfectly again
Es esta una buena pregunta?
Puntuación
1

5 comentarios
Did you manage to fix it? I am going to try amd attempt to fix mine by connecting a cable straight from the board bypassing their connector. I have the facilities at work so I will keep you updated. If you know the pinout please let me know as it will save a lot of hassle guessing for
- de Tejjy
Same problem here. Contacted Nacon with request to buy new cable from them, in respons i got “we invite you to serch the internet for a replacment cable" - worst company ever. F
- de marcinszg
Hardwiring is the best solution as the manufacturing design is awful. There’s also a video on YouTube that shows how to replace and mod your own bumper and trigger buttons as these are also an extremely poor design. I ordered a replacement cable direct over a year ago and have never received it. Nacon is hoping you’ll just buy their new V2 model which is a far better cable connection design. The problem is that there is nothing to keep the connector from being banged around and no guide when inserting. Controllers get dropped and manipulated in all sorts of odd manners when tempers flare. I liked (not loved) this controller but it’s now a bookend and I’ll never buy from Nacon again. Those buttons I replaced are amazing though!! Lol
- de Robert Remington
I ended up getting a new one through amazon, but I took it apart and got a multimeter across so when it inevitably breaks I can either hardwire it or make a usb c or micro usb connection to replace
- de Tejjy
I just got a new Nacon V2, it seems as though the faulty cord has been corrected with the new design, but maybe not, it's beyond repair, it seems, 2 months or so after purchase, buttons act at their own free will, most annoying controller ever. Getting a new xbox "One" and am just going to disassemble it and take out the wireless card, a rep told me it would then treat the controller as wired and stop the system from outputting rf.
- de Scarlet Jester