Saltar al contenido principal

Cuarta generación de iPad, lanzada el 2 de noviembre de 2012, disponible en modelos Wi-Fi, CDMA y GSM con 16, 32 o 64 GB de almacenamiento.

Preguntas 408 Ver todo

Efficient removal of iPad 2/3/4 assembly adhesive - opinions needed!

Hey, guys. I've just sent this question in an email to a fellow repair technician I'm in contact with, and thought it may well be worth posting publicly, as I'm curious as to the different answers and techniques people may have.

I find myself searching "how to clean adhesive off ipad" far too often, in the hope that I'll stumble across some "magic bullet" in the form of a new chemical cleaner or updated guide to help speed the process along.

The technician I've emailed has done literally hundreds of them, so I figure he's got the removal of old adhesive down to an art form at this point. I'm approaching my 20th iPad repair, and it's still taking much longer to completely remove old adhesive that I'd prefer.

Here's my current technique, which I hope you can weigh in on and help me improve, as I don't feel it to be particularly efficient:

  1. I completely remove the old glass assembly and LCD.
  2. I remove any and all of the actual 'tape' I can find using the flat end of a plastic spudger.
  3. I pour a small amount of WM Barr's "Goof Off!" into a spray bottle's protective cap.
  4. I dip a cotton swab in the GO and use it to saturate an area on the iPad's metal border, and leave it for 2 minutes.
  5. I use a combination of dry cotton swabs and the flat end of the plastic spudger to wipe up as much of the glue as possible.
  6. I wipe the area clean using a bit of tissue paper.
  7. Rinse and repeat - saturate, leave for 2 minutes, wipe up, tissue paper - until all of the residue is gone in that area. To try and speed things up, I tend to have one side saturating while I'm working on the opposite side.
  8. I give the areas a clean down after all of the residue is removed using 99% isopropyl and cotton swabs.

The technique works, but it's taking me maybe an hour per iPad, and I'm convinced there has to be a better way to do it. A better adhesive remover, or that I'm missing some important element that I should be taking into account.

Goof Off! was recommended by one of the other fixers on this forum, but to be honest I'm not particularly impressed with it. I was expecting the glue to be completely dissolved after a couple of minutes contact with it, and that it'd just wipe up with the residue GO after.

Cheers,

Craig J.

Contestado! Ver respuesta Yo también tengo este problema

Es esta una buena pregunta?

Puntuación 5
1 comentario

kerosene, dummy!

- de

Agregar un comentario

11 Respuestas

Solución Elegida

Hello Craig, and all the other techs that google "the best way to remove iPad glue"

I have repaired hundreds of iPad screens, from 1st to Air and so far my glue removal method is:

Remove all glass and tape..

Use a metal spudger looks like a dentist pick with a flat head on both sides. I shape one end to fit the small groove for the bezel. (the key is to keep the blade sharp and flat) So sharpen once every other frame. use a flat bladed Dremel or metal emery cloth to keep a flat or straight sharp edge on it. I dip the tip into ISO and scrap around the frame. wiping off the blade using a paper towel as it gathers glue. you'll find a sweet spot with the amount of ISO needed. JUST after 6 inches of scraping I dampen a Q-tip with ISO and wipe up the loosened glue. Then the next 6 inches. When the bulk of the glue has been scraped and wiped up with a Q-tip and ISO I use goof off and a Q-tip to remove any thin layer of glue left over. But again I only clean up about 6 inches of frame with the goof off then use a Q-tip with ISO to rinse. The whole frame cleaning process may take 10 minutes depending on if its been repaired before, or the model iPad, some models seem easier then others. Hope the info helps.

Fue útil esta respuesta?

Puntuación 3

7 comentarios:

My problem isn't the glue it's taking the shot glass off the bezel area that is hard as rock candy and does not want to come off any advice about that before we even get to the glue

- de

Shard glass not shot !

- de

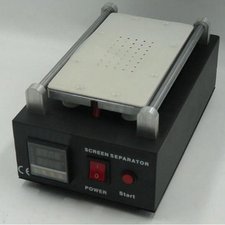
I purchased the machine that heats up the surface and melts the glue then use moly wire and drag it across to separate the glass from the lcd - no ISO needed until its separated just to clean up - never used goof.

The machine has a variable temp control so just start off low then keep going up slowly until the glue has softened enough - no heat damage to the screen or inadvertently putting the scraper through it lol.

- de

Peanut oil, Olive oil, Sunflower oil, Linseed oil, WD-40, 10W-40, etc. etc. etc.

But in your case, use EXTRA VIRGIN Olive oil, to go along with your incessant predilection to wanking. Oil that puppy up, then Beat the Bishop.... WEE !!!!

- de

Soak the thing on COCA-COLA for 3 weeks, that'll eat the $@$* off!

- de

Mostrar 2 comentarios más

Agregar un comentario
Respuesta Más Útil

I have tried a variety of methods and I can say, for my purposes, using chemicals was not the answer. Goof off/goo gone leave a slimy residue and even rubbing alcohol can make the task take longer. So here is what I do:

I remove all of the parts, same as you, including old bezel (I always install a new bezel for that freshly repaired look and feel), and find a good area to work on where the ipad wont slip. I then use a small razor set, the kind on a pen type handle, with the blade facing up (so it looks like a mini tint remover) and use downward force while keeping my finger on the top of the blade (away from the cutting edge, mind you) and scrape away the adhesive that way.

I do this for a few reasons. It being dry like this makes it easier to get all the adhesive off without it turning into little goo balls. Also, it helps create more surface area on the aluminum frame for the new adhesive to grab. It takes around 20 minutes to do the entire frame and get it near spotless.

I've done hundreds of iPads at this point and I find this method to be the best. I just do not like the idea of spraying abrasive chemicals inside of a device, that close to the board. And I got really tired of using tweezers and picking out those adhesive goo balls that are left over. That and the residue left by these cleaners never dries quickly enough, and will weaken your new adhesive.

Hope this helps!

Fue útil esta respuesta?

Puntuación 6

10 comentarios:

Hey Eric, cheers for responding!

I'm curious as to the type of blade used. The closest thing I have to that is either my scalpel - which is too thin - or and older metal pry tool that I sharpened up for removing adhesive underneath batteries. Edit: Yikes! This comment system has eaten my paragraphs, so I'm just going to reply as separate comments!

- de

I do have a thinner "metal spudger" that I shaped one side of for quick removal of the iPhone standoff screws, but the other side of it isn't used for much. I could probably sand it into a flat blade.

Here's a photo of the two tools in question:

https://dl.dropboxusercontent.com/u/4436...

- de

Working on my iPad repairs 'dry' would certainly help decrease the masses of swabs I go through with each repair, so if I can get one (or both) of these tools in an appropriate state, I may well try it with an iPad 4 I have in my "pending" pile. How about application of heat between scraping? I have a heat gun with a fairly precise tip which may be of use for this purpose.

- de

Hi Craig!

I threw some photos up on my dropbox so I can show you exactly what I use. I do not use spudgers for adhesive removal as I got tired of cleaning old adhesive off of them, and I found that these work oh so much better.

Here are the two tools I use for adhesive removal on iPads specifically: https://www.dropbox.com/s/h26msj2ndemupp...

Here is a close up shot of the blades themselves: https://www.dropbox.com/s/6zp093xl2kwgaq...

You can pick up an entire set of precision blades at an auto store, harbor freight or pretty much anywhere. Here is what $5 set looks like: https://www.dropbox.com/s/t0x1ukcd3exa6x...

I prefer to remove adhesive at this stage cold, as it will come off in stronger strips instead of bunched up, heated masses of stickiness. Most of all, this will come down to preference. No two cooks will make the same dish, or something along those lines.

Hope this helps!

- de

Forgot to mention: I use the smaller, angled blade to remove the adhesives under the bezel, and the larger one for the frame. I put my index finger on the top of the blade and use downward force to make sure I am getting underneath the adhesives. This will also help with blade control, making sure you do not use too much force and keeps the blade from skipping and possibly damaging flexes and the like.

- de

Mostrar 5 comentarios más

Agregar un comentario

I agree Use a small flat blade scrape off old adhesive and then wipe down with alcohol. Goof off and many other's will leave residue causing the new adhesive to not work properly.

Fue útil esta respuesta?

Puntuación 1

2 comentarios:

I must admit, I was surprised by the amount of 'slime' produced by the Goof Off! - I guess it being designed more to be mopped up with a cloth after use, the designers didn't see it as a particularly big problem.

- de

@maniputech on instagram for a simple demo. didnt use goo anything, a special cleaner. that dries as fast as 91% isopropyl.

- de

Agregar un comentario

We use Scotch 3M sticker remover markers. It is similar to the goo gone concept, but the marker makes it a lot easier. No saturating, just start scrubbing the adhesive with the marker. Go around the frame a few times, and then just pull off the excess with a makeup remover pad. Once over with alcohol---perfect frame.

I think you're on the right track--a perfect frame is the key to a professional repair.

Fue útil esta respuesta?

Puntuación 1

3 comentarios:

I've not heard of these before - I'll have a look around on eBay to see if I can get them in the UK. The next repair I do, I'm going to try 'dry', but something that provides friction coupled with the concept of a chemical cleaner may be a bit more effective than my current technique. If I can get ahold of one of these markers, I'd like to test both that alongside the dry method and see which I prefer.

- de

Do they look like this, jessabethany? https://dl.dropboxusercontent.com/u/4436... I found them, but marketed as "Scotch Easy Clean Adhesive Removal Pen".

- de

not quite--but that might be a similar product. Here is what I use: http://www.ebay.com/itm/251719579894

- de

Agregar un comentario

3M General Adhesive Cleaner will remove all glue residue in minutes just wiping with a paper towel. I just put a digitizer on my iPad for the first time and used this product after everything else failed. It is as close to effortless as you are likely to get. It is available in automotive stores.

Fue útil esta respuesta?

Puntuación 1
Agregar un comentario

This may sound weird but i use what seems to be called a "metal pry spudger" on the googles. Basically a metal spudger/prying tool. It has one rounded end I use as the handle, and a squared off end. I actually happened to get 2 free with a digitizer one time and i've used it hundreds of times since. I use the flat end to just scrape off all the adhesive just like kerri's method, works great, no mess or risk of liquid touching other components and can't cut yourself on them. The moment I see them show up in the store here I'm gonna stock up a couple more. It seems they work for approximately 200 uses for probably what they weren't even designed for XD.

Fue útil esta respuesta?

Puntuación 0

1 comentario:

Go spudge yourself

- de

Agregar un comentario

I use this bud

Block Image

Fue útil esta respuesta?

Puntuación 0

1 comentario:

Screen is held down by a vacuum pump - variable temp control. Best thing i ever bought.

- de

Agregar un comentario

CHARCOAL LIGHTER FLUID

Not sure if this will work for iPads but I use it for laptop digitizer bezels and it works for me.

Pour some lighter fluid into a small glass. Not much, just enough to dip a Q-tip.

Dip the Q-tip into the fluid and gently coat the adhesive and let it soak in for a few minutes.

Use the dipped Q-tip to remove the adhesive using a forward pushing motion as if you are shoveling or chiseling it off. It softens the adhesive to a point which it won't stick to your fingers and leaves no residue. There may be an oily feel and doesn't smell too great but it works pretty good actually.

After completely removing the adhesive, I go back around the bezel and clean with rubbing alcohol to remove and residual finger prints, adhesive debris, etc.

Oh and I don't recommend smoking while handling the lighter fluid and would recommend not using it around any electrical sources or batteries, etc.

Fue útil esta respuesta?

Puntuación 0
Agregar un comentario

I know im replying to a bit older question, but I suggest using lamp oil to remove the adhesive.

Use swab to rub lamp oil on (make surface look wet)

Use spudger to remove the adhesive

If adhesive is thick, repeat steps.

This seems the quickest way to remove the adhesive. Of course after using the oil, use a chemical to make the surface not oily any more.

-Gijsbert

Fue útil esta respuesta?

Puntuación 0
Agregar un comentario

1) Order replacement piece on eBay.

2) Wait 15 days for it to arrive from China.

3) Place Paypal claim.

4) Piece shows up 3-4 days later, it's free.

5) Ebay and the Chinese finally get what they deserve for ruining America.

Fue útil esta respuesta?

Puntuación 0
Agregar un comentario

Hey check out aldon-chem website and search for sds, or google “aldon chem sds”. Chemical name “AA-0051”. The sds says it’s 99.8% acetone, 0.1% Cherry Almond Fragrance and 0.1% FD&C Blue #1 (C.I. No. 42090). It’s all public information.

Fue útil esta respuesta?

Puntuación 0
Agregar un comentario

Añadir tu respuesta

Craig Jessup estará eternamente agradecido.
Ver Estadísticas:

Ultimas 24 horas: 0

Ultimos 7 días: 8

Ultimos 30 días: 40

Todo El Tiempo: 22,865