
Adjusting valves on a 17 hp briggs & stratton motor
I have a John Deere riding lawn mower. How do u adjust the valves on the motor & what size gauge should i use
Es esta una buena pregunta?
Puntuación
13
Rep: 157
![]() 2
2
![]() 2
2
![]() 1
1
I have a John Deere riding lawn mower. How do u adjust the valves on the motor & what size gauge should i use
Es esta una buena pregunta?

Rep: 789.2mil
![]() 1.1mil
1.1mil
![]() 897
897
![]() 2.4mil
2.4mil
gump 01, here is a general idea about some of the B&S engines. O could probably provide you with a bit more in depth information, if I would know which engine model you have. :" Adjust Valve Clearance
All Models - Except Vertical Models 110000, 120000 Early Production
NOTE: Check valve clearance while the engine is cold.
1. Turn crankshaft counterclockwise until piston is at top dead center on the compression stroke. This prevents the compression release from holding the valves open.
2. Insert a narrow screwdriver or rod into the spark plug hole as a gauge, then slowly turn crankshaft counterclockwise until the piston has moved down the bore by 1/4” (6mm).
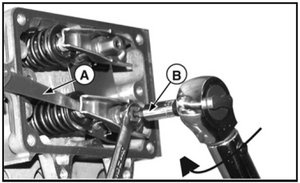
3. Using a feeler gauge (A, Figure 41), adjust rocker nut to obtain the clearance as listed on the bottom o this answer.
4. Hold rocker nut and tighten the rocker ball setscrew (B) to the torque valve of 45 lb-in. (5 Nm).
5. Check clearance again and re-adjust, if necessary.
6. Repeat for other valve.
NOTE: On some models, the nut and setscrew are positioned above the push rod ends.
Vertical Models 110000, 120000 Early Production
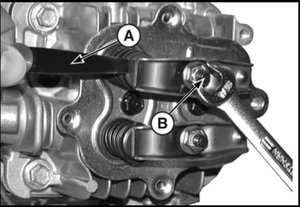
1. Using a feeler gauge (A, Figure 42) adjust the locking hex nut (B) to obtain the
correct clearance as listed on the bottom of this answer.
2. Repeat for other valve.
- OR -
1. Loosen jam nut (A, Figure 43) at base of rocker arm stud. Then, using a feeler gauge (B), turn rocker arm screw (C) to obtain the correct clearance as listed on the bottom of this answer.
2. Hold the screw and tighten the jam nut to value 45 lb-in. (5 Nm).
3. Check clearance again and re-adjust, if necessary.

MODEL 110000 HORIZONTAL SERIES
Valve Clearance – Intake .004 - .006 in. (.10 - .15 mm)
Valve Clearance – Exhaust .009 - .011 in. (.23 - .28 mm)
MODEL 120000 HORIZONTAL SERIES
Valve Clearance – Intake .004 - .006 in. (.10 - .15 mm)
Valve Clearance – Exhaust .009 - .011 in. (.23 - .28 mm)
MODEL 150000 HORIZONTAL SERIES
Valve Clearance – Intake .004 - .006 in. (.10 - .15 mm)
Valve Clearance – Exhaust .009 - .011 in. (.23 - .28 mm)
Fue útil esta respuesta?
Normal engine rotation is clockwise looking at flywheel side.
This info was very helpful. My 17.5 Briggs, was backfiring out carb. While I was mowing the machine bogged down, and started sputtering, backfired and I couldn't get it to start again. I checked spark, fuel, compression, took out plug, turned motor and no ugly noises. While trying to start, it seemed to have to much compression. It would only turn over on intake stroke. I took valve cover off, and the end cap in spring of exhaust valve was sitting in cover and lock nut had back out. I tightened lock nut, put cap on, and adjusted valves to specs. However I eyeballed the 1/4 inch past tdc. Tightened it back up, and still had same issue. To cover off again, and measured the 1/4 past tdc, readjusted valve to spec. Before putting cover back on, I turned it over and it fired right up. I shut it down, put cover on, tightened everything up, and she runs just like new. This info was helpful. If I can do it, anyone can.
Rep: 121
![]() 1
1
![]() 1
1
Additional info:
I have a 17.5 HP Model 31C707.
Valve Clearance – Intake .003 - .005 in.
Valve Clearance – Exhaust .005 - .007 in.
I prefer to not stick anything metallic down the spark plug hole. A disposable chopstick works fine and makes it easy to mark at TDC, then put a second mark 1/4 inch farther out.
Fue útil esta respuesta?
have a model 31C707--type 0154 E1 17.5 hp. Is the intake on top?
I have a type 31C707 3346 G6 I can confirme the clearances for the engine are the same. Is the 1/4" procedure the recommended. I saw other posts about doing it a different way compressing adjust, rotate and do the next and they did not use find TDC by sticking into the spark plug hole.
I also have the 31c707 i/c. Are the intake and exhaust valve adjustment screws different? My exhaust have torx head and the intake doesn't.
Mine has an Allen type ball set screw in the center of the clearance adjust nut for both intake and exhaust. You can use a torx bit if you don't have a allen wrenches.
I have a B&S model 31r907
Type 0062 G1 anyone know valve clearance thanks
Rep: 97
![]() 1
1
![]() 1
1
This information is wrong!! Top valve on this engine is EXHAUST! Bottom is intake
Fue útil esta respuesta?
Hey tomh4 THANKS MAN I WAS ADJUSTING WRONG ONE!
Rep: 25
![]() 1
1
I used a pencil for marking TDC and it must have been brittle because a portion broke off in the spark plug hole.
I manually rotated the cylinder but can not see it.
Will I have to disassemble the engine to get this out?
Fue útil esta respuesta?
NO just get a vacuum
cleaner suck it out i did same thing lol
Rep: 25
![]() 2
2
Just like Mike I have a 17.5 HP Model 31C707 on a craftsman lawn tractor. But this information did NOT work for me, though it is the same as Briggs and Stratton -- https://www.briggsandstratton.com/na/en_...
Well first of all, I had a bent intake push rod. The stud came loose and messed everything up. It even broke a rocker arm. So after spending a good hour trying to put the new push rod in the valve and getting them to stay (I finally took the valve guide off and stuck the rods in it, finally got them to stay and then carefully put the screws in) I followed this guide exactly. I set the clearances as Mike said.
When I went to start it, the engine would barely turn over. So I asked the guy who sold me the parts how to do it. He said to turn the flywheel clockwise, the way it spins, until one push rod is extended out as far as it will go. THEN you set the clearance on the other rocker Arm. Do the same for the first rocker arm-- keep turning the engine until the other push rod is all the way out, and set the clearance. My engine started right up and runs better than it did when it was new.
So I don't know what is going on, but I tried setting the valves as this guide here says and I tried setting them when the piston was at top dead center without going down 1/4 inch. (I got that from a youtube video.) And I tried the way that worked. And the clearances were WAY different in each case! It's not like you can use one method the same as the other.
Oh, one other thing the mechanic told me to do- put some blue loctite on the the studs. They take a ten mm wrench. ALSO, you need a t20 torx bit to loosen and tighten the set screws.
Fue útil esta respuesta?
One other thing, if you mix up the push rods the intake is aluminum and does go on the bottom as tom4h said.
Here's a video where the guy sets it like I ended up doing: https://www.youtube.com/watch?v=1-XlET33...
Oops! Found I was missing a cap on the exhaust valve, maybe that was responsible for the discrepancy between the two ways of doing it.
Thank you, thank you! After replacing broken intake pushrod (aluminum) in my Craftsman rider mower Briggs & Stratton 31c707, I followed these instructions by "dontlistentoquacks" and had excellent results ... engine runs like new!
I installed a aluminum push rod in a 17.5 31c707 the moter fired right up but when I engage the pto it pulls the motor way down I set the valve cleaeance a 5000 should it have been set to 7000
Rep: 13
![]() 1
1
No need to find top dead center (TDC)! Just adjust with both valves CLOSED.
Fue útil esta respuesta?
Rep: 1
![]() 1
1
I see alot of advice here, some of it being verbatim Briggs and Stratton specs and procedures and some being, to put it politely, a slightly improvised version. I would suggest that you always initially stick with what the manufacturer has published making sure that you check for the latest revisions and any service bulletins that apply to your specific model. Valuable hacks may exist, but this is how I look at it. Who knows more about a product than the people who designed, manufactured, sell, and provide tecnical support.
Fue útil esta respuesta?
My exhaust valve has about a 1/4” and adjustment nut will not tighten any more. I pulled the rod out and it is not broken. Any help?
Fue útil esta respuesta?
cap on valve stem is missing.

cvherb
Stick a tube in hole & blow it out. If that don't work, roll it over a few times should should crush it burn & go out exh. Could take cowl off & spin with drill. If that don't work then pull head off. If it is just a little pencle might hold a valve off seat.
Fue útil esta respuesta?
I adjust the valves on a 21hp briggs. It went smoothly. Started good ran good. But after 15 mins of mowing the mower lost power and slowing down. I believe the valves loosened again. What would cause this?
Maybe you forgot to tighten the set screws in the adjusting nut. You need a t20 torx bit. Also, maybe the studs the adjusting nuts screw onto were loose.
Ultimas 24 horas: 24
Ultimos 7 días: 140
Ultimos 30 días: 731
Todo El Tiempo: 206,292
14 comentarios
Which engine model is it? Is it a B&S 17hp OHV motor?
- de oldturkey03
I think this #is right model#711777 or it's 11777
- de sami
I have Briggs and Stratton 500 cc silver edition 17.5 HP motor on a craftsman Lt 1500 riding mower I need to know the valve torq spechs can someone please tell me them thanks
- de jeff grant
how to find out the series of a lawn mower engine
- de Kenneth Martin
I'm trying to find out the series of my lawn mower engine so i can set the valves where is this information found?
- de Kenneth Martin
Mostrar 9 comentarios más