Introducción
Follow the steps in this guide to replace the right cell antenna in an iPad Mini 4 LTE.
-
If your display glass is cracked, keep further breakage contained and prevent bodily harm during your repair by taping the glass.
-
Lay overlapping strips of clear packing tape over the iPad's display until the whole face is covered. For particularly bad breaks, you may need to lay down two layers.
-
Do your best to follow the rest of the guide as described. However, once the glass is broken, it will likely continue to crack as you work, and you may need to use a metal prying tool to scoop the glass out.
-
Place the iOpener in the center of the microwave.
I found you need to be very patient when using the iOpener. It's worth taking your time, giving the heat time to work on the glue. When I finally got the battery out, there were some strips of glue left behind that I just cleaned off with some isopropanol before installing the new battery.
By the way, I had to run the iOpener for longer in my microwave for it to get hot enough. When it was too hot to touch, I figured it was hot enough for the batteries.
Fredrik -
I didn't find this to be as hard as I had built it up in my mind to be; HOWEVER, saying that I need to say years ago I was the local Nokia service center in my town. But many years ago right after they got rid of analog times. Yeah. A classic installer/repairer mistake when starting something they haven't fixed or installed before is picking up the instructions, flipping through them; maybe even reading a section that is new-then tossing the instructions over the shoulder. "I got this." This usually comes right before something major gets broke. And I can tell you when you try to do it yourself and then mess it up horribly then take it to the repair shop. Well we called that "I can do it myself" syndrome and charged extra to put back together what they brought in in the box. Now knowing all this - I can't stress this enough because I am stupid, stupid, stupid. COVER YOUR SCREEN IN CLEAR BOXING TAPE AND READ ALL THE INSTRUCTION BELOW THROUGH TO THE END BEFORE EVEN ATTEMPTING THIS FIX. Take my advise.
I didn't have an iOpener, so I used a wheat type heat bag. If you do this though, make sure you put a layer of plastic between your Mac and the bag, or you'll get condensation in places you don't want it.
I started out using the iOpener but switched to my wife's hairdryer. A heat gun or hair dryer proved to be much more convenient and is a time saviour. You can heat more and the glue becomes more fluid make the next steps with the opening picks much easier
Use a hair dryer! Watch this vid: https://youtu.be/16GkvjVyOJA It is much easier to do if you heat it from the other side.
I wonder how many people actually wrapped in their iPhone into iOpener and put this "sandwich" into microwave??
I know this is obvious, but backup your iPad with iTunes before you start. I'd also turn off your passcode if you have one.
Ther first time you heat up the iOpener for this repair when its room temperature I had to heat it up for more than 30 seconds. I remember I had to heat it up for around 45 seconds. However, after that when you need to reheat it again during the repair 30 seconds will be enough.
I've been with Samsung for 8 years now!! Never did i have a case on any of my phones My Samsung 8 is 2 months old the case protector around the edge pop off and broke my phone it's like someone put a bullet hole in it
Not everybody has a microwave. You need to state how long and at what temperature in a conventional oven.
Hi, the microware have multiple power 1 to 9, what must be used ?
Regards,
Cedric
-
Heat the iOpener for thirty seconds.
-
Throughout the repair procedure, as the iOpener cools, reheat it in the microwave for an additional thirty seconds at a time.
May I know the temperate limit about heating iOpener? (maximum 150 degrees Celsius?) thx so much.
DO NOT USE IN NON ROTATING MICROWAVE! It will pop a hole. I had it in for 45 seconds the first time. It wasn't very hot inside and I saw it started to leak on the paper towel I put under it. Just a fair bit of advice. I think I will just stick with the heat gun. Loud but useful.
can i use just ordinary microwave???
If I don't have a microwave then I try to use hot air gun so how many munuts i want to heat ?
I heated mine up for 30 seconds, tested, then again for 30 seconds. It felt adequately hot. Leaving it on the left side, per the instruction, for a minute did not loosen the adhesive. I ended up pulling the suction cup hard enough to shadder the old screen. Moral of the story, I don't think it gets hot enough safely to have an affect.
There is a clear problem here with the heating part using the iopener things....no details are given. Whoever is testing them needs to make it clear - What temperature does it need to be? And for which phone models, because they differ in what's needed. It's only £10-15 for a laser guided temp sensor unit, and the designers/repairers should have one of those already for doing these kinds of repairs. Explaining half a repair, is worse than not explaining at all :-(
If I may suggest include your microwave wattage so people can get an idea on time for there own
I ended up using a hair dryer. That iOpener thing took forever.
-
Remove the iOpener from the microwave, holding it by one of the two flat ends to avoid the hot center.
Yes, as does a heat gun.
-
Handling it by the tabs on either side, place the heated iOpener on the side of the iPad to the left of the home button assembly.
-
Let the iOpener sit for about five minutes to soften the adhesive beneath the glass.
-
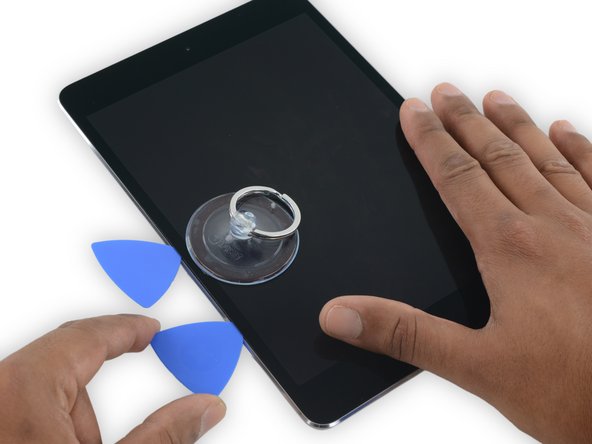
Carefully place a suction cup halfway up the heated side.
-
Be sure the cup is completely flat on the screen to get a tight seal.
-
-
While holding the iPad down with one hand, pull up on the suction cup to slightly separate the front panel assembly from from the rear case.
-
While holding the glass up with the suction cup, slide the point of an opening pick into the gap between the glass and body of the iPad.
-
Reheat and reapply the iOpener.
-
Let it rest for a few minutes to reheat the left edge of the iPad.
-
Place a second opening pick alongside the first and slide the pick down along the edge of the iPad, releasing the adhesive as you go.
-
Continue moving the opening pick down the side of the display to release the adhesive.
-
If the opening pick gets stuck in the adhesive, "roll" the pick along the side of the iPad, continuing to release the adhesive.
-
Take the first pick you inserted and slide it up toward the top corner of the iPad.
-
Reheat the iOpener and place it on the top edge of the iPad, over the front-facing camera.
-
If you have a flexible iOpener, you can bend it to heat both the upper left corner and the upper edge at the same time.
-
Slide the opening pick around the top left corner of the iPad to separate the adhesive.
-
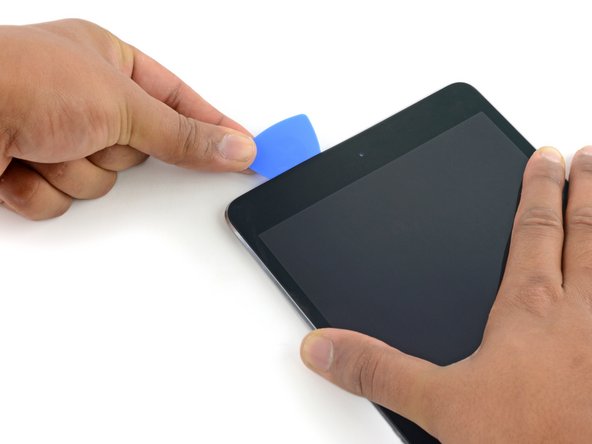
Slide the opening pick along the top edge of the iPad, stopping just before you reach the camera.
-
As you reach the front-facing camera, pull the pick out slightly and continue sliding it across the top edge.
-
Leave the opening pick in the iPad slightly past the front-facing camera.
-
Take a second pick and insert it to the left of the camera, where the first pick just was. Slide it back to the corner to completely cut any remaining adhesive.
-
Leave the second pick in place to prevent the corner adhesive from re-sealing as it cools.
-
Insert the previous pick deeper into the iPad and slide it away from the camera toward the corner.
-
Leave the three picks in the corners of the iPad to prevent re-adhering of the front panel adhesive.
-
Reheat the iOpener and place it on the remaining long side of the iPad—along the volume and lock buttons.
-
Insert a new opening pick and slide it down the right edge of the iPad, releasing the adhesive as you go.
-
Continue sliding the opening pick down the right edge of the iPad, reheating the edge using an iOpener if necessary.
-
Leave the opening picks in place and reheat the iOpener.
-
Set the reheated iOpener on the home button end of the iPad and let it rest for a few minutes to soften the adhesive beneath the glass.
-
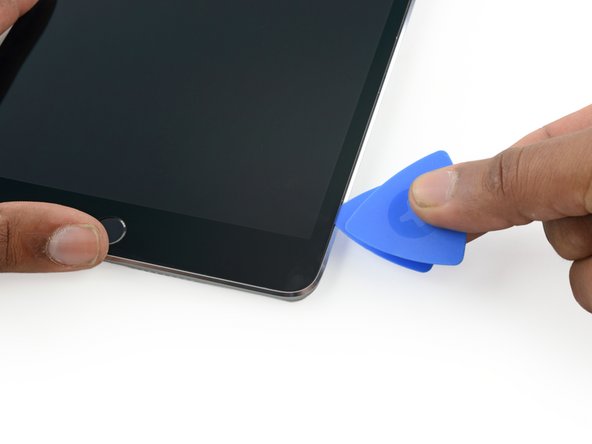
Insert a new opening pick at the bottom right corner of the display, below the last opening pick you used to slice down the right edge.
-
Rotate the new pick around the lower right corner of the device.
-
Slide the pick from the bottom right corner along the lower edge of the device. Stop about half an inch shy of the home button.
-
Insert a final opening pick at the lower left corner of the iPad, directly below the existing one.
-
Slide the pick around the lower left edge of the iPad.
-
Continue sliding the pick at the lower left edge of the display toward the center of the iPad, until it is roughly half an inch from the home button.
-
Twist the two picks at the top edge of the iPad to break up the last of the adhesive holding the display assembly in place.
-
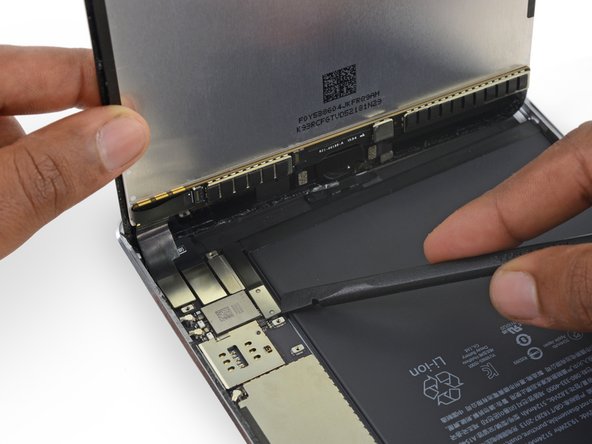
Lift the display from the top edge to open the device.
-
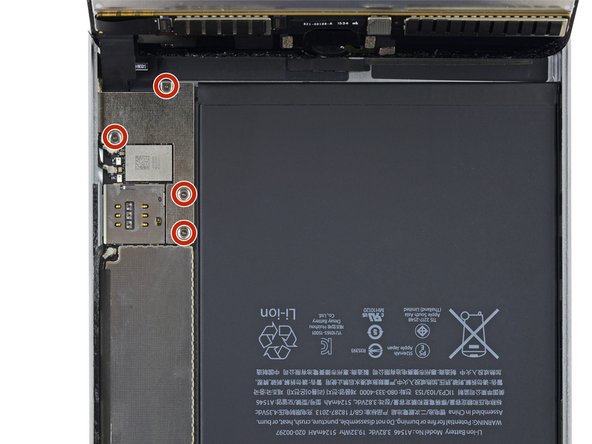
Remove the four 1.2 mm Phillips screws over the battery/display connector bracket.
-
Remove the battery/display cable bracket.
-
Use the flat tip of a spudger to disconnect the battery connector from its socket on the logic board.
-
Use the pointed end of a spudger to disconnect the display data connector from its socket on the logic board.
-
Use the pointed end of a spudger to disconnect the digitizer cable connector from its socket on the logic board.
-
Remove the display assembly.
-
Remove the four 1.3 mm Phillips screws securing the right antenna to the rear case.
-
Lift the upper right cellular antenna cable out of its socket on the logic board.
-
Be careful not to pry on the socket, only on the connector.
-
-
Push the connector side of the antenna up and remove it from the iPad.
To reassemble your device, follow these instructions in reverse order.
Cancelar: No complete esta guía.
2 personas más completaron esta guía.