Saltar al contenido principal

Waring Pro SB30 Hot Plate Replacement

Qué necesitas

  1. Waring Pro SB30 Hot Plate Replacement, Back Panel: paso 1, imagen 1 de 1
    • Remove the screws on the back panel with the #1 Phillips screwdriver bit.

    • The screws in the rubber legs of the burner do not need to be removed.

    • If the back panel has never been opened before, the screws may be more difficult to unscrew.

  2. Waring Pro SB30 Hot Plate Replacement: paso 2, imagen 1 de 2 Waring Pro SB30 Hot Plate Replacement: paso 2, imagen 2 de 2
    • Using a wrench, remove the bolt from the center of the back panel.

  3. Waring Pro SB30 Hot Plate Replacement: paso 3, imagen 1 de 1
    • The back panel can now be easily lifted off.

  4. Waring Pro SB30 Hot Plate Replacement, Hot Plate: paso 4, imagen 1 de 2 Waring Pro SB30 Hot Plate Replacement, Hot Plate: paso 4, imagen 2 de 2
    • Remove screws #1 Phillips screwdriver bit.

    • The interior edges of the metal frame are sharp and can cause minor cuts.

    • 3 screws on the perimeter of the circle

    • 1 screw in the circle

    • 2 screws on the eletrical stands with wires

  5. Waring Pro SB30 Hot Plate Replacement: paso 5, imagen 1 de 2 Waring Pro SB30 Hot Plate Replacement: paso 5, imagen 2 de 2
    • Remove rod from the center of the plate with a wrench.

  6. Waring Pro SB30 Hot Plate Replacement: paso 6, imagen 1 de 2 Waring Pro SB30 Hot Plate Replacement: paso 6, imagen 2 de 2
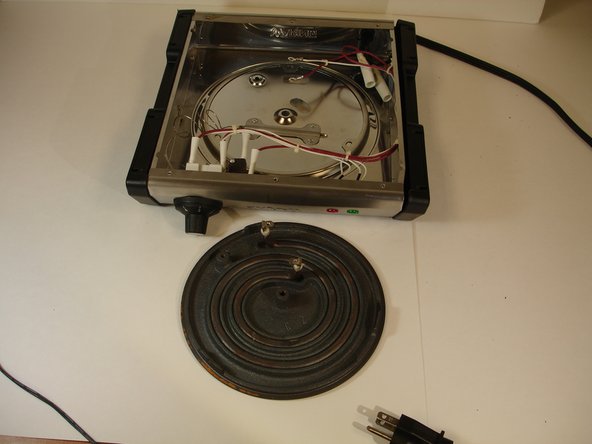
    • Remove plate carefully as to not damage internal components i.e. insulator, metal frame, wires, etc.

Conclusión

To reassemble your device, follow these instructions in reverse order.

2 personas más completaron esta guía.

Sun Fai Lau

Miembro Desde 09/22/14

588 Reputación

5 Guías creadas

Equipo

USF Tampa, Team 10-7, Brown Fall 2014 Miembro de USF Tampa, Team 10-7, Brown Fall 2014

USFT-BROWN-F14S10G7

3 Miembros

5 Guías creadas

0 comentarios

Agregar Comentario

Ver Estadísticas:

Ultimas 24 horas: 0

Ultimos 7 días: 4

Ultimos 30 días: 12

Todo El Tiempo: 1,934