Saltar al contenido principal

Sony Cyber-shot DSC-P9 Lens Replacement

Qué necesitas

  1. Sony Cyber-shot DSC-P9 Lens Replacement, Battery: paso 1, imagen 1 de 1
    • Slide the battery latch down the side of the camera with your hands.

    • The latch will automatically pop open.

  2. Sony Cyber-shot DSC-P9 Lens Replacement: paso 2, imagen 1 de 1
    • Unlatch the clip over the battery.

    • The battery will partially pop out.

  3. Sony Cyber-shot DSC-P9 Lens Replacement: paso 3, imagen 1 de 2 Sony Cyber-shot DSC-P9 Lens Replacement: paso 3, imagen 2 de 2
    • Remove the battery from the camera.

  4. Sony Cyber-shot DSC-P9 Lens Replacement, Outer Casing: paso 4, imagen 1 de 2 Sony Cyber-shot DSC-P9 Lens Replacement, Outer Casing: paso 4, imagen 2 de 2
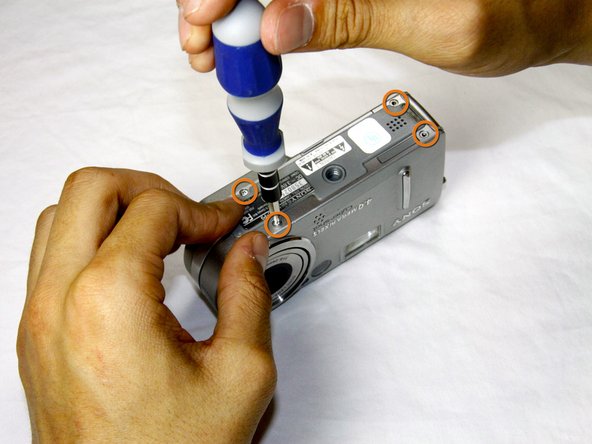
    • Remove the four 3.0mm Phillips #000 screws on the top of the camera with the phillips screwdriver.

    • Remove the additional four 3.0mm Phillips #000 screws on the bottom of the camera.

  5. Sony Cyber-shot DSC-P9 Lens Replacement: paso 5, imagen 1 de 2 Sony Cyber-shot DSC-P9 Lens Replacement: paso 5, imagen 2 de 2
    • Once the screws are removed, slowly remove the back casing from the rest of the camera.

  6. Sony Cyber-shot DSC-P9 Lens Replacement: paso 6, imagen 1 de 2 Sony Cyber-shot DSC-P9 Lens Replacement: paso 6, imagen 2 de 2
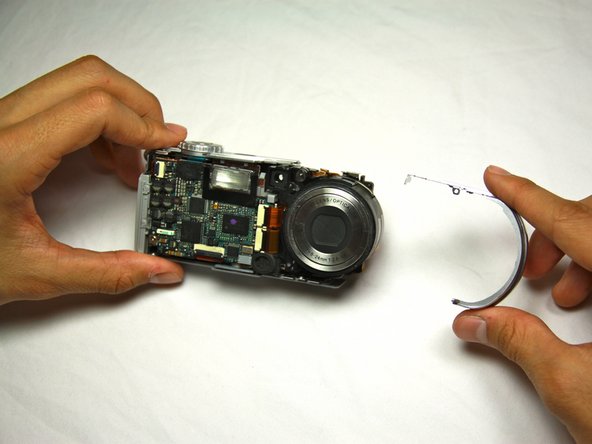
    • Then, pull the front case away from the rest of the camera.

  7. Sony Cyber-shot DSC-P9 Lens Replacement: paso 7, imagen 1 de 1
    • After the casing is removed, the camera should look as shown.

  8. Sony Cyber-shot DSC-P9 Lens Replacement, Lens: paso 8, imagen 1 de 2 Sony Cyber-shot DSC-P9 Lens Replacement, Lens: paso 8, imagen 2 de 2
    • Dislodge the round casing from the lens.

    • Pull it away from the rest of the camera.

  9. Sony Cyber-shot DSC-P9 Lens Replacement: paso 9, imagen 1 de 1
    • Unscrew the two 4.0mm Phillips #000 screws from the display.

  10. Sony Cyber-shot DSC-P9 Lens Replacement: paso 10, imagen 1 de 1
    • Pull the two ribbon cables out of their slots on the back circuit board.

  11. Sony Cyber-shot DSC-P9 Lens Replacement: paso 11, imagen 1 de 1
    • Remove the three 4.0mm Phillips #000 screws holding the back panel in place.

  12. Sony Cyber-shot DSC-P9 Lens Replacement: paso 12, imagen 1 de 3 Sony Cyber-shot DSC-P9 Lens Replacement: paso 12, imagen 2 de 3 Sony Cyber-shot DSC-P9 Lens Replacement: paso 12, imagen 3 de 3
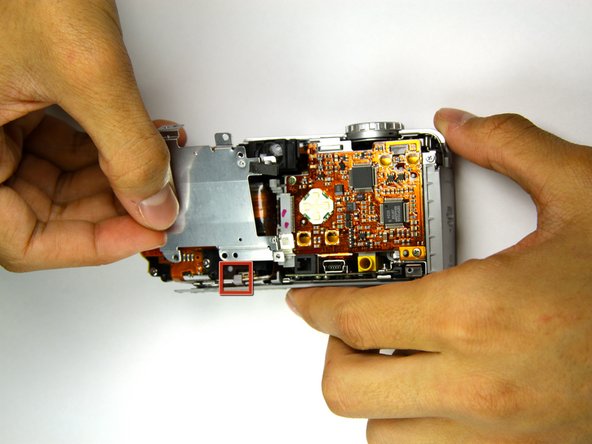
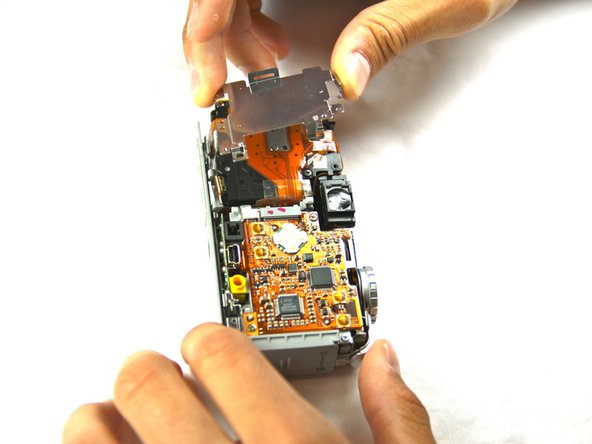
    • Work the back panel out from under the small grey clip.

    • Slide the back panel off of the camera by dislodging it from the remaining clips.

    • Below is a flat, orange cable connecting the lens to the motherboard.

    • Be careful not to bend the back plate during this process.

  13. Sony Cyber-shot DSC-P9 Lens Replacement: paso 13, imagen 1 de 1
    • Turn the camera over so that you can see the front of the lens.

    • Two connectors link the lens to the motherboard.

    • Gently bring the lens away from the camera.

  14. Sony Cyber-shot DSC-P9 Lens Replacement: paso 14, imagen 1 de 1
    • Using the flat end of the plastic spudger tool, flip up the black tabs on the connectors.

    • Be careful not to exert too much force, as the connectors are delicate.

  15. Sony Cyber-shot DSC-P9 Lens Replacement: paso 15, imagen 1 de 3 Sony Cyber-shot DSC-P9 Lens Replacement: paso 15, imagen 2 de 3 Sony Cyber-shot DSC-P9 Lens Replacement: paso 15, imagen 3 de 3
    • Gently pull out the cables and move the lens away from the rest of the camera.

    • You should now have two distinct, separate components.

Conclusión

To reassemble your device, follow these instructions in reverse order.

Una persona más ha completado esta guía.

Sean Sayles

Miembro Desde 05/09/12

7 Reputación

1 Guía escrita

Equipo

Cal Poly, Team 17-25, Amido Spring 2012 Miembro de Cal Poly, Team 17-25, Amido Spring 2012

CPSU-AMIDO-S12S17G25

4 Miembros

14 Guías creadas

0 comentarios

Agregar Comentario

Ver Estadísticas:

Ultimas 24 horas: 0

Ultimos 7 días: 1

Ultimos 30 días: 7

Todo El Tiempo: 1,352