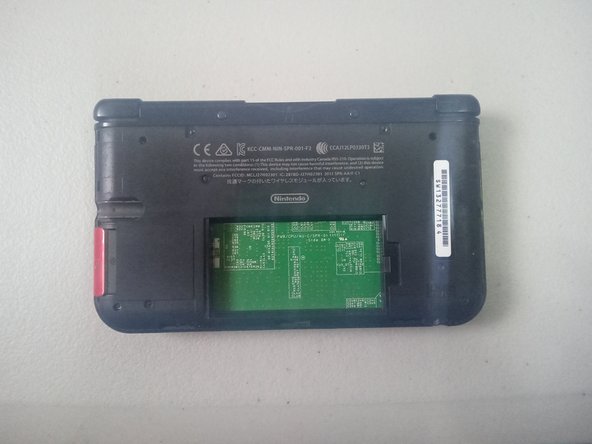
Saltar al contenido principal

Nintendo 3DS XL Hinge/Midframe Replacement

Qué necesitas

  1. Nintendo 3DS XL Hinge/Midframe Replacement, Hinge/Midframe: paso 1, imagen 1 de 2 Nintendo 3DS XL Hinge/Midframe Replacement, Hinge/Midframe: paso 1, imagen 2 de 2
    • Flip the 3DS XL upside down.

  2. Nintendo 3DS XL Hinge/Midframe Replacement: paso 2, imagen 1 de 1
    • Remove the two 4.2 mm screws from the back cover using a Phillips #00 screwdriver.

  3. Nintendo 3DS XL Hinge/Midframe Replacement: paso 3, imagen 1 de 1
    • Use an opening tool to pry the cover loose and lift the back cover.

    • Caution: Make sure to lift the side with the screws up first as to not break hooks on the cover.

  4. Nintendo 3DS XL Hinge/Midframe Replacement: paso 4, imagen 1 de 2 Nintendo 3DS XL Hinge/Midframe Replacement: paso 4, imagen 2 de 2
    • Use an opening tool to remove the battery.

  5. Nintendo 3DS XL Hinge/Midframe Replacement: paso 5, imagen 1 de 1
    • Remove the six 6.2 mm screws from the back cover using a Phillips #00 screwdriver.

    • Remove the single 2.3 mm screw from the back cover using a Phillips #00 screwdriver.

  6. Nintendo 3DS XL Hinge/Midframe Replacement: paso 6, imagen 1 de 3 Nintendo 3DS XL Hinge/Midframe Replacement: paso 6, imagen 2 de 3 Nintendo 3DS XL Hinge/Midframe Replacement: paso 6, imagen 3 de 3
    • Use your hands to carefully remove the back cover at an angle, while keeping it connected to the top edge with caution regarding the ribbons.

  7. Nintendo 3DS XL Hinge/Midframe Replacement: paso 7, imagen 1 de 2 Nintendo 3DS XL Hinge/Midframe Replacement: paso 7, imagen 2 de 2
    • Use a pair of tweezers to carefully detach both of the ribbon cables connected to the back cover.

  8. Nintendo 3DS XL Hinge/Midframe Replacement: paso 8, imagen 1 de 2 Nintendo 3DS XL Hinge/Midframe Replacement: paso 8, imagen 2 de 2
    • Remove the two 7.5 mm screws from the white plate.

    • Use your fingers to lift it off the space carefully.

  9. Nintendo 3DS XL Hinge/Midframe Replacement: paso 9, imagen 1 de 1
    • Use a pair of tweezers to remove the small plastic circle from the opened space.

  10. Nintendo 3DS XL Hinge/Midframe Replacement: paso 10, imagen 1 de 2 Nintendo 3DS XL Hinge/Midframe Replacement: paso 10, imagen 2 de 2
    • Use your fingers to carefully disconnect the small green rectangle.

  11. Nintendo 3DS XL Hinge/Midframe Replacement: paso 11, imagen 1 de 1
    • Remove the ten 3 mm screws from the motherboard.

  12. Nintendo 3DS XL Hinge/Midframe Replacement: paso 12, imagen 1 de 2 Nintendo 3DS XL Hinge/Midframe Replacement: paso 12, imagen 2 de 2
    • On the bottom right corner, remove the small plastic piece using a pair of tweezers.

  13. Nintendo 3DS XL Hinge/Midframe Replacement: paso 13, imagen 1 de 2 Nintendo 3DS XL Hinge/Midframe Replacement: paso 13, imagen 2 de 2
    • On the bottom left corner, remove the small plastic piece using a pair of tweezers.

  14. Nintendo 3DS XL Hinge/Midframe Replacement: paso 14, imagen 1 de 2 Nintendo 3DS XL Hinge/Midframe Replacement: paso 14, imagen 2 de 2
    • With caution yet with slight force, use a pair of tweezers to pull and disconnect the ribbon cable from the latch on the top right corner.

  15. Nintendo 3DS XL Hinge/Midframe Replacement: paso 15, imagen 1 de 2 Nintendo 3DS XL Hinge/Midframe Replacement: paso 15, imagen 2 de 2
    • With caution yet with slight force, use a pair of tweezers to pull and disconnect the second ribbon cable from the latch on the top right corner.

  16. Nintendo 3DS XL Hinge/Midframe Replacement: paso 16, imagen 1 de 2 Nintendo 3DS XL Hinge/Midframe Replacement: paso 16, imagen 2 de 2
    • With caution yet with slight force, use your hands to lift the screen and the green motherboard from the frame.

    • Caution: There is still a ribbon cable connected, so do not suddenly remove what was lifted.

  17. Nintendo 3DS XL Hinge/Midframe Replacement: paso 17, imagen 1 de 2 Nintendo 3DS XL Hinge/Midframe Replacement: paso 17, imagen 2 de 2
    • With caution yet with slight force, use a pair of tweezers to pull and disconnect the ribbon cable at the hinge from the latch.

  18. Nintendo 3DS XL Hinge/Midframe Replacement: paso 18, imagen 1 de 2 Nintendo 3DS XL Hinge/Midframe Replacement: paso 18, imagen 2 de 2
    • Use your fingers to disconnect the green rectangle from the small green cable.

  19. Nintendo 3DS XL Hinge/Midframe Replacement: paso 19, imagen 1 de 2 Nintendo 3DS XL Hinge/Midframe Replacement: paso 19, imagen 2 de 2
    • Flip the 3DS XL right side up and open it.

  20. Nintendo 3DS XL Hinge/Midframe Replacement: paso 20, imagen 1 de 3 Nintendo 3DS XL Hinge/Midframe Replacement: paso 20, imagen 2 de 3 Nintendo 3DS XL Hinge/Midframe Replacement: paso 20, imagen 3 de 3
    • Use a pair of tweezers to remove the small rubber squares from each corner of the front screen.

  21. Nintendo 3DS XL Hinge/Midframe Replacement: paso 21, imagen 1 de 1
    • Remove the four 4.3 mm screws from the top screen using a Phillips #00 screwdriver.

  22. Nintendo 3DS XL Hinge/Midframe Replacement: paso 22, imagen 1 de 3 Nintendo 3DS XL Hinge/Midframe Replacement: paso 22, imagen 2 de 3 Nintendo 3DS XL Hinge/Midframe Replacement: paso 22, imagen 3 de 3
    • Use your hands to remove the top cover by pushing the cover horizontally away from the hinges, as to not break any plastic hooks.

  23. Nintendo 3DS XL Hinge/Midframe Replacement: paso 23, imagen 1 de 2 Nintendo 3DS XL Hinge/Midframe Replacement: paso 23, imagen 2 de 2
    • Flip the 3DS XL upside down and find the top left hinge.

    • In the small opening, use a small opening tool to push the small white plastic piece down towards the other hinge.

    • Caution: A decent amount of force will be needed to push it down, so use a small but sturdy object that can fit in the opening to push it down.

  24. Nintendo 3DS XL Hinge/Midframe Replacement: paso 24, imagen 1 de 2 Nintendo 3DS XL Hinge/Midframe Replacement: paso 24, imagen 2 de 2
    • Use a pair of tweezers to remove the small black plastic piece covering the hinge.

  25. Nintendo 3DS XL Hinge/Midframe Replacement: paso 25, imagen 1 de 2 Nintendo 3DS XL Hinge/Midframe Replacement: paso 25, imagen 2 de 2
    • Use a pair of tweezers to remove the small clear plastic piece from the hinge.

    • At this point you can remove the bottom frame from the left hinge using your hands.

  26. Nintendo 3DS XL Hinge/Midframe Replacement: paso 26, imagen 1 de 3 Nintendo 3DS XL Hinge/Midframe Replacement: paso 26, imagen 2 de 3 Nintendo 3DS XL Hinge/Midframe Replacement: paso 26, imagen 3 de 3
    • At the top right hinge, use your hands to carefully slide the ribbon cables through a small gap next to the hinge to remove them from the bottom frame.

  27. Nintendo 3DS XL Hinge/Midframe Replacement: paso 27, imagen 1 de 2 Nintendo 3DS XL Hinge/Midframe Replacement: paso 27, imagen 2 de 2
    • Use your fingers to remove all buttons and rubber covers from the old frame and place them into the new frame.

Conclusión

To reassemble your device, follow these instructions in reverse order.

Una persona más ha completado esta guía.

FixitKevin

Miembro Desde 10/25/23

412 Reputación

1 Guía escrita

Equipo

0 comentarios

Agregar Comentario

Ver Estadísticas:

Ultimas 24 horas: 25

Ultimos 7 días: 274

Ultimos 30 días: 1,157

Todo El Tiempo: 3,562