Saltar al contenido principal

LG Incite Touch Screen Replacement

Qué necesitas

  1. LG Incite Touch Screen Replacement, Battery: paso 1, imagen 1 de 1
    • Hold the phone camera-side up and locate the rear cover.

  2. LG Incite Touch Screen Replacement: paso 2, imagen 1 de 1
    • Place a thumb below the camera, apply a little pressure, and slide the cover toward the bottom of the phone.

  3. LG Incite Touch Screen Replacement: paso 3, imagen 1 de 1
    • Place the plastic opening tool in the small slot below and to the left of the battery.

    • Pry the battery upward to remove it.

  4. LG Incite Touch Screen Replacement, Back Panel: paso 4, imagen 1 de 1
    • Using the #00 Philips screw driver, unscrew the four 4.5mm screws located around the battery compartment.

  5. LG Incite Touch Screen Replacement: paso 5, imagen 1 de 1
    • Wedge the plastic opening tool between the screen and the body of the device, using care to avoid damaging internal components.

    • Gently move the tool around the perimeter of the screen to separate it from the body.

    • You should not completely separate the screen from the device in this step.

  6. LG Incite Touch Screen Replacement: paso 6, imagen 1 de 1
    • Flip the device over so the battery compartment faces up.

    • Press the scroll wheel, located in the upper-left corner, into the device to avoid damage.

    • Gently insert the plastic opening tool into the seam between the frame and front cover to separate the back panel from the device.

    • The volume, lock, and camera buttons are loose, so be careful not to misplace them.

  7. LG Incite Touch Screen Replacement, Motherboard: paso 7, imagen 1 de 3 LG Incite Touch Screen Replacement, Motherboard: paso 7, imagen 2 de 3 LG Incite Touch Screen Replacement, Motherboard: paso 7, imagen 3 de 3
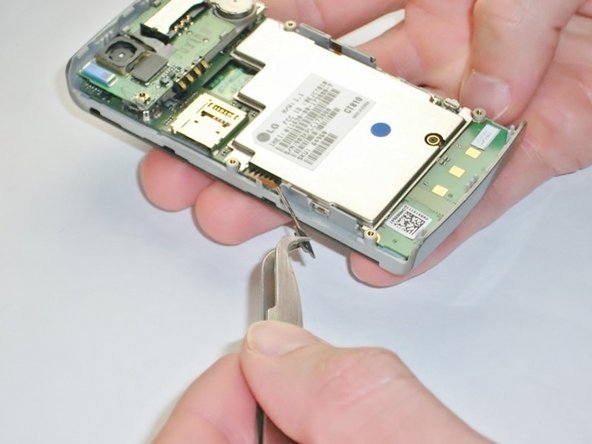
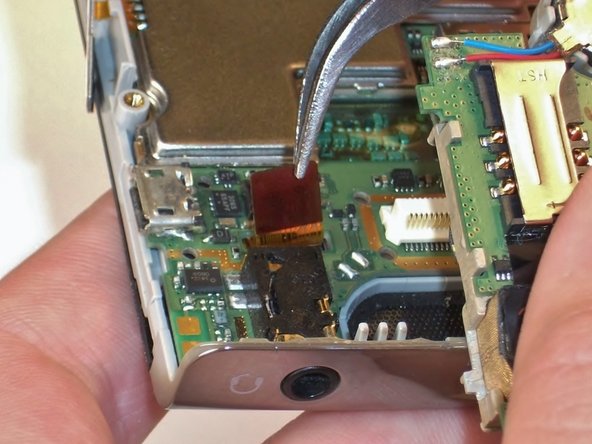
    • Use the metal tweezers to gently peel the yellow tab from the left edge of the phone at the two plastic bases.

    • Do not completely remove the tab from the body, it should still be connected to the phone by the orange plastic.

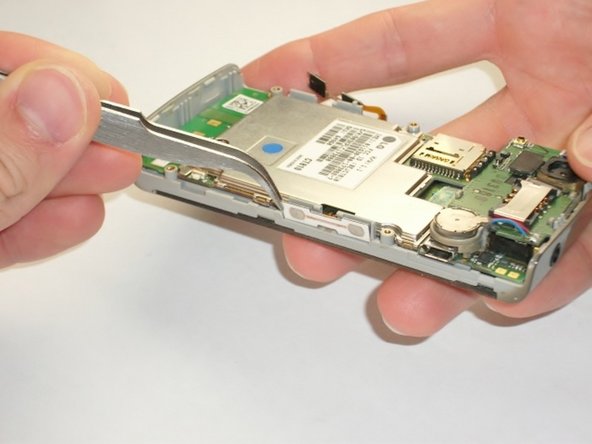
    • Repeat this for the white tab on the opposite side of the phone.

    • This tab also has two plastic bases adhering it to the edge of the phone.

  8. LG Incite Touch Screen Replacement: paso 8, imagen 1 de 1
    • Insert your plastic opening tool underneath the speaker/camera panel, and gently pry it upwards.

    • Do not fully remove the panel! It should still be attached to the motherboard by a red and black wire.

  9. LG Incite Touch Screen Replacement: paso 9, imagen 1 de 2 LG Incite Touch Screen Replacement: paso 9, imagen 2 de 2
    • Use the metal tweezers to gently lift the edge of the maroon tab, it should pop up easily.

    • Do not remove the tab completely, it should still be connected to the phone.

  10. LG Incite Touch Screen Replacement: paso 10, imagen 1 de 1
    • Insert the plastic opening tool underneath the motherboard towards the bottom edge of the phone and gently pry it from its case.

    • Lift the motherboard and slide it towards you by hand to free it from the phone.

    • The call and end buttons may fall out when the motherboard is removed! Don't lose the buttons.

  11. LG Incite Touch Screen Replacement, Touch Screen: paso 11, imagen 1 de 1
    • Remove the call and end buttons using the metal tweezers.

  12. LG Incite Touch Screen Replacement: paso 12, imagen 1 de 1
    • Wedge the plastic opening tool between the screen and sides of the phone.

    • Slide the tool along the edge to loosen the screen.

    • Repeat for the opposite side.

    • Don't completely remove the screen yet to avoid damaging the screen.

  13. LG Incite Touch Screen Replacement: paso 13, imagen 1 de 1
    • Wedge the plastic opening tool under the screen where the buttons were to loosen it.

  14. LG Incite Touch Screen Replacement: paso 14, imagen 1 de 2 LG Incite Touch Screen Replacement: paso 14, imagen 2 de 2
    • Gently peel the touch screen off from the bottom of the phone.

    • Do not damage the yellow tab in the upper right corner of the phone.

Conclusión

To reassemble your device, follow these instructions in reverse order.

5 personas más completaron esta guía.

Kimberly Kha

Miembro Desde 04/16/13

163 Reputación

5 Guías creadas

Equipo

Cal Poly, Team 2-18, Maness Spring 2013 Miembro de Cal Poly, Team 2-18, Maness Spring 2013

CPSU-MANESS-S13S2G18

4 Miembros

11 Guías creadas

0 comentarios

Agregar Comentario

Ver Estadísticas:

Ultimas 24 horas: 0

Ultimos 7 días: 1

Ultimos 30 días: 1

Todo El Tiempo: 1,209