Saltar al contenido principal

Black and Decker BL3000S button panel replacement

Qué necesitas

  1. Black and Decker BL3000S button panel replacement, Blender Base: paso 1, imagen 1 de 2 Black and Decker BL3000S button panel replacement, Blender Base: paso 1, imagen 2 de 2
    • Before disassembling the blender base, make sure the blender disconnected from any power outlet.

    • Lift the jar straight up from the base without tilting the jar.

  2. Black and Decker BL3000S button panel replacement: paso 2, imagen 1 de 1
    • Remove the top three 1/4 inch base screws using a Philip's head screwdriver.

  3. Black and Decker BL3000S button panel replacement: paso 3, imagen 1 de 2 Black and Decker BL3000S button panel replacement: paso 3, imagen 2 de 2
    • Remove the two base leg covers next to the power cord using pliers or a flat-head screwdriver.

    • This provides access to the base screws beneath.

  4. Black and Decker BL3000S button panel replacement: paso 4, imagen 1 de 1
    • Remove the following screws that secure the top and bottom halves of the base.

    • One 1/4 Phillips screw

    • One TA-20 screw

    • Both screwdrivers must have a minimum of a three inch shank (length).

    • Screwdrivers with extenders will not fit down the access holes.

  5. Black and Decker BL3000S button panel replacement: paso 5, imagen 1 de 1
    • Lift the top half of the base from the bottom half of the base to reveal the internal mechanism.

  6. Black and Decker BL3000S button panel replacement, Circuit Board: paso 6, imagen 1 de 1
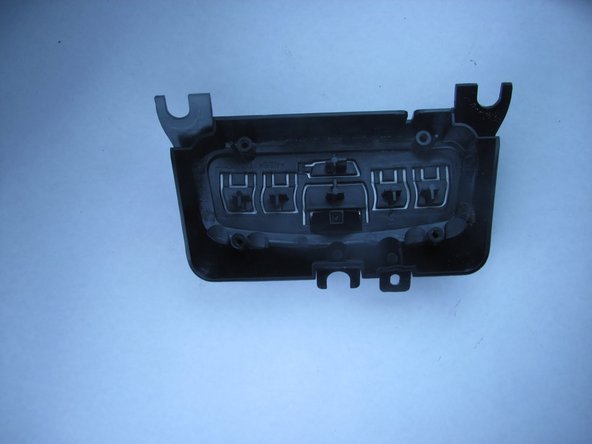
    • Once you have the base removed, the circuit board should be clearly visible inside.

  7. Black and Decker BL3000S button panel replacement: paso 7, imagen 1 de 2 Black and Decker BL3000S button panel replacement: paso 7, imagen 2 de 2
    • Remove the four screws located on the circuit board.

    • Two are on the left side.

    • Two are on the right side.

  8. Black and Decker BL3000S button panel replacement: paso 8, imagen 1 de 1
    • Remove the following soldered connections with a soldering iron:

    • Motor wires

    • Power cord wires

  9. Black and Decker BL3000S button panel replacement: paso 9, imagen 1 de 1
    • Lift the circuit board straight up to remove it from the base.

  10. Black and Decker BL3000S button panel replacement, Buttons: paso 10, imagen 1 de 1
    • Once the circuit board has been freed from its screws it can be moved out of the way to gain access to the buttons.

    • A single screw must be removed from the top as shown.

  11. Black and Decker BL3000S button panel replacement: paso 11, imagen 1 de 1
    • Push firmly from the outside of the blender on the face of the buttons to pop it out of its locked position.

  12. Black and Decker BL3000S button panel replacement: paso 12, imagen 1 de 2 Black and Decker BL3000S button panel replacement: paso 12, imagen 2 de 2
    • Provided is a front and a back view of a functioning button frame from the BL3000S.

    • Check for cracks, bends, debris, or missing extentions and fastens.

Conclusión

To reassemble your device, follow these instructions in reverse order.

Austin Abernathy

Miembro Desde 10/05/12

18 Reputación

1 Guía escrita

Equipo

Cal Poly, Team 6-34, Regan Fall 2012 Miembro de Cal Poly, Team 6-34, Regan Fall 2012

CPSU-REGAN-F12S6G34

4 Miembros

6 Guías creadas

0 comentarios

Agregar Comentario

Ver Estadísticas:

Ultimas 24 horas: 0

Ultimos 7 días: 4

Ultimos 30 días: 20

Todo El Tiempo: 2,378