Saltar al contenido principal

why! N240BU CMOS Battery Replacement

Qué necesitas

  1. why! N240BU CMOS Battery Replacement, Battery: paso 1, imagen 1 de 2 why! N240BU CMOS Battery Replacement, Battery: paso 1, imagen 2 de 2
    • Start by unlocking the right locking latch.

    • Then, by simultaneously unlocking the left latch, lift the battery out of its socket.

  2. why! N240BU CMOS Battery Replacement, Access to main components: paso 2, imagen 1 de 2 why! N240BU CMOS Battery Replacement, Access to main components: paso 2, imagen 2 de 2
    • Begin by spotting the dummy memory card.

    • Then, remove it and put it on your workplan.

  3. why! N240BU CMOS Battery Replacement: paso 3, imagen 1 de 3 why! N240BU CMOS Battery Replacement: paso 3, imagen 2 de 3 why! N240BU CMOS Battery Replacement: paso 3, imagen 3 de 3
    • Locate the 15 screws that hold the bottom cover of the device in place.

    • Unscrew them and place them on your work surface.

    • Then, un-clip the bottom cover, starting with the side shown in the third picture.

  4. why! N240BU CMOS Battery Replacement, CMOS Battery: paso 4, imagen 1 de 2 why! N240BU CMOS Battery Replacement, CMOS Battery: paso 4, imagen 2 de 2
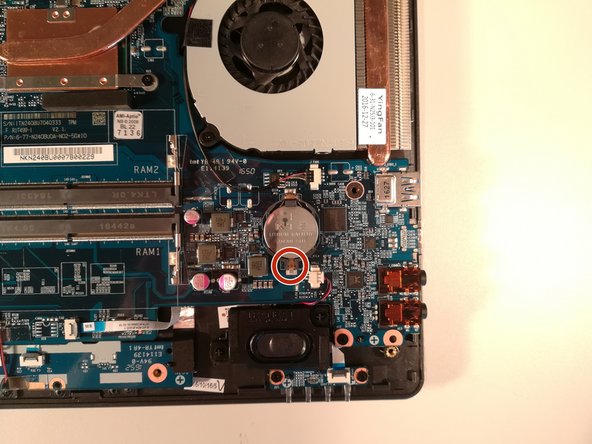
    • Press with a screwdriver in the red circled area to spread the base of the battery

    • Remove the battery by holding the screwdriver down

Conclusión

To reassemble your device follow the following instructions in reverse order

Un agradecimiento especial a estos traductores:

fr en

100%

Estos traductores nos están ayudando a reparar el mundo! ¿Quieres contribuir?
Empezar a traducir ›

Felice Suglia

Miembro Desde 06/15/13

30,908 Reputación

264 Guías creadas

0 comentarios

Agregar Comentario

Ver Estadísticas:

Ultimas 24 horas: 0

Ultimos 7 días: 5

Ultimos 30 días: 10

Todo El Tiempo: 207