Saltar al contenido principal

iRobot Roomba 860 Side Wheel Assembly Replacement

Qué necesitas

  1. iRobot Roomba 860 Side Wheel Assembly Replacement, Debris Extractors: paso 1, imagen 1 de 2 iRobot Roomba 860 Side Wheel Assembly Replacement, Debris Extractors: paso 1, imagen 2 de 2
    • To remove the debris extractor, first begin by removing and emptying the trash bin.

    • Push down and pull out on the silver button located on the top of the Roomba in the back.

    • The trash bin should then slide out.

  2. iRobot Roomba 860 Side Wheel Assembly Replacement: paso 2, imagen 1 de 2 iRobot Roomba 860 Side Wheel Assembly Replacement: paso 2, imagen 2 de 2
    • With the Roomba upside down, locate the two yellow buttons by the extractor.

    • To open the flap holding the extractos in place, pinch the two yellow buttons together towards the center and pull up on the flap at the same time

  3. iRobot Roomba 860 Side Wheel Assembly Replacement: paso 3, imagen 1 de 3 iRobot Roomba 860 Side Wheel Assembly Replacement: paso 3, imagen 2 de 3 iRobot Roomba 860 Side Wheel Assembly Replacement: paso 3, imagen 3 de 3
    • Once the flap is open, grab the yellow end of the dark gray extractor and pull up slightly.

    • After lifting it up about an inch, pull it out towards one of the side wheels.

    • The extractor should slide out with ease. Repeat the same procedure for the light gray debris extractor.

  4. iRobot Roomba 860 Side Wheel Assembly Replacement, Side Wheel Assembly: paso 4, imagen 1 de 2 iRobot Roomba 860 Side Wheel Assembly Replacement, Side Wheel Assembly: paso 4, imagen 2 de 2
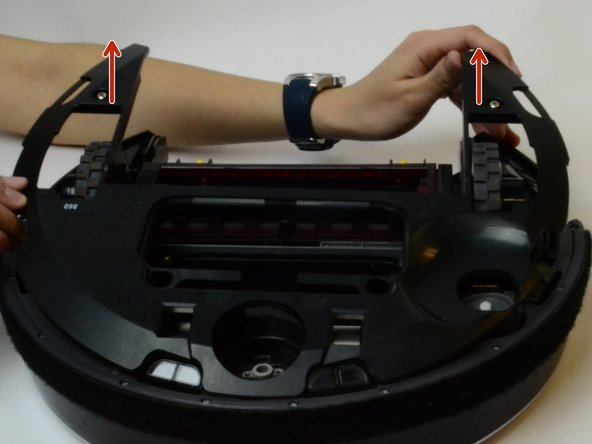
    • To remove the Side Wheel Assembly, start by locating 2 15mm Phillips #2 Point screws above the wheels.

    • Remove the screws and pull up on the plate surrounding the side wheels.

    • Locate and remove 3x Phillips #0 Point Screws located behind the yellow side brush, bottom let corner of heel assembly, and on the outside of the wheel assembly.

    • With all the screws removed, lift up on the side wheel assembly to remove it from the Roomba housing.

    • The other wheel can be removed and replaced the same way

Conclusión

To reassemble your device, follow these instructions in reverse order.

Ryan Murphy

Miembro Desde 03/02/17

446 Reputación

4 Guías creadas

Equipo

USF Tampa, Team S13-G5, Cagle Spring 2017 Miembro de USF Tampa, Team S13-G5, Cagle Spring 2017

USFT-CAGLE-S17S13G5

4 Miembros

4 Guías creadas

0 comentarios

Agregar Comentario

Ver Estadísticas:

Ultimas 24 horas: 0

Ultimos 7 días: 2

Ultimos 30 días: 7

Todo El Tiempo: 1,282