Introducción
Usa esta guía para reemplazar el botón de inicio en tu iPod Touch.
Qué necesitas
-
-
Si el vidrio de tu pantalla está agrietado, mantén contenidas las roturas adicionales y evita daños corporales durante la reparación pegando el vidrio con cinta adhesiva.
-
Coloca tiras superpuestas de cinta de embalaje transparente sobre la pantalla del iPod hasta cubrir toda la cara.
-
-
-
Usa un secador de pelo o prepara un iOpener y aplícalo en el borde inferior del iPod durante aproximadamente un minuto para suavizar el adhesivo que se encuentra debajo.
-
La parte inferior de la pantalla (cerca del botón de inicio) se mantiene en su lugar con un adhesivo fuerte.
-
A medida que comienzas a quitar la pantalla en las siguientes etapas, es posible que debas aplicar más calor para mantener el pegamento tibio y flexible.
-
-
-
Centra la ventosa en la sección inferior del vaso, con su borde centrado sobre el botón de inicio.
-
Presiona firmemente y asegúrate de que la ventosa tenga un agarre fuerte.
Be very careful. I have bought the ifixit kit. Tried with the suction cup and it didn’t work. None of the tools actually helped. Follower the instructions carefully and still ended up with a cracked screen. I wish I could go back in time and not doing any of this. I literally just cried and have no money for a new screen.
-
-
-
Sostén el iPod firmemente contra una mesa o banco.
-
Levanta la ventosa hacia arriba y hacia atrás hacia la parte superior del iPod. Se paciente y tira con fuerza firme y constante hasta que el adhesivo se rompa y la pantalla salga de la carcasa trasera.
-
Puede ser necesario usar una pistola de aire caliente para ablandar el adhesivo (especialmente en climas más fríos). Si puedes hacer palanca para separar la pantalla y el adhesivo todavía se pega y se separa como el queso de una pizza, puedes deslizar una hoja de afeitar delgada y cortar suavemente el adhesivo.
Step 2.5: Recover iPod from far side of the room due to suction assisted throwing.
thanks, Apple
Did as shown, button switch works fine, when I reinstall button, it's like it won't touch the switch to engage.
What next?
I've got the same problem, managed to get the screen off, transferred the little steel plate to the new home button and put it in. The switch works fine when I press it with my finger, but it won't work with the home button??? - Did you manage to solve this problem?
Tom -
I've got the same problem. Been trying to find a solution for a few days now. Lots of people ask this question, but no one ever answers it. How did you solve it?
tirgang -
It sounds like you need to replace the home button dome switch rather than the actual home button. I'm currently searching for one myself. My customer jammed the home button and now it doesn't click. The dome switch is located on the home button ribbon cable and not on the home button.
The "home button" repair shows the physical button, but it's not actually the repair for the switch, which is what should be shown as the home button repair. The switch has a little black plastic tab that breaks off with excessive presses, and that's why the button plate cannot engage the switch when the screen is reinstalled. You will need to replace the switch, or modify it with something small enough to press the switch when the LCD is lowered.
Rene -
I also ran in to the Home button not working issue. I have not idea what changed with the button, but it would not work (from the outside) after the battery replacement & re-assembling. If you opened the iPod up, you could press the switch directly and it clicked & worked, but it seemed finicky. I ended up putting the tiniest dot of hot melt on the center of the switch (smaller than the switch 'dome', and thin too, maybe 0.6-0.7mm thick), re-assembled, and it works fine now.
Use the hair dryer or a heat gun to loosen the adhesive. This did not work with just a suction cup for me.
I also had to use a heat gun and the opening tool instead of just a suction cup to open the assembly. The rest of the guide worked really well!
When putting back together, make sure the display connector is in firm or you might get lines. And also, perform a hard reset - my power wasn't working, I took it apart and checked the power flex cable, but all it needed was a hard reset when put back together.
Suction cup and hair dryer method never worked for me. Even tried my heat gun. Finger went numb before I gave up. Used thin prying + suction cup and eventually opened it but screen cracked in the process when I was too aggressive opening it.
In hind-sight, it would have been very helpful to know that the adhesive is just in the 2 areas to either side of the home button, nothing along the edges.
Biggest complaint is the time wasted, should have just bought a replacement iPod, better return on my money/time.
The adhesive strips are only located to the left and right of the home button. Imagine two small squares of tape in each corner. Be careful heating. I used a heat gun on the lowest heat, but I think I may have overheated the area and damaged the digitizer on the bottom of the screen. I now have small green lines on that section of the screen. I too had to use a thin metal spudger to release the adhesive.
-
-
-
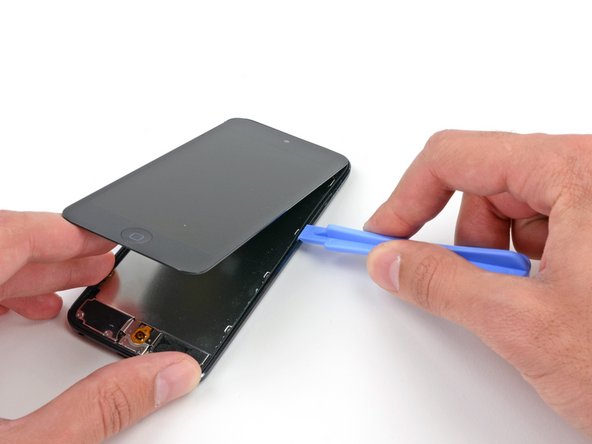
Comenzando en la parte superior derecha del dispositivo, inserta una herramienta de apertura de plástico en el espacio entre el marco de plástico y la carcasa trasera de aluminio.
-
Desliza la herramienta por esta grieta, aflojando el marco de la caja.
Careful! This piece is super fragile. It really helps to understand the way the clips work. I struggled for 10 min with not a single un-clip, snapped the plastic frame in 2 places because I didn't understand the clips, and as soon as I figured out how they work the piece was off like a prom dress.
The clips are metal n shapes around the outside of the frame. They need to be pushed away from the center of the device to release the frame. You need to get something in between the plastic and clip to release, a guitar pick is probably too thick. A thin opening device would probably work but I used a razor blade. I'm not sure if these clips are on all of the newer Apple devices, but I've never encountered one before (usually work on android devices.)
I hope this helps prevent someone from having to replace the frame.
I wish I had read this comment before I broke my frame, hah! It made sense once I had the clips out, but while they were still in it was mystifying. Thankfully it won't be too big of a problem since all of the frame will still clip in, it just won't be connected.
-
-
-
-
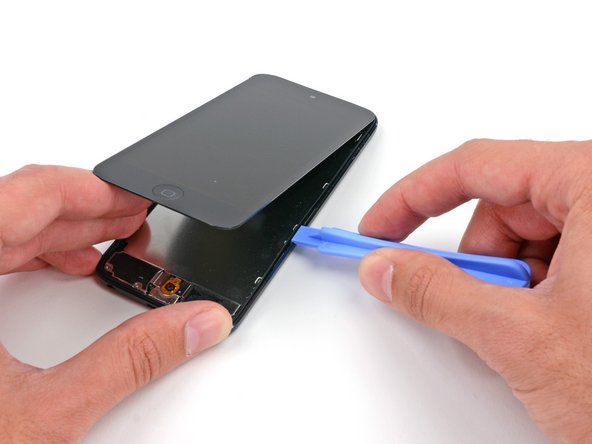
Inserta la herramienta de apertura de plástico entre el marco y la carcasa trasera detrás del primer clip.
-
Mueve la herramienta hacia los lados para extender el espacio detrás del clip y separarlo de la caja trasera.
-
Es posible que esto no libere el clip inicialmente, pero repetir el procedimiento para cada clip comenzará a aflojar la pieza.
-
-
-
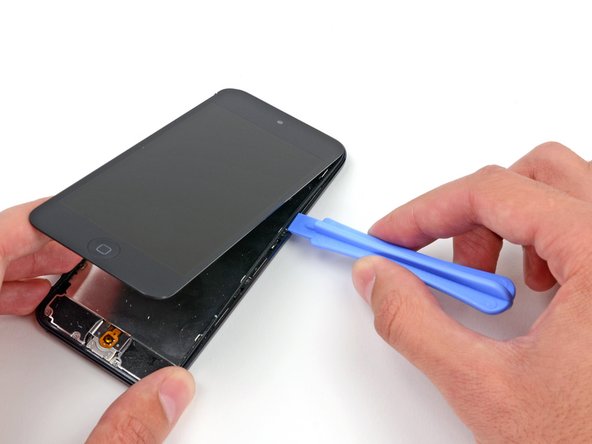
Repite el procedimiento con los dos clips siguientes de este lado.
-
Inserta la herramienta de apertura de plástico entre el marco de plástico y la carcasa trasera de aluminio detrás del segundo clip.
-
Mueve la herramienta hacia un lado, aflojando el clip de la carcasa.
Hello how are you? I don't know what happens when I go back and put everything I close and the home button doesn't work, I disarm it and check the flex and it works when I press it but with the home button it doesn't.
-
-
-
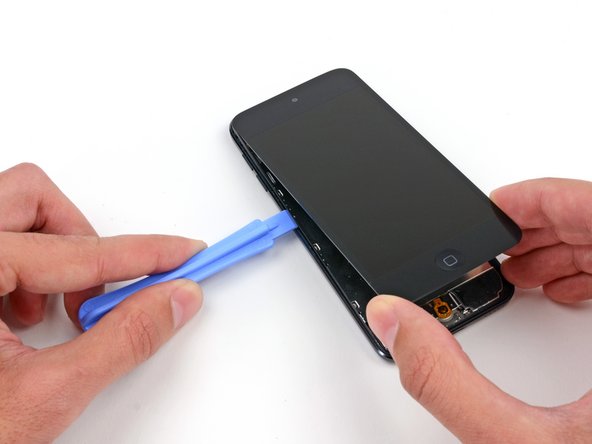
Usando el mismo procedimiento, afloja el último clip que sujeta el marco de plástico a la caja trasera.
They have the exact same dimensions.
do you think if i use reolacement scren of itouch 5th gen to my itou h 6th gen this would work? i cant find screen for itouch 6th gen so im thnking to use the screen of 5th gen pls help me
-
-
-
Inserta la herramienta de apertura de plástico entre el ensamblaje de la pantalla y la carcasa trasera cerca de la parte superior del iPod.
-
Gira ligeramente la herramienta de apertura para levantar el panel frontal de la carcasa trasera.
-
Separa el ensamblaje de la pantalla del iPod.
-
-
-
Usa una herramienta de apertura de plástico para levantar la membrana de goma alrededor del botón de inicio.
-
-
-
Una vez que hayas hecho palanca lo suficiente como para inclinar el botón hacia arriba y agarrarlo, levántalo suavemente del ensamblaje de la pantalla, tirando lentamente para evitar romper la goma.
-
Retira el botón de inicio del iPod.
How do you put the home button back on the screen? Mine won't stay on. Please help!!
I used a fine tip like a toothpick and carefully applied spray adhesive to the soft rubber and placed it back on the glass, used the spudger to ensure it was seated, let it sit for ten minutes then reassembled and gave it ten more minutes befor I tried it, been working great . Spray adhesive on a paper plate and dab toothpick in it and carefully apply. Be patient
Where can you buy a new home button if you can't find one in stores
Ebay is nice, just be sure you buy the right model made for your Ipod Touch series
Alyrxc -
-


Para volver a armar tu dispositivo, sigue estas instrucciones en orden inverso.
Para volver a armar tu dispositivo, sigue estas instrucciones en orden inverso.
Cancelar: No complete esta guía.
11 personas más completaron esta guía.
Un agradecimiento especial a estos traductores:
100%


Estos traductores nos están ayudando a reparar el mundo! ¿Quieres contribuir?
Empezar a traducir ›

4 comentarios
Anyone else notice his thumbnail is different between the two pictures in step 14?
I spilled jelly on my home button and ever since it only worked half the time. Would I want to clean my button or replace it?
Any repair guides for front camera?
ipod touch 5th generation front camera freezes then returns to rear camera. This happened after replacing battery. Any ideas? Tried hard reset & restoring. Nothing worked.
Libby - Contestar