Introducción
Es la mitad trasera brillante de la funda de tu iPod.
Qué necesitas
-
-
Para ayudar en la visualización, los dos clips enmarcados en rojo están ubicados más cerca del conector para auriculares.
i don't know what genoration my ipod is...but it looks exactly like that on and it doesnt have the clips......what do i do?
https://www.ifixit.com/info/ID-your-iPod
Try that first to find what you have
Given the inherited risks of damaging the components, it would also be important to mention that the area where there are no clips is where the flat cable to the screen resides. So NO deep sticking tools in that area. It’s attractive to do because at that right side the back panel is intruded the easiest way - but dont do it.
-
-
-
-
Inserta la herramienta grande para abrir el iPod en la costura entre la carcasa frontal y el panel posterior del iPod, sobre el conector de la base. El borde de la herramienta debe apuntar hacia el panel posterior para evitar que se raye accidentalmente la carcasa frontal de aluminio anodizado.
-
-
-
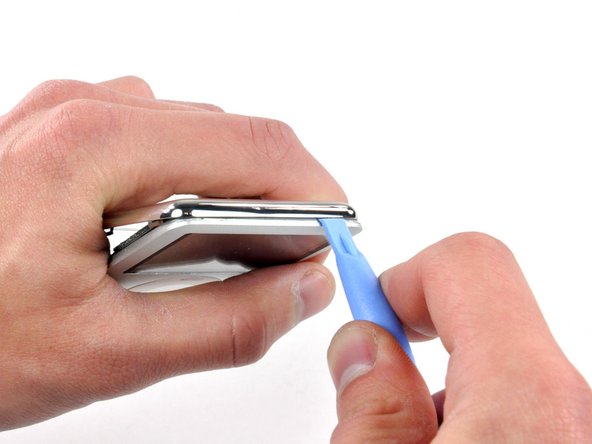
Inserta una pequeña herramienta de apertura de iPod en la costura del lado del conector para auriculares del Nano, con el borde de la herramienta apuntando hacia el panel trasero.
-
Amplía suavemente el espacio existente presionando/moviendo la pequeña herramienta de apertura del iPod en el espacio cerca de cada una de las dos pestañas unidas a la carcasa trasera, empujando los clips hacia el centro del Nano hasta que ambos se hayan liberado.
the tool i bought because you suggested it to me got inevitably broken like it was butter made, thanks
This is virtually impossible! I have already cut myself when the stupid tool slipped trying to push in on the clips. Why on earth would anyone design something to impossible to open when they know the battery would need to be replaced at some point?
Forget the iFixit plastic tools. You need to use steel on steel. I used a heavy duty engravers knife I happened to have, to get it started. Then, a fine chisel and jeweler’s screwdrivers and LOTS of force to pry it off. I messed up the aluminum front case a bit, but I cleaned that up with sandpaper. The back case was bent a bit, but I straightened that, and after replacing the battery I fastened it back on with black electricians tape. It looks quite well, and good enough for me. I will cancel my order for a replacement back. Joe M 2/3/2018
i never needed the large tool i just needed i little flat head screwdriver
-
-
-
Inserta una herramienta de apertura de iPod en el espacio cerca de la esquina superior izquierda del Nano y trabaja para liberar los tres clips a lo largo del borde superior del panel trasero.
-
Después de asegurarte de que todas las pestañas estén libres, separa las dos mitades del iPod.
-
El panel trasero ahora está libre del iPod.
-


Para volver a armar tu dispositivo, sigue estas instrucciones en orden inverso.
Para volver a armar tu dispositivo, sigue estas instrucciones en orden inverso.
Cancelar: No complete esta guía.
36 personas más completaron esta guía.
Un agradecimiento especial a estos traductores:
100%


Estos traductores nos están ayudando a reparar el mundo! ¿Quieres contribuir?
Empezar a traducir ›

2 comentarios
but what about the model no.
its just a third-gen ipod nano they all have the same design
I found removing the back to be very difficult and had to use a mini screwdriver to complete it. While removing the back to replace the clickwheel, I not only destroyed the back, I inadvertently mangled the video cable and so I then had to replace that too.
gruntso - Contestar