Introducción
¿Pantalla rota o defectuosa? Cámbiala.
Qué necesitas
-
-
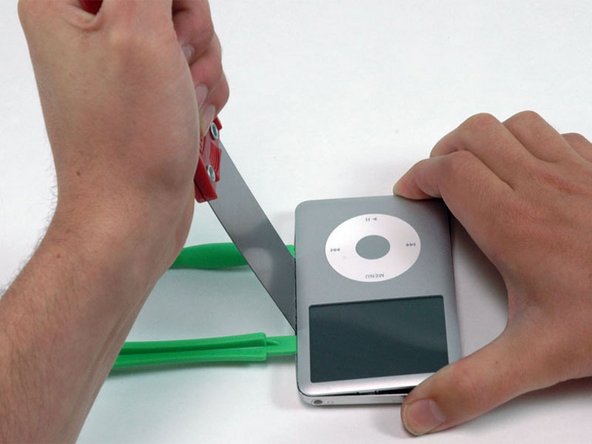
Inserta una herramienta de apertura de plástico en la costura entre la parte frontal y posterior del iPod.
right here, you should insert a picture of the little clips on the rails inside the back of the ipod, so that we can visualise what we're trying to undo, & get a better idea of which way to bend, which way NOT to bend the tools.
Good point! There is such a picture showing the location of at least four (4) clips on each side of the case here:
https://d3nevzfk7ii3be.cloudfront.net/ig...
in the Step 4 of the “iPod Classic Teardown”: Desmontaje del iPod Classic
As mentioned below by Kevin M there are 3 more (1 on top and 2 on the bottom sides).
LDS -
Actually it’s a wayyyyyyy easier using the iFlash opening tool and following the pdf of this guy (youtube link)
Actually it’s wayyyyyy easier using this tool as mentioned by this awesome guy on his video.
That video is excellent. He has a PDF you print which is the same size as the iPod so you know exactly where the 11 clips are (1 on top, 2 on bottom, and 4 more along each side).
Appreciated the earlier comment about using guitar picks. It is very easy to open the iPod with guitar picks. It still requires patience sometimes, but no noticeable damage to the iPod. Went to the local music store, they stocked Fender picks. Fender "Thin" work best for me for starters, but sometimes Fender "Medium" are needed. (Go to your local music store-- very cheap!) I have opened (and repaired successfully!) four different iPods just using guitar picks.
-
-
-
En ángulo, inserta cuidadosamente una espátula de aproximadamente 1/8 de pulgada en la costura entre las dos herramientas de apertura.
-
Una vez que la espátula haya despejado el borde del panel posterior, gira la espátula para que quede vertical y con cuidado (pero con firmeza) muévela directamente hacia el espacio entre las herramientas de apertura.
I tried this on the first iPod I was trying to fix. This method really messes up the sides of the iPod. Go back and read earlier comments about using guitar picks or other tools!
I tried this on the first iPod I was trying to fix. This method really messes up the sides of the iPod. Go back and read earlier comments about using guitar picks or other tools!
-
-
-
Empuja con los dedos el panel posterior detrás de la espátula para minimizar la flexión. Lentamente flexiona la espátula, como se muestra en la imagen, para asegurarse de que la mayoría de las pestañas metálicas de este lado del iPod estén desenganchadas.
I tried this on the first iPod I was trying to fix. This method really messes up the sides of the iPod. Go back and read earlier comments about using guitar picks or other tools!
-
-
-
En ángulo, inserta cuidadosamente una espátula de aproximadamente 1/8 de pulgada en la costura entre las dos herramientas de apertura.
-
Una vez que la espátula haya despejado el borde del panel posterior, inclina la espátula para que quede vertical y con cuidado (pero con firmeza) muévela directamente hacia el iPod a través del espacio entre las herramientas de apertura de plástico.
-
Empuja con los dedos el panel posterior detrás de la espátula para minimizar la flexión. Flexiona ligeramente la espátula para asegurarte de que la mayoría de las pestañas metálicas de este lado del iPod estén desenganchadas.
-
-
-
-
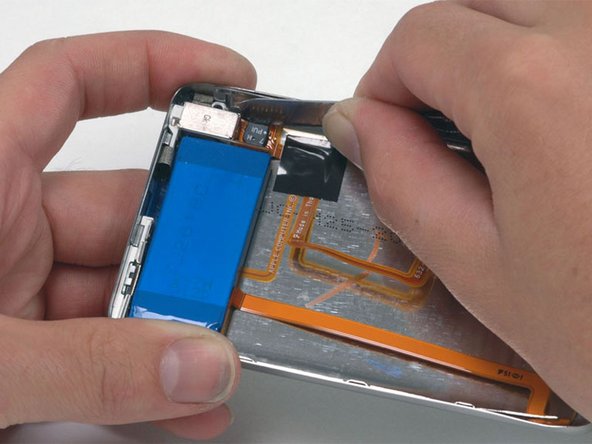
Sujeta el conjunto del panel frontal con una mano y el panel posterior con la otra.
-
Suavemente (SUAVEMENTE) desengancha los clips restantes del panel posterior tirando de la parte superior de los paneles frontal y posterior (piensa en la parte inferior del iPod como una bisagra), teniendo mucho cuidado de no dañar los cables de cinta que sujetan el dos mitades juntas
-
-
-
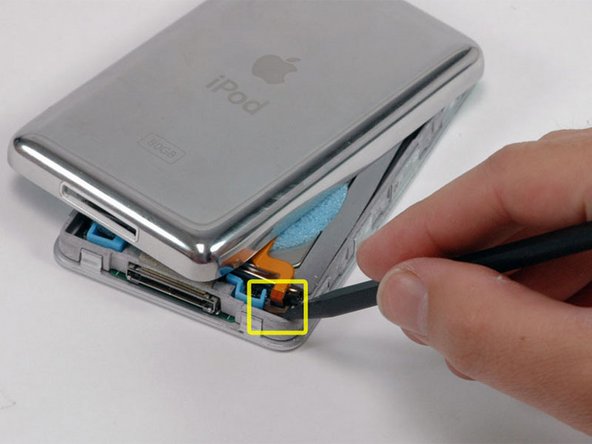
Usa un spudger para deslizar hacia arriba el conector que sostiene la cinta naranja de la batería en su lugar. Solo necesitas levantar la barra de bloqueo unos 2 mm para liberar el cable.
-
Desliza la cinta naranja de la batería fuera de su conector.
If the small battery black/white connector pumps out of the ipod when you are trying to unplug the cable...REMEMBER the "U" black shape is meant to be just in the same direction as the blue plastic "U" beside it. If you plug it back in the wrong way it will display "Charging please wait..." forever!.
:)
How did you get the black battery piece to stay in after it popped out?
I knocked this little bit out too! Any tips to get it back in? Soldering?
This step is what ultimately destroyed my iPod. A caution to be very careful would be good.
I got the whole black white thing disconnected from the pins. After a lot of struggle I was able to get it back in, but I couldn’t get the black locking part to go up on its own. after many tries and some tries to get it in when the black thing is closed, i tore out the pins that were connected to the panel. can’t get it back on so it isn’t connected to the battery…
Now i have a perfect iPod with a new harddrive but I can’t use it.
Please add a red caution sentence because I’m pretty sure that if i had known what I had to do I would’ve been more careful and I would now have a functioning iPod.
Nonetheless, great guide! without this I wouldn’t even have tried and the harddisk came from another broken down iPod classic so it’s not that I lost money.
I got the whole battery clamp connector (black and white) all out too… So angry about it! I thought that the white part should be disconnected too, like former iPod models. Be careful, you only have to release the BLACK locking bar! One more photo with a zoom on the battery connector could have been useful… Great guide anyway :-)!
battery connector fix
Hello! Trying to identify the problem on my Ipod. I think I'm not qualified to open it and do the fixing. Do you know a shop or someone in Paris that would try it? Apple says they are not qualified anymore.
Thanks in advance!
OK, you have to be really careful with this step! If you pry too hard, the little plastic clamp that holds the cable will come up too far and break, and then you are ****ed. It only needs to be raised millimeter or two, but at first, it doesn't move at aIl, so it is easy to pry upwards too hard. I have found that using angled tweezers while VERY GENTLY prying upwards on both sides works best. But still, BE VERY CAREFUL AND GENTLE! It's also easy not to even know that it is up all the way! So every now and then try gently lifting the ribbon cable to see if it is already released.
-
-
-
Levanta el disco duro con una mano para poder acceder a la cinta de auriculares debajo.
-
Usa un spudger para voltear la lengüeta de plástico que sujeta la cinta de auriculares en su lugar. La pestaña girará 90 grados hacia arriba, liberando el cable plano.
-
Desliza la cinta naranja del conector para auriculares fuera de su conector.
-
El panel posterior ahora está suelto del iPod.
-
-
-
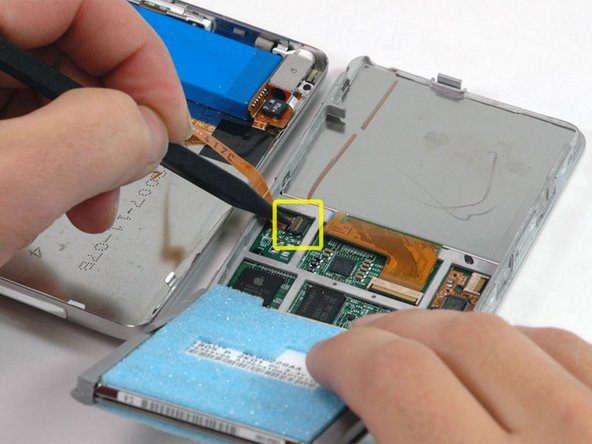
Girar el disco duro hacia fuera del framework y posicionarlo de tal manera que el conector se quede mirando hacia arriba.
-
Utiliza un spudger de plástico para levantar la lengüeta de plástico que sostiene la cinta naranja del disco duro La pestaña girará 90 grados, liberando el cable plano.
To be clear, the plastic tab to be flipped up is the SMALL BLACK piece shown vertically in the photo above. The spudger is pointing directly to it. The tab flips TOWARDS the ribbon. While the picture is correct, this wasn’t obvious to me.
Thanks for the feedback! I will adjust the wording to clarify this.
-
-
-
Retira los tres tornillos Phillips que sujetan el panel frontal al marco de metal.
See here, it’s a PH00.
-
-
-
Trabaja con cuidado alrededor de los bordes del iPod para separar el panel frontal del marco de metal gris.
I would suggest prying with a tool on one of the lips that holds the front place on, but do NOT pry on one near the LCD screen or you may damage the screen. Also, don't forget there is an extra small latch on the top of the LCD that has to be loosened too.
I pressed gently on the click wheel on the play botton side first to help unlock the glue. Keep away from the screen side best you can.
After reading all your warnings and how risky it is to damage my IPOD I don’t dare to replace the display which got out of light and I no longer see the text. I planned to send for a new but it seems like the possibility to succeed without damaging the IPOD is less than succeeding. It is really a pity since I love it snd have so much good music saved to it. I usually fix my damaged apparatus but this seems more orf ess impossible after reading the text. I am really sad/devastated!! :
-
-
-
Usa un spudger para levantar la pestaña de plástico que sujeta la cinta naranja de la pantalla en su lugar. La pestaña girará 90 grados hacia la pantalla, liberando el cable plano.
-
-
-
Levanta la placa posterior de metal de la pantalla LCD hacia arriba y hacia afuera de la pantalla.
-
Queda la pantalla.
thank you for showing us it realy helps
Hi, I need to replace my LCD (on my IPOD CLASSIC, 160 GB) but when I see that it is classified as a “VERY DIFFICULT” operation I do get scared. I am not a complete novice (I do exchange computer parts and mend electrical lamps, exchange the electrical parts e t c) but I am scared not to be able to get the IPOD together again after removing the disk e t c. You don’t describe the reassembling steps, how the LCD is exchanged, the disk put back in place e t c. When you do something the first stome you can’’t get info enough. I would like to see more steps after step 34. Until then, the info is superb! :)
Hi janeossowicki,
i did change my ipod screen by my self, i was afraid at the begainig , but its okay.
i filmed the change steps and upload it to youtube to help others.
you may see the videovia this link :
am sorry that i speak arabic in the video but you still can see and know how.
good luck
The display panel is very delicate because it uses aluminum foil as the back reflector (for thinness). If you press too hard on the face or twist the frame even slightly, you can permanently damage the display. Ask me how I know. Be very careful at this step.
-


Antes de cerrar la carcasa, asegúrese de probar el dispositivo para asegurarse de que funciona correctamente.
Para volver a armar tu dispositivo, sigue estas instrucciones en orden inverso.
Antes de cerrar la carcasa, asegúrese de probar el dispositivo para asegurarse de que funciona correctamente.
Para volver a armar tu dispositivo, sigue estas instrucciones en orden inverso.
Cancelar: No complete esta guía.
101 personas más completaron esta guía.
Un agradecimiento especial a estos traductores:
100%


Estos traductores nos están ayudando a reparar el mundo! ¿Quieres contribuir?
Empezar a traducir ›

8 comentarios
If you damage the LCD FPC, do not throw away! I can replace it. The part is not sold so I have to rely on my iPod salvage yard! If you have a classic dead board, I will pay $15 for the board. THe board is used for salvage purposes. If you need the LCD FPC, Battery FPC, hard drive FPC replaced, headphone jack FPC replaced, email me at zfixit.com. I can repair these parts but again, parts are not sold. iPod has to have been working before! No dead iPods that you bought on eBay or craigslist .. fee will still apply! You can check out my contact pages at bustedApple.com and zfixit.com and contact me through there! Price to replace any FPC is $45 + shipping shipping + tax if you reside in Texas. $25 labor fee applies if my work does not bring back to life as it should or the full $45 ++ fee if successful. I can replace the part but other issues with iPod are beyond my control .. so be sure you are original owner with 1st hand knowledge as to the working state prior to FPC damage!
The 6/7th Gen iPod Classic is very hard to open without damaging the chrome back or clips... You may ruin your device. The ifixit tutorial is not the best, I can open in exactly 30 seconds .. their method seems to take an eternity! If you are lucky, you may succeed but really, these devices should be opened by seasoned professionals. Small price to pay so that you have a working iPod after the repair!
hi how can i replace the lil black bit that holds the screen when connected i got spare off old board but cant seem to fit it pls help email me
Before opening my iPod for the second time, I purchased a back cover. very good idea and it is not expensive saves me a lot of trouble getting the cover back because i ruined the clips. I had to transfer the battery, the jack and the switch and the little black frame for the usb cable. The rest went well. Thanks
Instructions guided me to a fine fix of my screen. I had little trouble in separating the front and rear panels. Interestingly, my unit was missing the LCD metal backplate shown in the directions. But all works well now, thanks.
Sehr gut beschrieben, vielen Dank. Mein Ipod Classic hat jetzt ein 2. Leben.
If you're meticulous, the job can perfectly be done, without any of the recommended tools. I hadn't the time to order them, so I opened my iPod with the large blade of my Victorinox swiss army knife. By just following the instruction I succeeded in releasing all of the metal tabs all around the iPod, and didn't damage any of them. You can clearly hear them "declipsing". I think the blade of the Victorinox is thiner than the putty knife, the only thing you have to take care of, is not to cut the black or silver painting of the front of the case, but if you are used to cut with a knife, you should succeed. Just be aware that it is however a difficult job !
jcfsystems - Contestar
Thank you for these instructions - my dead iPod classic (that died whilst attached to an ipod dock during a heavy thunderstorm which took out the dock too) is now working again. Opening the case took me 40 minutes and 7 plastic case openers not to mention very sore hands but the rest of the process worked fine. thanks again
Stuart Hutchesson - Contestar
Opened it up with MANY super thin nylon guitar picks in less than a minute starting from the two tabs on the bottom - I used the putty knife in my shop for wood filler and patching walls :)
cmguitar - Contestar
Appreciated the earlier comment about using guitar picks. It is waaaaaay easier to open the iPod with guitar picks. It still requires patience sometimes, but no noticeable damage to the iPod. Went to the local music store, they stocked Fender picks. Fender "Thin" work best for me for starters, but sometimes Fender "Medium" are needed. (Go to your local music store-- very cheap!) I have opened (and repaired successfully!) four different iPods just using guitar picks.
Novice iPod Repair Guy - Contestar