Saltar al contenido principal

iPhone 6s Battery Replacement

Guía Archivada
Esta guía se mantiene únicamente para fines históricos. Utiliza la última versión de la guía para llevar a cabo tu reparación.

Qué necesitas

  1. iPhone 6s Battery Replacement, Battery Connection: paso 1, imagen 1 de 1
    • Power off your iPhone before beginning disassembly.

    • Remove the two 3.4 mm Pentalobe screws surrounding the Lightning connector.

  2. iPhone 6s Battery Replacement: paso 2, imagen 1 de 1
    Herramienta utilizada en este paso:
    iSclack
    $24.99
    Comprar
    • If you don't have an iSclack, use a single suction cup to lift the front panel:

    • Press a suction cup onto the screen, just above the home button.

    • Be sure the cup is pressed securely onto the screen to get a tight seal.

  3. iPhone 6s Battery Replacement: paso 3, imagen 1 de 3 iPhone 6s Battery Replacement: paso 3, imagen 2 de 3 iPhone 6s Battery Replacement: paso 3, imagen 3 de 3
    • There is a notch on the underside of the display just above the headphone jack that is the safest place to begin prying the phone open.

    • Pull up on the suction cup to slightly separate the front panel assembly from the rear case.

    • Take your time and apply firm, constant force. The display assembly is a much tighter fit than most devices and is held down with adhesive.

    • Once a small gap has been opened, insert the flat end of a spudger above the headphone jack.

  4. iPhone 6s Battery Replacement: paso 4, imagen 1 de 2 iPhone 6s Battery Replacement: paso 4, imagen 2 de 2
    • Twist the spudger to open the gap more and break it free from the adhesive.

    • Keep pulling up on the suction cup while twisting the spudger.

  5. iPhone 6s Battery Replacement: paso 5, imagen 1 de 2 iPhone 6s Battery Replacement: paso 5, imagen 2 de 2
    • Use the edge of a spudger to slice through the adhesive on either side of the phone.

  6. iPhone 6s Battery Replacement: paso 6, imagen 1 de 2 iPhone 6s Battery Replacement: paso 6, imagen 2 de 2
    • Use the edge of a spudger to slice through the adhesive on either side of the phone.

  7. iPhone 6s Battery Replacement: paso 7, imagen 1 de 3 iPhone 6s Battery Replacement: paso 7, imagen 2 de 3 iPhone 6s Battery Replacement: paso 7, imagen 3 de 3
    • Use the suction cup to open the display, breaking the last of the adhesive.

    • Don't open the display more than 90 degrees, as it is still connected at the top by three cables that may break if stretched.

  8. iPhone 6s Battery Replacement: paso 8, imagen 1 de 1
    • Lean the display against something to keep it propped up while you're working on the phone.

    THESE INSTRUCTION / GUIDE IS NOT COMPLETE. I broke my phone and ended up with $250 in repairs at the local cell phone store at this step. You need to detach the display completely instead of prop it up against a box. It is very likely your cables will tear at this step if you don’t completely detach the display

    Christopher Kuhar - Contestar

  9. iPhone 6s Battery Replacement: paso 9, imagen 1 de 1
    • Remove the following screws from the battery connector bracket:

    • One 3.0 mm Phillips #00 screw

    • One 2.3 mm Phillips #00 screw

  10. iPhone 6s Battery Replacement: paso 10, imagen 1 de 1
    • Remove the metal battery connector bracket from the iPhone.

  11. iPhone 6s Battery Replacement: paso 11, imagen 1 de 3 iPhone 6s Battery Replacement: paso 11, imagen 2 de 3 iPhone 6s Battery Replacement: paso 11, imagen 3 de 3
    • Use the flat end of a spudger to disconnect the battery connector from the logic board.

    • Push the connector to the side to ensure it doesn't accidentally make contact and power on the phone while you're working on it.

  12. iPhone 6s Battery Replacement, Battery: paso 12, imagen 1 de 3 iPhone 6s Battery Replacement, Battery: paso 12, imagen 2 de 3 iPhone 6s Battery Replacement, Battery: paso 12, imagen 3 de 3
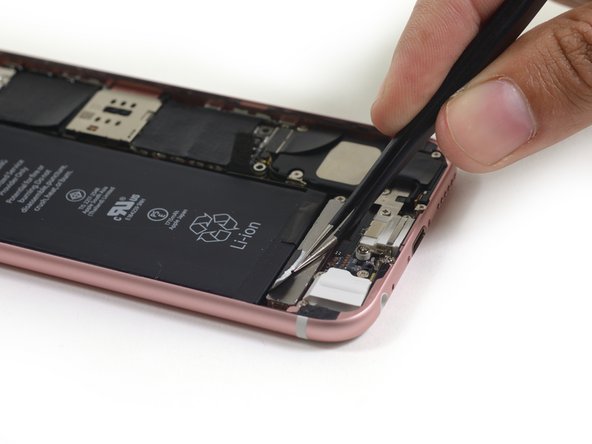
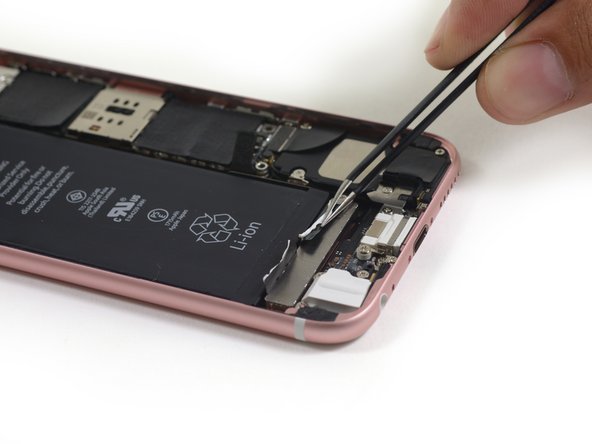
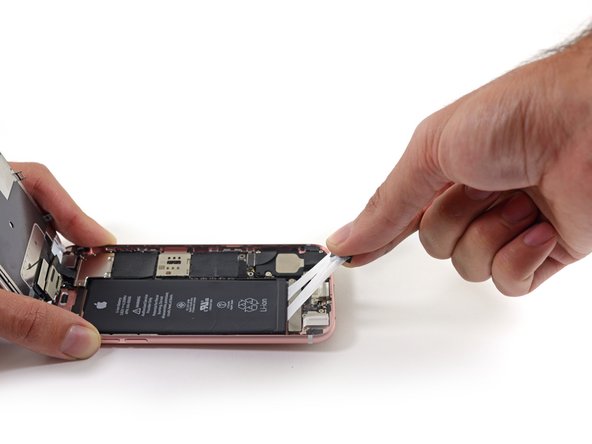
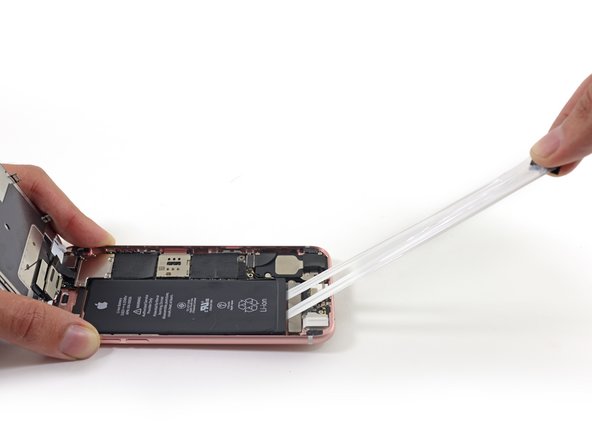
    • Use tweezers to peel up the edges of the two adhesive strips at the bottom of the battery.

  13. iPhone 6s Battery Replacement: paso 13, imagen 1 de 1
    • Grab the ends of the two adhesive strips and hold them together. Try to keep the strips flat and wide.

  14. iPhone 6s Battery Replacement: paso 14, imagen 1 de 3 iPhone 6s Battery Replacement: paso 14, imagen 2 de 3 iPhone 6s Battery Replacement: paso 14, imagen 3 de 3
    • Slowly and gently pull the two strips up and away from the phone.

    • The strips will stretch to many times the length of the battery—keep pulling until they come out from between the battery and the rear case.

  15. iPhone 6s Battery Replacement: paso 15, imagen 1 de 1
    • Remove the battery from the rear case.

    • When installing the battery, refer to this guide to replace your battery's adhesive strips.

    when I remove battery can I again uset

    Mohammed Alhussain - Contestar

Conclusión

To reassemble your device, follow these instructions in reverse order.

75 personas más completaron esta guía.

Sam Goldheart

Miembro Desde 10/18/12

465,608 Reputación

538 Guías creadas

Equipo

iFixit Miembro de iFixit

Staff

135 Miembros

16,731 Guías creadas

11 comentarios

Quickkkkkkkkkkk Question. How do I go about replacing that adhesive you had me slice?

Doc Brown - Contestar

I need to buy the 6s replacement battery itself as well as the tools. Do you sell that as well as the display?

2ndwindranch - Contestar

i remember i get my battery repair kit and adhesive for less than 25$ from this seller on amazon https://www.amazon.com/dp/B01LKN9AUG

exdany9 -

Please do a video. Lets see how fast you guys can change the 6s battery.

klactwiggy - Contestar

nice very repair mizan.....

mohsen m - Contestar

Phone fell in water

matouq - Contestar

Do the 6 and 6 s have the same battery???

Cashmand - Contestar

If your phone is under the 'necessary recall] battery replacement be aware that Apple will give you quite a run around requiring at least two perhaps three trips to the apple store to effect repair.

WhyMeLord - Contestar

What if I didn't get all the adhesive out from under the battery?!

Margo Christianson - Contestar

Very nice and helped me a lot. Thank you.

krakkoandras - Contestar

Success. I got one adhesive strip to come out in one piece. The 2nd one snapped in half. I had to do the pry-of-shame, but once I could see the adhesive underneath the battery, I was able to grab it with the angled tweezers, and pull the rest of it out. Wow it’s a lot easier to remove the battery if you get both adhesive strips out in one piece each! I left the screen attached during the battery replacement, so I only removed the batter connector cover. Helps to have a 2nd person hold the screen so you don’t damage the connectors.

ericrose62 - Contestar

Agregar Comentario

Ver Estadísticas:

Ultimas 24 horas: 0

Ultimos 7 días: 2

Ultimos 30 días: 6

Todo El Tiempo: 68,699