Introducción
Utiliza esta guía para sustituir el conector Lightning y el cable del puerto de audio de tu iPhone 5c. Si has probado cleaning the lightning port en vano, sustituir el conector Lightning puede solucionar los problemas de carga y conectividad.
También puedes utilizar esta guía como referencia a la hora de sustituir la junta del micrófono.
Qué necesitas
Resumen del Video
-
-
Si tu pantalla está rota, evita que hayan más desperfectos o que sufras algún accidente con las piezas rotas colocando cinta adhesiva sobre el cristal de la pantalla.
-
Coloca varias capas de cinta adhesiva transparente sobre la pantalla del iPhone hasta cubrirla completamente.
-
-
-
Apaga tu iPhone antes de empezar a desarmarlo.
-
Separa los dos tornillos Pentalobe P2 de 3.8 mm en ambos lados del conector Lightning.
to keep screws in order, buy some double sided tape and then affix the tape in small pieces to a sheet of paper. As you take the screws out, you can affix them to the tape (which is on the paper) and then write a description of what they are and where they go. quick, cheap and easy.
I found that these screws did not remove easily. After turning several times and feeling the threads drop back, indicating they were loose, the heads did not extend far enough to grip with my fingernails to pull out. I had to use the tweezers and then it took a bit more force than expected to remove them.
My iPhone 5c has P1 Pentalobe screws, not P2. This guide caused me to buy wrong tools so I thought I would share my experience. Perhaps they vary.
@codycraven01 These guides are created using iFixit tools, and P2 is definitely the correct driver. If you’re using tools you bought somewhere else, then yes, results may vary.
-
-
-
Cierra el agarre del iSclack, abriendo las mandíbulas succionadoras.
-
Coloca la parte inferior de tu iPhone entre las ventosas, apoyándolo en el tope de plástico.
-
La ventosa superior debería estar colocado un poco por encima del botón de Inicio.
-
Abre las palancas para que las mandíbulas del iSclack se cierren. Centra las ventosas y presiónalas firmemente sobre la parte de arriba y de abajo del iPhone.
I just replaced my iPhone 5C battery today and only used the I fix it repair kit that came with the suction cup. Getting the glass screen out was not too difficult as I used a little bit of upward motion on the suction cup while at the same time prying gently with the flat end of the opening tool at the same time. If you have two people it makes it a little easier as someone can hold the phone. After getting the end open, I was able to go around the perimeter and gently pry up the edges with very little trouble.
Experienced immediate problem: there is s strap going from the home button to the screen, about 1-1/2 inch long. After removing 3-4 screws I saw no way to disconnect it from either end. My daughter came to help get the screws back (my 70 years have problems with very tiny screws). Slid a piece back and the strap came free of the home button ares. Screen could only open then 75-80 degrees. Tapr tore. Pried battery out. Replaced on original sticky tape. Restarted fine and about to recycle the charge. Thanks for the kit and all. But 6 demos and 3 inatructions never mentioned this strip! So careful opening it up, please!!
@mikamazn What you’re describing sounds like an iPhone 5s. This guide is for the 5c. Glad to hear things worked out for you.
-
-
-
Agarra tu iPhone con fuerza y cierra las palancas del iSclack para separar las ventosas, separando así la pantalla de la carcasa trasera.
-
El iSclack está diseñado para abrir tu iPhone lo suficiente para separar las piezas, pero no tanto como para dañar los cables internos.
-
Ignora los siguientes tres pasos y continúa hasta el Paso 8.
-
-
-
Presiona una ventosa sobre la pantalla, justo por encima del botón de Inicio.
cool i diden't now
very, very difficult to get a tight seal on tape. I removed the tape and still can't get a tight seal.
-
-
-
Mientras agarras tu iPhone con una mano, empuja hacia arriba la ventosa con la otra mano para separar ligeramente la pantalla frontal de la carcasa trasera.
-
Con una herramienta de apertura de plástico, empieza a abrir empujando y separando lentamente la carcasa trasera de la parte frontal, a la vez que sigues tirando de la ventosa.
Be sure not to use metal pry tools as they may crack the plastic.
-
-
-
Levanta el extremo del botón de Inicio de la pantalla para tener acceso a los conectores que hay en la parte superior del teléfono.
-
Abre la pantalla hasta que forme un ángulo de unos 90º, y apóyala sobre algo que la mantenga en posición mientras trabajas en el teléfono.
-
Si no se te ocurre qué usar, haz lo siguiente: usa una lata de refresco sin abrir para mantener la pantalla.
-
Coloca una banda elástica de goma para que la pantalla quede fija a la lata mientras trabajas. Esto evitará que torsiones los cables de la pantalla.
I use an old iPhone box to support the open phone. Set the box up on its end, and rubber band the screen side to the box. It works perfectly!
What do I do if it’s a little sticky and dirty inside?
-
-
-
Separa los dos tornillos Phillips #000 de 1.6 mm que mantienen el soporte del conector metálico de la batería unido a la placa lógica.
These screws are very tiny and hard to manipulate. The screwdriver is magnetic; which is great to take them out, but makes it hard to put the screws back in, as the screwdriver pulls them from the hole. I solved this problem by using the pointed end of the spudger to put a tiny drop of Elmer's glue in the hole and then insert the screw. You can do this before putting the bracket in place if you want. Then the screw wont pull out by the magnetic driver and make lining up and fastening the screws much easier; at least for me!
I found that you don't need to disconnect the battery... why bother doing more fiddling with annoyingly tiny screws and obstinate cable connectors when you don't actually have to? Especially when you could only end up causing more damage. As a matter of fact, the original iFixit video didn't bother to disconnect the battery either, but they've since updated the video to include battery disconnection, I guess as a "belt and braces" approach in case the repair-hero forgets to power down the phone first?
Disconnecting the battery is a safety precaution, and yes it's worth doing. Even with the phone powered off, there is some danger of blowing the backlight filter fuse if you disconnect the display while the battery is connected. At that point you're no longer looking at a simple DIY repair. Even though it's possible to skip this step and still come out okay, my advice is not to risk it.
It’s a relatively junky phone, so if it breaks, what the heck. I’m not going to disconnect the battery.
-
-
-
Utiliza la parte plana de un spudger para cuidadosamente hacer palanca sobre el conector de la batería y desconectarlo de su enchufe en la placa lógica.
Instead of using a spudger, you can use your fingernails too. This is quicker and enables you to feel if you're not accidentally putting on too much pressure or lifting the connector instead of the cable.
Accidentally pulling out the logic board socket is no idle warning - exactly what I did without much effort. I think this shouldn’t be described as ‘prying’ up because it implies needing to use force - but these things actually pop off quite easily with a nudge, which you discover at later steps.
-
-
-
Quita los siguientes tornillos Phillips #000 que mantienen conectados el enchufe del cable de la pantalla a la placa base:
-
Dos tornillos de 1.3 mm
-
Un tornillo de 1.7 mm
-
Un tornillo de 3.25 mm
I didn't need to remove the front panel to replace the lightning connector. Just prop it up like in Step 8, then skip steps 12-16.
I always put my screws in a magnet tray and place the screws in the exact position they were taken out. The magnet tray holds the screws tight in the position I put them in. No chasing on the floor looking for small screws that you brushed off the table.
I always take a picture of the phone, print it out, then use scotch tape to tape the screws onto the picture in the location where they go. You don't lose the screws and you always know where they go for re-assembly
good tip! but instead of taking & printing a picture of your own phone, you probably could just print the color coded pic from this step (assuming everything on your phone is exactly the same).
When reassembling, the screw holder that the screws screw into came off the board. Is there a way to superglue that back in?
no, do not use super-glue. Quite some of these ‘screw-holders’ are screws themselves with e hollow tread in the head (didn’t find the correct naming for it) - just like the things you screw into a PC case and fasten the mainboard on.
did NOT remove the front entirely. its not necessary to do this to remove the battery. these are only precautionary steps in case your clumsy or you feel you might not be able to manage it without. as always, be cautious.
Agree. Step 12 is unnecessary if one is extremely careful.
*warning* … this connector assembly is very messy to re-build. Next time I change such a battery, I’ll try to get it out carefully *without* detaching the display unit. My resumée: *never* unscrew more things than necessary. These things are not M five (5 mm bolt diameter) like on a bike, these are M zero-point-five. Even for a smirf, this is tiny stuff.
Hi Ali,
You can choose to not remove those screws and still be able to take the battery out. Be very careful supporting the display, or you may tear the display cables and damage your screen.
-
-
-
-
Usa una herramienta de apertura de plástico o una uña para desconectar la cámara y el conector del cable del sensor.
You might get a more “modernised” part from eBay (for this very model, iPhone 5c) which has an ENTIRE CABLE missing… if you look closely, it’s been re-directed into the middle cable. And it all works perfectly, touch screen, and display. So it’s a optimisation.
In summary - if you get this version of the screen, you only need to deal with 2 cables, not 3. The rightmost socket will remain empty.
-
-
-
Usa una herramienta de apertura de plástico o tus uñas para desconectar el cable LCD.
I replaced the broken front panel of the iPhone 5c and got the "famous white stripes" on the new screen. Reading about all kind of problems that the lcd/digitizer cable contacts may cause, I compared the cable connectors of the original Apple and the replacement part I bought online with a 35x magnifying glass. The quality difference was visible: The white description on the original part on the cable next to the connector is: 821-1784-A, while the inferior replacement part is: 821-1784-02. Check out the two numbers online and insist getting the "A" to avoid future troubles !!!
This person above is not knowledgeable. That number is a camera proxy part number, not the lcd or digitizer number. It changes with production date, both for original and aftermarket ones. A, B, D, 02, 04, 08 etc. Can all be either or.
vince -
Apple uses numerical revisions (-02) for pre-production parts, and alpha revisions (-A) for production revisions. It looks like you got a preproduction assembly, or a knock-off.
There are, in fact, three connectors in this step, not two. The front-facing camera and digitizer connector (Step 11) is really difficult to align when you put it back. Took me about 15 minutes before I succeeded.
Now I have a different problem. Everything works just dandy, EXCEPT:
Towards the bottom of the screen (in portrait) there is a horizontal line that is dead to the touch. For example, on the keyboard, I can use the spacebar, but not C V B N M, etcetera.
Three possibilities in my mind: One, when I dropped it, something else besides the glass and digitizer, etc, was damaged.
Two: I did not replace the cables correctly. This seems unlikely. They all "clicked" into place and stayed there.
Three: The digitizer supplied is faulty.
Comments? Which cable/connector could be causing this -- if it is that?
Take apart, Clean Connections, Put back together.... If same problem sounds like a fault part...
duston -
When reassembling the iPhone 5c, I used the flat end of the spudger to press on the connectors and maintain them while replacing the front panel on the body of the iPhone.
The third and "deepest" connector no longer slips out of its socket, which it did before holding the whole lot with the spudger.
If the ESD plate covering the connectors is properly re-attached to the phone, you should not have to do this. The cover holds all the connectors in place just fine.
iBroke -
I replaced the display assembly to resolve an issue with the phone not responding to any touch input. I assumed it was a bad digitizer. However, I have the same problem with the new display assembly—no touch response at all. The phone starts up fine and the screen works, I just can’t “slide to unlock”. This is also preventing me from downloading photos from the phone since I can’t enter the passcode. I have cleaned the connections and reseated the cables. Is it possible this is a problem on the logic board? If so, is there any way to get the photos off the phone since I can’t enter the passcode on the screen?
-
-
-
Separa la pantalla de la carcasa trasera.
-
-
-
Desliza la punta de un spudger entre la batería y el jack del auricular para desdoblar la tira adhesiva de la batería.
I didn't need to remove the battery to replace the lightning connector assembly. Skip past steps 17 through 25.
I agree, waste of time and you risk damaging the battery if the adhesive is too strong.
I also didn't need to remove the battery to replace the lightening cable. I'd say skip it unless you have big fingers, because it is a tight space.
The adhesive tab has a small extension tab with a hole in the end closest to the ear phone jack. If you stick the tip of your spudger through it, you can use it to lift one end and get you started.
-
-
-
Tira del adhesivo de la batería hacia fuera del teléfono.
It is a must to use a little heat. In my instance I used some hand warmers. My first attempt was with some older ones that didn’t get too hot. I then pulled out some others and using a little bit of time and several hand warmers it seemed to soften the grip of the tape underneath the battery. Using a hair dryer might have been my next step had my hand warmer trick not worked. USE HEAT!!!! It is your friend.
Removing the charging port can make accessing the pull tabs easier.
-
-
-
Corta la tira de adhesivo de la batería entre las dos tirad adhesivas blancas, separándolas.
Use heat beforehand to soften the grip of the sticky double sided tape that is used to keep the battery in place. USING HEAT IS A PREREQUISITE if you want this to go smoother. I also ended up using a little dental floss the come from underneath and then used it to saw back and forth to loosen the grip of the tape. Just take your time and use the magic of heat to loosen the grip.
-
-
-
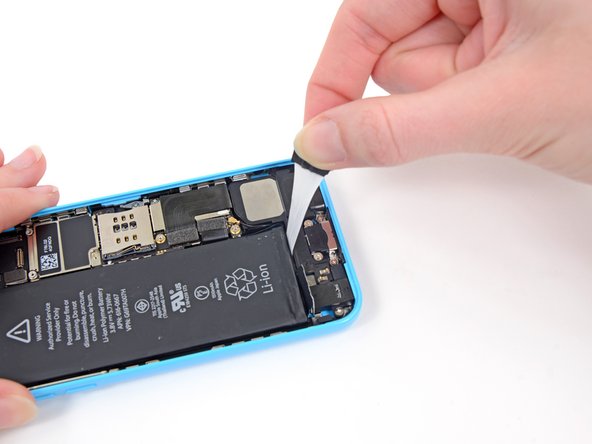
Lentamente tira de uno de los adhesivos hacia fuera de la batería, y hacia la parte de abajo del iPhone.
-
Tira firmemente, manteniendo una tensión constante en la tira mientras va saliendo de entre la batería y la carcasa posterior. Para tener mejores resultados, tira del adhesivo con un ángulo de 60 grados.
-
Guía la tira cuidadosamente alrededor de la esquina y hasta el lado de la batería. Ten cuidado de no engancharla en ningún otro de los componentes del iPhone.
I pulled the first tab straight up and it snapped. I tried to see if I could pry the battery out but couldn't without bending the battery. So I left the battery in and was able to complete this without removing it. However, I'm pretty sure I damaged the battery. Waiting on the replacement battery now to confirm. Long story short, leave the battery in for this fix!
When I tried to remove the adhesive, it snapped on both sides. Even though I was careful not to bend or twist. But now the battery is still stuck in place. What do I do now?
Keep reading; there are some additional steps you can take toward the end of the guide. The battery is much easier to remove if you keep the pull tabs intact, but they can be tricky.
My tabs broke as well, quite close to the battery's lower corners. Then I discovered a reasonably hot surface to place the phone - my quite old Apple Airport Extreme. I warmed the phone for a couple of 3 minute sessions, that didn't loosen the glue but made it more malleable. Then proceeded to carefully pull the tab on the logic board's side with tweezers, which was a success. After that I could get an old ID card under the battery and push the other tab into itself. That done, the glue basically gave out and the battery was free.
So my advice would be to use some sort of heat before pulling on the tabs, which will make them a bit easier to work with. It does take some time but result counts, right?
This is the most awful thing: removing the battery. The adhesive holds sooo strong. I ripped it off very soon. So i heated the back of the iPhone with a hair dryer up and opened the battery with scissors. Then i could draw the battery off.
5c is much better to repair then my last repaired iPhone. A 3gs :-)
Tanx ifixit. You are the best.
I don't thnk we need Steps 9 to 12 to remove the battery
Leave the display attached is you only need to replace the battery !!!
@lmusolino of course you can skip those steps (9-12) but it's risky for those digitizer to be damaged if you are careless while removing the battery.
This was more tricky than I thought. I bent the original battery quite hard to get it of, while blowing the phone with a hair dryer. I fixed two 5c's for my kids and I ordered one kit and a extra battery. I didn't understand when ordering that just one pair of adhesive strips came along, with the kit. I partial them using one strip each on the phones. Hope that it will work. Everything seems to work with the phones.
Don't pull too hard or it will break just gently apply presaure
If u do break the tabs the lift the top end of th battery and get them from that end
the adhesive is very strong and does NOT pull free. you MUST use heat (iopener) or similar to apply heat to it. go slow and when (not if) the adhesive snaps you will have to find a way to shove a spudger or an old credit card under the battery. after that, just rub your finger over the adhesive firmly and “roll” it out. this stuff is really nasty.
Whilst pulling the adhesive strips from beneath the battery, I was making sure to not pull too fast and also to keep in flat, not twisted, and it still snapped on both sides way before I even got half way… I haven’t had my battery replaced at all so the adhesive should be authentic Apple factory standards. Be SUPER careful at this stage people, I’m going to try and remove the battery with the adhesive in place :S
Both my tabs broke immediately with the gentlest tug, as if they were dry and ready to come off. So I heated the back of the phone with warm heat from a hair dryer and was able to push a thin flexible plastic piece (thinner than a credit card but strong enough to be pushed in) under the corner of the battery near its connector. It would go in only so far, so I kept reheating and pushing it in more, moving up the long side of the battery. This works because you’re pushing toward / against the frame side so you can exert enough pressure. You don’t need to pry or lift the battery up (and you shouldn’t anyway because you may damage the components along the side of the battery and/or the battery itself) until it’s mostly loose.
This part was really difficult. After reading other comments, I applied heat right away (I balanced my phone and screen (rubber-banded like in step 8) on top of the iOpener - had to be very careful to keep it balanced). The case-side strip pulled around the battery corner and snapped; the logic board-side strip snapped immediately.
I couldn’t get plastic cards or triangle wedges in far enough to get leverage; I carefully used two spudgers to pry up the bottom of the battery. From there I used tweezers to grab the edge of the logic-side adhesive. It took many tries to grab enough to continue to pull it, but once I had it, I got the whole strip out. Then my battery was loose enough to pry it up and off of the other strip with a plastic card.
It’s definitely easier to get the battery out if you can get the logic board-side strip out. The strips came out easier when I stopped pulling and grabbed the base instead of pulling from the end. I tried to keep the angle as flat as possible but there’s not much room.
Both tabs broke. I tried heat multiple times and alcohol. Based on this step the rating on this repair should be changed to difficult. It is too easy to damage other cables. I’ve damaged some cable but I don’t know which one from the videos. I would say if you get to this point and it doesn’t come up easily after applying heat, go to a professional or risk further damage to other components. It is very difficult to use the card to pry without damaging something.
Now that the phone is reassembled, I can say that what is broken is the touch sensitivity on the screen. The sensory perception is off.
Now that the phone is reassembled, I can say that what is broken is the touch sensitivity on the screen. The sensory perception is off.
THE FLOSS is where it’s at. Heat slowly and work the floss through.
When I (gently) start pulling strips, they both TORN.
After try out (unsuccessfully) different recommendations, it works out the one with (pure) ALCOHOL.
My way was in particularly like that: I take SPUDGER and wet it FLAT-HEAD with alcohol. And start to pry up battery from left side, near middle (there's some more space). Step by step, for a LITTLE bit, deeper and deeper, and EVERYTIME to wet spudger with alcohol. So all way down to bottom, and from the bottom (not from the motherboard on the right, and upper side at all). It takes couple (or more) dozens prying ups. Eventually battery came off, and leave adhesive at the case (removed with alcohol and spudger again).
-
-
-
Repite para quitar la segunda tira.
I was able to remove the first strip as the guide discusses in Step#20. When I attempted to peel the second strip, as in Step #21 above, it broke. This left the adhesive strip on half of the battery and I was unable to grip anything. I got some dental floss and threaded it underneath the already free side. I then used a slight back and forth motion to loosen the grip of the other half of the strip enough that I could "GENTLY" pry the free side of the battery up. Taking extreme care not to pry against any components of the phone. I then gently pried the battery up a little at a time along with using a sawing motion on the dental floss to eventually free the battery from the underlying adhesive strip. Takes patience and persistence. GENTLY being the operative word.
At this step, be VERY careful with the two gold-colored prongs (pins) right next to the lightening cable port. If you crush/bend/collapse these pins, they won’t make contact with the screen side when re-assemble the phone, making your Home button non-functional.
If accidentally collapsed the pin because you pushed on it, be VERY careful bending it back. You have one shot at getting this right. Over-bending leads to the pins breaking off, and then you’re really f’ed. That’s what happened to me, and I had to solder some tin onto the base to build-up to the right height; very tedious.
https://s.real.com/jnjcW3 This shows photo of what I’m talking about.
The adhesive tape snapped on me as well. Tried strong cotton to cheesewire it out, much like the dental floss, but didn’t work, kept snapping. Tried a little heat from hair drier, didn’t help! Had to prise the bottom end up enough to insert very thin metal scaper, approx. 1” wide and slowly force it up . Nerve wracking, but finally came out.
Oops, just seen the next step was to help with this problem!
I did not use the recommended tools, so it’s not the best advice.
-
-
-
Quita la batería de tu iPhone.
Use heat before attempting to remove adhesive strips. They will break. Heat helps tp loosen the grip and is your friend. Dental floss can also be a good helper to saw back and forth once you get it under one corner of the battery. Go slow and take your time. USE HEAT BEFOREHAND. I FOUNF THAT IT TOOK A GOOD 3-5 minutes to get everything hot enough to loosen the grip of the tape.
-
-
-
Aplica unas gotas de alcohol isopropílico (90 % o más) debajo de la batería y déjalo fluir alrededor del adhesivo para ayudar a debilitarlo. El alcohol isopropílico de alta concentración actúa como disolvente y se seca sin dejar residuos, por lo que no dañará tu iPhone.
-
Cuidadosamente, inserta una tarjeta de plástico debajo de la batería desde el lado más cercano a la placa base.
-
Desliza la tarjeta desde la parte superior de la batería hacia la parte inferior, empujando hacia el borde de la carcasa.
A picture of the position of the upper ribbon cable would be useful here. I have falsely thought that you only have to be careful around the top edge of the battery that is near the logic board, and have managed to cut the upper component cable with the plastic card.. :(
The third bullet of this step has a link to two photos of the cable.
I destroyed the ribbon cable that runs down the side of the case toward the headphone jack (not mentioned in the instructions!) while trying to wedge the battery out with a credit card. Am I SOL or is there a fix?
Sounds like you hit the upper component cable mentioned in red in the instructions. “Avoid prying near the top edge of the battery, or you may damage the upper component ribbon cable.” You’ll likely need to replace the cable, or use on-screen accessibility button replacements. If you’d like to post photos to our Answers Forum, you may get more specific help for your situation. Best of luck!
Wow. Good luck removing your battery by this method. The adhesive on mine was impossible to remove, finally the battery foil peeled off, the battery was totally destroyed, and I had to scrape the adhesive off the phone bit by bit. Scary to abuse a lithium battery that way… Destroyed my ribbon cable, too, so now I can spend another $30 and a bunch more time… Wow. Not recommended; impossible to accomplish as described. Battery is not removable. Those adhesive strips are from !&&*. There is no reason to use that adhesive in that location, except to deliberately make the phone non-serviceable. Once the adhesive gets old, it just snaps and heat doesn’t help. Good luck.
Well… That was interesting. I dropped my phone this morning at some weird angle and the housing bent a little. I opened the phone only to reveal a torn battery. The adhesive strips were so old they were impossible to remove even after I removed the exploded battery. Just, wow, I never thought a caseless phone drop + a hot summer day would result in this. What a scary thing to see blue-green chemical flames inside a phone! I’ve never seen this happen with a Note 7 so I thought I’d never see a burning battery, but boy was I wrong!
dental floss works great but needs lots of pressure and heat
-
-
-
Sigue nuestras instrucciones de calentado con el iOpener o usa un secador para calentar el adhesivo que sujeta la batería a la carcasa posterior.
-
Reposa el iOpener plano en la parte trasera del iPhone a la derecha de la cámara. Alísalo para que haya un buen contacto entre la parte trasera del iPhone y el iOpener.
-
Deja que la bolsa se asiente en el iPhone durante aproximadamente 90 segundos antes de intentar quitar la batería.
-
Si usas un secador de pelo o una pistola de aire caliente, calienta la parte posterior del iPhone hasta que esté un poco demasiado caliente para tocarlo.
you can substitute a 'bed buddy' or similar microwave activated heating pack here for the iOpener. i eventually wound up working on-top-of the heading pad as at softened the adhesive. take your time and let the heat work
A hairdryer works too. Aim it at the same spot on the back of the phone, don't let it get too hot though.
Instead of using the iOpener, I opted for my “patented” “Rice in a sock” and heated the sock for 1 minute, which worked perfectly. I laid the heated sock flat and used it as a mini work bench while removing the adhesive strip! My wife uses this for when she has head aches, which caused “me to not have a headache”, when peeling back the adhesive strips!
I always have to do this because the adhesive strips never work because they can’t be pulled out at a flat enough angle. As you heat the back of the case in preparation for battery removal, also load some heat into some kind of smooth, flat metal tool to slide under one end of the battery as you pry it up. This makes for much less prying on the battery and much less chance of damaging it. It also makes for faster removal. The metal spatula tool provided in the fixit Pro Tech Toolkit, Pro Tech Toolkit, (an earlier version of which I use CONSTANTLY and is one of the most used toolkits I have) is perfect for this job.
-
-
-
Levanta y quita la batería del iPhone
-
Adhiere la batería, desconéctala y continúa armando tu dispositivo.
My repair went well. However, the teeny screws were a nuisance putting the parts back. I have relatively large hands, so I used the tweezers. I finally got all of them in, save one. It popped out, and I thought I lost it. Luckily, it was stuck to my hand! The magnetic screwdriver helped, but if it was off a bit it would pull the screw out. Not bad for my first repair. Apple must use elves to assemble their products.
-
-
-
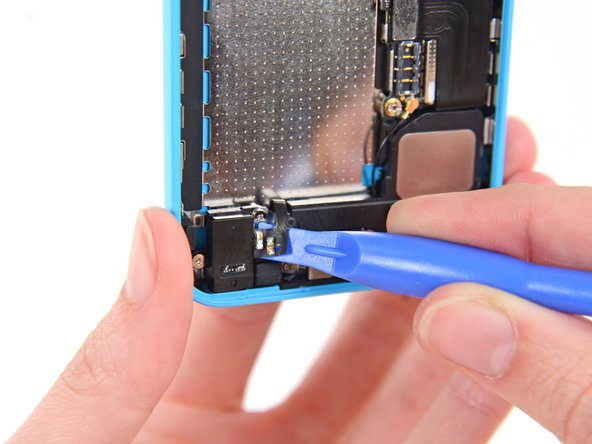
Utiliza una herramienta de apertura de plástico para despegar el cable del muelle de contacto del botón de inicio de la carcasa del altavoz.
-
-
-
Retira los siguientes tornillos que fijan el recinto del altavoz a la caja trasera:
-
Dos tornillos Phillips #000 de 2,7 mm
-
Un tornillo Phillips #000 de 2,2 mm
These screws didn't fit our brand new Phillips #000 at all, but they did fit a J #000 just fine.
The light is not Working if I can get new iPhone 5c if okay with you
-
-
-
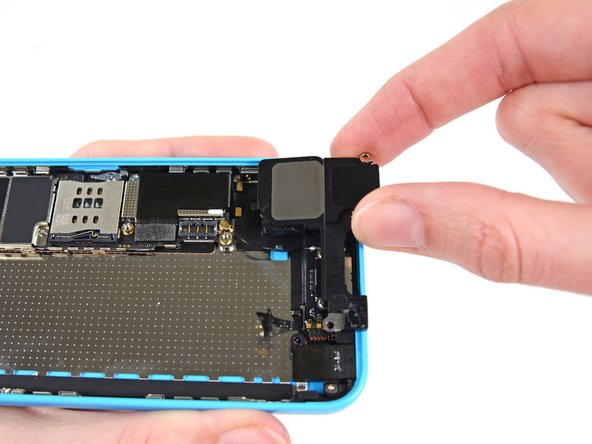
Retira la carcasa del altavoz. Ten cuidado de no engancharlo en el cable de la antena.
I’ve done this twice and still cannot understand why we are removing the speaker before removing the antenna on top of it. It gets in the way, and again when you reverse the instructions when you put the antenna on first and then the speaker… I’ve been swapping those steps instead.
-
-
Why remove this microscopic bracket? That was the hardest part of the whole job. Just keep it on, but alert people to its presence to ensure they don't let it slip off. But putting it back on was a pain.
-
-
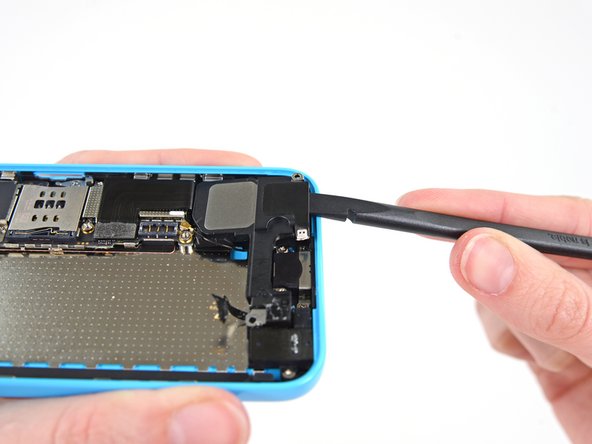
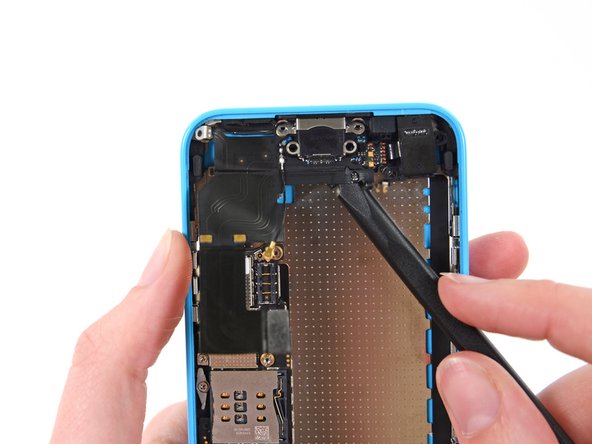
El cable del conector Lightning está ligeramente adherido a un escudo de la placa lógica. Utiliza el extremo plano de un spudger para despegar suavemente el cable.
When reversing this and reseating the new component, you really need to give it a push to lock in. Just touching the connectors will make most of the phone work, but you need to have the connector locked in completely for the home button to activate
-
-
-
Desconecta el conector de la antena del móvil de la base de la placa lógica.
How the !&&* are you supposed to get this back on?! I just can't do it.
I usually hold the connector in place over the socket with a pair of tweezers, and then press it down with the flat end of a spudger.
-
-
-
Retira los siguientes tornillos que fijan el conector Lightning a la caja trasera:
-
Dos tornillos Phillips #000 de 3,4 mm
-
Insertar traducción aquí
-
Un tornillo Phillips #000 de 2,7 mm
The lower left corner (yellow circled) screw has probably "screwed" us - for some reason it just won't start turning. Perhaps some glue under this one, needs heat? Anyone else faced this issue?
I did not when doing this job. The only part that I found had some adhesive was the cellular antenna cable. Perhaps some heat in some cases is necessary, but go easy on it.
Follow Up on this one -- turns out I had loosened the screw already but it got kinda "soft-stuck" and just would not fall out of the hole (or turn any further). I almost stripped it totally but then poked around by trying steps 35-37 in advance, then I found I could turn the screw back inward (clockwise), then back out again, and kind of jimmy it out of the hole to complete the disassembly. I was VERY lucky that it was still usable for the re-assembly with the replacement part.
-
-
-
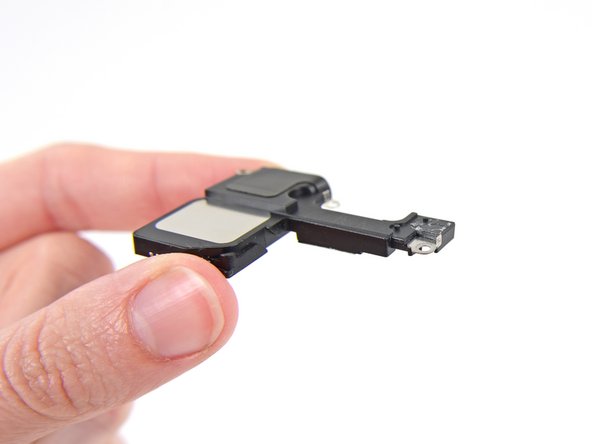
Retira el ensamblaje del conector Lightning.
-
Hay una pequeña junta de goma adherida al micrófono. Asegúrate de transferirla al nuevo ensamblaje.
The microphone gasket is not really a gasket like an O ring, it is a foam box into which you insert a little metal box on the end of the ribbon cable. Be sure you look at the side of the foam box that faces the bottom of the phone. The wider margin is towards the Lightening connector. The metal box goes up into the bottom of the foam box forming an “L” to the bottom of the phone. It is easier than it looks.
Never saw any gasket for the headphone jack.
-


Para volver a ensamblar tu dispositivo, sigue estas instrucciones en orden inverso.
Para volver a ensamblar tu dispositivo, sigue estas instrucciones en orden inverso.
Cancelar: No complete esta guía.
147 personas más completaron esta guía.
Un agradecimiento especial a estos traductores:
100%

¡ Mariana Roca nos está ayudando a reparar el mundo! ¿Quieres contribuir?
Empezar a traducir ›

22 comentarios
I fix it. Tomorrow I was got my packet from ifixit.com with lightning assembly and today my iPhone 5c can charge again.
And I would like to tell you several words about a process:
1. Thanks Ifixit for the tools - pentalope screwdriver and a magnet mat - it was great
2. All was simple with a step by step instructions on site.
3. IMPORTANT!!!! Unnecessary to remove a battery before the Lightning assembly replace - replacement possible without it)))
4. Don't forget to remove a rubber head from an old microphone - new hasn't such part.
5. Don't forget to lay an antenna cable properly when install a speaker back.
6. All the parts are very small - a magnifying glass required)))
7. I was made it for 1 hour )))
THOSE CHANGING JUST THE DOCK CONNECTOR!
Important! Steps 14, 15, and 19 through 28 are totally unnecessary. The SIM card is fine where it is, and the battery does not need to be removed to access everything. I would recommend disconnecting the battery connector while working, however.
Also, be careful with the little antenna where it connects to the dock connector flex. Mine broke off and had to be resoldered, but I bought the part on eBay.
Thanks for your feedback! We went ahead and removed the SIM card steps. It may be helpful to remove the battery in order to get enough clearance to separate the Lightning cable assembly from the rear case, but folks are certainly welcome to skip those steps if they are comfortable doing so. :)
It is certainly not necessary to remove the battery in order to do this repair. I do not recommend following those steps.
Can i replace my iphone 5s motherboard with iphone 5c's motherboard?
The connectors are in different places, plus the 5C does not have a connector for Touch ID. I would say no.
I ruined my battery, without necessity. But that's ok. Allways learning!
Just followed the steps, took me about 2:30 hours (I had to do 2 attempts) but phone is back working 100%
It was difficult cause I have huge hands but this guide is quite good.
As other stated, I didn’t had to remove the battery.
Thanks ifixit
Why do we need a microphone gasket?
Clearly to channel the sound neatly from the outside to the inside of the case with no interference - muffling due to something being in the way, or vibrating of the case direct contact with the mic with nothing to absorb the shock. The mic is very tiny, when you’re working with parts this small, this stuff matters. The clarity of audio you’ve come to expect on phone calls doesn’t happen by magic.
domarius -
The hardest part - to connect back the antenna.. this challenge took the most of the time, everything else is pretty simple. No needs to take off the battery, but making next steps and keep the screen connected - just less comfortable. The guid is really helpful, thank you guys, but it would be even better to add more details and picture of the “small rubber gasket“ mentioned in last step 37, how take it off.. It took a while until I figured out what is it and how it’s mounted.
I always use a bottle of wine and a rubber band to fix the upper part with the screen while working on the bottom part. Removing all connectors could result in connection problems so I avoid this by all means (ruined an iPhone 5s this way).
I also discovered that I didn’t needed to take off the screen protector. It fit that hard to the screen that the removal tool didn’t even cause the slightest bubbles.
Hey everyone,
after the replacement of the Jack and lightning connector I realized that only the right earpod is working, I checked with an other Headphone and the Earpods are working fine with the MacBook, so it has to be in the internals somewhere (and yes I made a fresh install of iOS)
Any suggestions to work this out?
Great guide. Thanks.
I would like to comment that I was able to achieve this replacement without removing the battery. Some care is needed to avoid trapping the tab on the battery adhesive strip whilst refitting the components. I used the largest piece of adhesive protection film from the new part, to allow me to slide first the headphone jack socket, then the speaker assembly, past the battery adhesive tab without crumpling or trapping it. This removes the riskiest step (battery removal) and means that I didn’t need to buy new adhesive for the battery. There is a significant time saving by not needing to detach the screen assembly, which appears only to be necessary to allow the manipulation of the phone, necessary for battery removal.
Removing the battery is 100% unnecessary for replacing the lightning port. Considering how difficult it can be to remove one of these batteries, I’m really scratching my head over why you would have included it in this tutorial. Seems its gonna cause people a lot of extra grief, and might prevent some capable people from undertaking this procedure on the basis of not having proper tools specifically for removing the battery.
My best guess is that they wanted it to be safe, so you don’t puncture it while working with the other parts. But you can easily puncture it trying to take it out, so it really seems unnecessary to include it.
Phone was working but lighting connector was getting worse and worse as was battery. Decided to replace them. Apparently, I should have left well enough alone. Phone doesn’t turn on at all now. Not sure as to why. Retraced steps. Could new battery be bad? Broke tape trying to remove old one so I had to pry out old battery? Not sure if old oneis any good, now. Any way to check voltage on new one?
where did you buy your battery from?
The new headphone jack stopped working when I replaced the lightning assembly. What happened?
I replaced the Lightning Connector Assembly in a second iPhone 5c. The first one went fine. On the second one the headphone jack only plays through the right side of the headphones. I tried connecting multiple headphones that I know work on both sides with the same result. Was there anything I may have done wrong in installing the new Lightning Connector Assembly that may have caused this or is it defective?