Saltar al contenido principal

iPhone 4S Dock Connector Replacement

Qué necesitas

  1. iPhone 4S Dock Connector Replacement, Rear Panel: paso 1, imagen 1 de 1
    • Before you begin, discharge your iPhone battery below 25%. A charged lithium-ion battery can catch fire and/or explode if accidentally punctured.

    • Power off your iPhone before beginning disassembly.

    • Remove the two 3.6 mm Pentalobe P2 screws next to the dock connector.

    • Be sure the driver is well-seated when removing Pentalobe screws—they are easy to strip.

  2. iPhone 4S Dock Connector Replacement: paso 2, imagen 1 de 2 iPhone 4S Dock Connector Replacement: paso 2, imagen 2 de 2
    • Push the rear panel toward the top edge of the iPhone.

    • The panel will move about 2 mm.

  3. iPhone 4S Dock Connector Replacement: paso 3, imagen 1 de 1
    • Pull the rear panel away from the back of the iPhone, being careful not to damage the plastic clips attached to the rear panel.

    • Remove the rear panel from the iPhone.

  4. iPhone 4S Dock Connector Replacement, Battery: paso 4, imagen 1 de 2 iPhone 4S Dock Connector Replacement, Battery: paso 4, imagen 2 de 2
    • Remove the following screws securing the battery connector to the logic board:

    • One 1.7 mm Phillips screw

    • One 1.5 mm Phillips screw

  5. iPhone 4S Dock Connector Replacement: paso 5, imagen 1 de 3 iPhone 4S Dock Connector Replacement: paso 5, imagen 2 de 3 iPhone 4S Dock Connector Replacement: paso 5, imagen 3 de 3
    • Carefully push the pressure contact away from the battery connector until it slides free from its position.

    • Remove the pressure contact.

  6. iPhone 4S Dock Connector Replacement: paso 6, imagen 1 de 3 iPhone 4S Dock Connector Replacement: paso 6, imagen 2 de 3 iPhone 4S Dock Connector Replacement: paso 6, imagen 3 de 3
    • Use a plastic opening tool to gently pry up the battery connector from its socket on the logic board.

    • Place the tip of the tool between the loudspeaker enclosure and the metal cover of the connector, and lift the bottom edge of the connector first.

    • The battery connector comes off vertically from the logic board. Do not apply force sideways.

    • Be careful not to pry at the battery connector socket itself, or it may detach from the logic board. There are four very small solder points awaiting this mistake!

  7. iPhone 4S Dock Connector Replacement, Reassembly tip: paso 7, imagen 1 de 2 iPhone 4S Dock Connector Replacement, Reassembly tip: paso 7, imagen 2 de 2
    • During reassembly, be sure to carefully position the pressure contact back in place. It should rest on top of the Philips screw post shown, and the gold contact should point towards the battery connector.

    • Be sure to clean the pressure contact with a degreaser such as windex or isopropyl alcohol. The oils on your fingers have the potential to create wireless interference.

  8. iPhone 4S Dock Connector Replacement: paso 8, imagen 1 de 2 iPhone 4S Dock Connector Replacement: paso 8, imagen 2 de 2
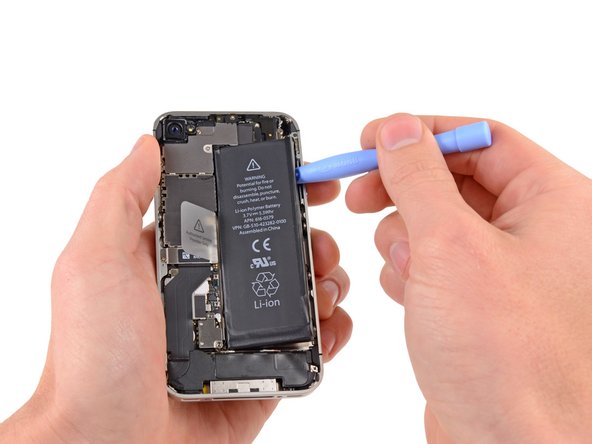
    • Insert the edge of a plastic opening tool between the battery and the outer case near the bottom of the iPhone.

    • Run the plastic opening tool along the right edge of the battery and pry up at several points to completely separate it from the adhesive securing it to the outer case.

    • If the adhesive is too strong, apply a few drops of high concentration (over 90%) isopropyl alcohol under the edge of the battery.

    • Wait about one minute for the alcohol solution to weaken the adhesive.

    • Use the flat end of a plastic opening tool to gently lift the battery.

    • Don't try to forcefully lever the battery out. If needed, apply a few more drops of alcohol to further weaken the adhesive. Never deform or puncture the battery with your pry tool.

    • If there's any alcohol solution remaining in the phone, carefully wipe it off or allow it to air dry before installing your new battery.

  9. iPhone 4S Dock Connector Replacement: paso 9, imagen 1 de 2 iPhone 4S Dock Connector Replacement: paso 9, imagen 2 de 2
    • Use the exposed clear plastic pull tab to peel the battery off the adhesive securing it to the iPhone.

    • Be careful not to pull the plastic pull tab too hard as it can be ripped off very easily.

    • Remove the battery.

    • If your replacement battery came in a plastic sleeve, remove it before installation by pulling it away from the ribbon cable.

    • If your replacement battery came with an uncreased cable, carefully crease the cable into the proper shape before installing the battery into the phone.

    • While installing the replacement battery, temporarily connect the battery connector to the phone to ensure proper alignment. Once the battery is glued in place, disconnect the battery connector.

    • Perform a hard reset after reassembly. This can prevent several issues and simplify troubleshooting.

  10. iPhone 4S Dock Connector Replacement, Speaker Enclosure Assembly: paso 10, imagen 1 de 2 iPhone 4S Dock Connector Replacement, Speaker Enclosure Assembly: paso 10, imagen 2 de 2
    • Remove the following screws securing the dock connector cable cover to the logic board:

    • One 1.5 mm Phillips screw

    • One 1.2 mm Phillips screw

    • Remove the metal dock connector cable cover.

  11. iPhone 4S Dock Connector Replacement: paso 11, imagen 1 de 1
    • Use the edge of a plastic opening tool to pry the dock cable up from its socket on the logic board.

  12. iPhone 4S Dock Connector Replacement: paso 12, imagen 1 de 1
    • Peel the dock connector cable off the adhesive securing it to the logic board and the side of the speaker enclosure.

  13. iPhone 4S Dock Connector Replacement: paso 13, imagen 1 de 2 iPhone 4S Dock Connector Replacement: paso 13, imagen 2 de 2
    • Use the edge of a plastic opening tool to pry the cellular antenna cable up from its socket on the logic board.

    • De-route the cellular antenna cable out from under the metal fingers attached to the logic board.

  14. iPhone 4S Dock Connector Replacement: paso 14, imagen 1 de 1
    • Remove the two 2.4 mm Phillips screws securing the speaker enclosure assembly to the outer case.

  15. iPhone 4S Dock Connector Replacement: paso 15, imagen 1 de 1
    • Remove the small black spacer that was under the Phillips screw near the vibrator.

  16. iPhone 4S Dock Connector Replacement: paso 16, imagen 1 de 3 iPhone 4S Dock Connector Replacement: paso 16, imagen 2 de 3 iPhone 4S Dock Connector Replacement: paso 16, imagen 3 de 3
    • Use a plastic opening tool to lift the speaker enclosure assembly out of the case, being sure not to damage the EMI fingers on the attached Wi-Fi antenna.

    • Remove the speaker enclosure assembly.

    • Before reinstalling the speaker enclosure assembly's screws, be sure the Wi-Fi grounding fingers are installed below the lip in the iPhone's metal case as seen in the third picture.

    • Before reassembly, be sure to clean all metal-to-metal contact points between the grounding fingers of the Wi-Fi antenna and the case of the iPhone with a de-greaser such as windex or isopropyl alcohol. The oils on your fingers have the potential to cause wireless interference issues.

  17. iPhone 4S Dock Connector Replacement, Dock Connector: paso 17, imagen 1 de 1
    • If present, remove the small strip of tape covering one of the dock connector screws.

  18. iPhone 4S Dock Connector Replacement: paso 18, imagen 1 de 2 iPhone 4S Dock Connector Replacement: paso 18, imagen 2 de 2
    • Use a plastic opening tool to flip up the retaining flap on the home button ribbon cable ZIF socket.

    • Be sure you are prying up on the hinged retaining flap, not the socket itself.

  19. iPhone 4S Dock Connector Replacement: paso 19, imagen 1 de 1
    • Use a pair of tweezers to pull the home button ribbon cable out of its socket.

    • There are tiny components on the back side of the ribbon, so be careful not to damage them upon ribbon removal.

  20. iPhone 4S Dock Connector Replacement: paso 20, imagen 1 de 1
    • Carefully pull the rubber microphone holder out of its tube in the bottom edge of the iPhone.

  21. iPhone 4S Dock Connector Replacement: paso 21, imagen 1 de 1
    • Remove the two 1.3 mm Phillips screws securing the dock connector to the case of the iPhone.

  22. iPhone 4S Dock Connector Replacement: paso 22, imagen 1 de 1
    • Remove the tiny rubber spacer near the dock connector.

  23. iPhone 4S Dock Connector Replacement: paso 23, imagen 1 de 2 iPhone 4S Dock Connector Replacement: paso 23, imagen 2 de 2
    • Use the edge of a plastic opening tool to peel the dock connector and its cable off the black plastic case of the iPhone.

    • If you are replacing the dock connector with a new part, make sure to transfer the rubber casing around the microphone. You can do this using a spudger.

  24. iPhone 4S Dock Connector Replacement: paso 24, imagen 1 de 2 iPhone 4S Dock Connector Replacement: paso 24, imagen 2 de 2
    • Pry the dock connector away from its opening at the bottom of the iPhone.

    • Remove the dock connector.

Conclusión

To reassemble your device, follow these instructions in reverse order.

683 personas más completaron esta guía.

37 comentarios

After re-assembling the phone I get searching or very low signal, and the signal that i get is not 3G.

Does anyone have any suggestions?

I have cleaned the connectors and made sure that all connections were tight.

qnc - Contestar

THe #00 screw driver does not work for all screws in the 4S so a smaller one is needed. Wasted my money on that one.

karl - Contestar

When I had changed the dock connector, my iPhone was not able to get a carrier signal. I found an helpful answer in the forum which worked perfectly for me. Make sure you set the correct date and time (after you remove the battery, it will most probably show you 1970) remove the sim card and plug it in again. That worked for me.

corgold - Contestar

I bought the pro tech toolkit and liberation kit and set my work area to the longest one hour of my life. Everything inside the 4s is so tiny and fragile, I was in constant fear of breaking something, but the teardown videos and the comments on this page really help me to get through the entire process.

Thank you everybody and let us continue tinkering our way through all the adversities in this life! Peace!

kinen - Contestar

This guide was perfect! Very detailed and explained everything very well. Only thing I found confusing was step 17, but besides that it went perfectly smooth!

Mason Hollis - Contestar

Agregar Comentario

Ver Estadísticas:

Ultimas 24 horas: 3

Ultimos 7 días: 34

Ultimos 30 días: 136

Todo El Tiempo: 317,378