Esta versión puede contener ediciones incorrectas. Cambie a la última instantánea verificada.
Qué necesitas
-
-
La caja posterior de tu iPhone 4 puede fijarse bien con dos tornillos Phillips #000 o bien con tornillos Apple de 5-Puntos (segunda imagen). Comprueba cuáles tienes y asegúrate de que tienes el destornillador adecuado para retirarlos.
-
Retira los dos tornillos Pentalobe o Phillips #000 de 3.6 mm que están junto al conector para el cargador.
-
-
-
Remueve el único tornillo de 2.5 mm Phillips que asegura el conector de la batería a la tarjeta lógica.
-
-
-
-
Usa la pestaña de plástico clara para levantar gentilmente la batería fuera del iPhone.
-
Si hay solución de alcohol restante en el teléfono, límpialo cuidadosamente o permite que se seque antes de instalar la batería nueva.
-
Antes de reconectar el conector de la batería, asegúrate que el clip de contacto (mostrado en rojo) este propiamente posicionado a lado del conector de la batería.
-
-
Este paso está sin traducir. Ayuda a traducirlo
-
Remove the following two screws:
-
One 1.2 mm Phillips
-
One 1.6 mm Phillips
-
Remove the thin steel dock connector cable cover from the iPhone.
-
-
Este paso está sin traducir. Ayuda a traducirlo
-
Use a plastic opening tool to gently pry the dock cable connector up off the logic board from both short ends of the connector.
-
-
Este paso está sin traducir. Ayuda a traducirlo
-
Carefully peel the dock ribbon cable off the logic board and the lower speaker enclosure.
-
-
Este paso está sin traducir. Ayuda a traducirlo
-
Use a plastic opening tool to pry the lower antenna connector up off its socket on the logic board.
-
-
Este paso está sin traducir. Ayuda a traducirlo
-
Remove the following screws securing the speaker enclosure assembly to the outer case:
-
One 1.9 mm Phillips screw
-
One 2.4 mm Phillips screw
-
-
Este paso está sin traducir. Ayuda a traducirlo
-
Use a plastic opening tool to lift the speaker enclosure assembly out of the case, being sure not to damage the EMI fingers on the attached Wi-Fi antenna.
-
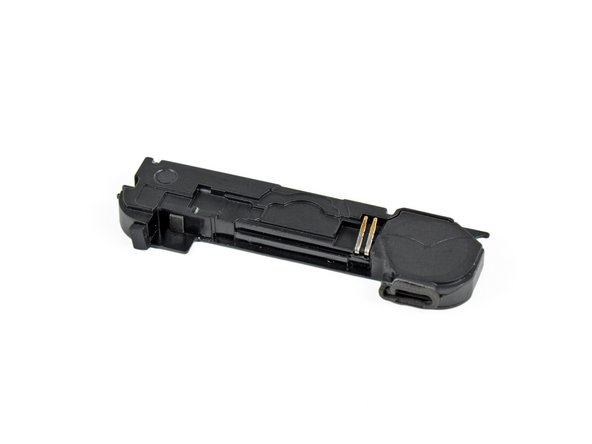
Remove the speaker enclosure assembly.
-
-
Este paso está sin traducir. Ayuda a traducirlo
-
Remove the two Phillips screws securing the antenna to the speaker enclosure.
-
-
Este paso está sin traducir. Ayuda a traducirlo
-
Starting near the cellular antenna cable, use the edge of a plastic opening tool to peel the antenna off the speaker enclosure. Make sure you insert the plastic opening tool under the plastic the antenna is mounted on, not the metal plate.
-
Continue peeling the cellular antenna off the speaker enclosure, being careful not to rip the gold bracket attached to one of its edges.
-
Remove the cellular antenna.
-


Cancelar: No complete esta guía.
179 personas más completaron esta guía.
Documentos Adjuntos

7 comentarios
ребята всё просто и понятно, глаза бояться руки делают! первый раз в жизни разбирал айфон ))) после сборки, всё окей :) процедура заняла 20 минут
Genius!
This is not a mere DIY guide but it is also an ethical handbook. You provide a boost to people's confidence, so that they can overcome their limits, as they are encouraged to overcome those technical barriers that huge companies (such as Apple) would like to be insurmountable. Furthermore, and maybe more important, you aim to reduce waste and excessive use of natural and human resources.
Thanks and Hurrah!