Saltar al contenido principal

Esta versión puede contener ediciones incorrectas. Cambie a la última instantánea verificada.

Qué necesitas

  1. , Cristal roto: paso 1, imagen 1 de 3 , Cristal roto: paso 1, imagen 2 de 3 , Cristal roto: paso 1, imagen 3 de 3
    • Si el cristal de la pantalla está agrietado, mantén la rotura contenida y evita que se produzcan daños corporales durante la reparación pegando el cristal con cinta adhesiva.

    • Coloca tiras superpuestas de cinta de embalar transparente sobre la pantalla del iPhone hasta cubrir toda la cara.

    • Esto mantendrá los fragmentos de cristal contenidos y proporcionará integridad estructural al hacer palanca y levantar la pantalla.

    • Utiliza gafas de seguridad para proteger tus ojos de los cristales que se desprendan durante la reparación.

  2. : paso 2, imagen 1 de 1
    • Retire los dos tornillos Phillips # 00 del extremo del conector de acoplamiento del iPhone.

    • Asegúrese de mantener todos los tornillos organizados como usted está tomando el teléfono aparte. Son de diferentes tamaños.

  3. : paso 3, imagen 1 de 1
    • Retire el mango metálico de la ventosa. Es más fácil y más seguro agarrar la base de la ventosa en lugar del mango metálico.

    • Tenga mucho cuidado al abrir el iPhone para que los cables bajo la pantalla no se corten. Hay una junta de goma entre el bisel frontal de plata y el conjunto de pantalla negro. Se requiere un poco de fuerza en este paso para separar el conjunto de visualización del iPhone.

    • Utilice una pequeña ventosa cerca del botón Inicio para levantar suavemente la parte inferior del ensamblaje de la pantalla del iPhone. Si el ensamblaje de la pantalla está demasiado dañado para permitir que la ventosa se adhiera, puede usarse una cinta con un adhesivo fuerte tal como una cinta de conducto.

  4. : paso 4, imagen 1 de 1
    • El conjunto de la pantalla todavía está conectado al iPhone por varios cables, así que no trate de quitarlo por completo todavía.

    • Gire el conjunto de la pantalla hasta que esté en un ángulo de aproximadamente 45 grados.

  5. : paso 5, imagen 1 de 1
    • Siga sosteniendo el ensamblaje de la pantalla con una mano y use la otra mano y un spudger para desconectar el cable de cinta negro con la etiqueta "1".

    • El cable de cinta "1" está conectado con un conector tipo enchufe. El bloque en el extremo del cable es el enchufe que es simplemente empujado en un zócalo en la placa de circuito. No se utiliza ningún otro mecanismo de bloqueo.

  6. : paso 6, imagen 1 de 1
    • Gire el conjunto de la pantalla hasta que esté aproximadamente vertical. Esto permitirá un acceso más fácil para desconectar los cables restantes.

    • Utilice un spudger para desconectar el cable de cinta negro con la etiqueta "2".

  7. : paso 7, imagen 1 de 2 : paso 7, imagen 2 de 2
    • El cable de cinta "3" se mantiene en su lugar mediante un conector de estilo FPC. Debe desbloquear este conector antes de deslizar el cable de cinta. El mecanismo de bloqueo está en el lado opuesto de donde se inserta el cable - gira 90 grados hacia arriba. Utilice un spudger de plástico para levantar el mecanismo de bloqueo.

    • El cierre de bloqueo de FPC es muy delicado y es típicamente un color diferente al cuerpo del conector. (Ver la imagen detallada del conector FPC abierta y cerrada)

    • Deslice el cable plano del conector y retire el conjunto de la pantalla del iPhone.

    • Es imposible reinsertar correctamente una cinta en un conector FPC a menos que la cerradura esté desconectada. Asegúrese de que el pestillo de bloqueo esté abierto al conectar / desacoplar el cable.

  8. : paso 8, imagen 1 de 1
    • Retire el tornillo Phillips # 00 único de la esquina del ensamblaje de la pantalla.

  9. : paso 9, imagen 1 de 1
    • Retire los dos tornillos Phillips # 00 del lado derecho del ensamblaje de la pantalla.

  10. : paso 10, imagen 1 de 1
    • Gire la pantalla alrededor, y si hay una tira fina de la cinta negra en el borde de la asamblea de la exhibición, cuidadosamente despega para arriba.

    • Mantener la cinta de pegarse a sí mismo puede ser difícil. Recomendamos colocar la cinta sobre un pedazo de papel cubierto de cera (cualquier adhesivo hará).

  11. : paso 11, imagen 1 de 1
    • Retire los tres tornillos Phillips # 00 del lado izquierdo del ensamblaje de la pantalla.

  12. : paso 12, imagen 1 de 1
    • Gire el ensamblaje de la pantalla y vuelva a insertar con cuidado un chavetero metálico entre los dos rieles metálicos a lo largo del borde del conjunto de la pantalla. Gire suavemente el spudger para levantar la LCD del vidrio.

  13. : paso 13, imagen 1 de 1
    • Separar la pantalla LCD y el cristal deslizando el panel LCD lejos de los cables de cinta en el cristal.

  14. Este paso está sin traducir. Ayuda a traducirlo

    : paso 14, imagen 1 de 1
    • This is what should be left after removing the LCD.

  15. Este paso está sin traducir. Ayuda a traducirlo

    : paso 15, imagen 1 de 3 : paso 15, imagen 2 de 3 : paso 15, imagen 3 de 3
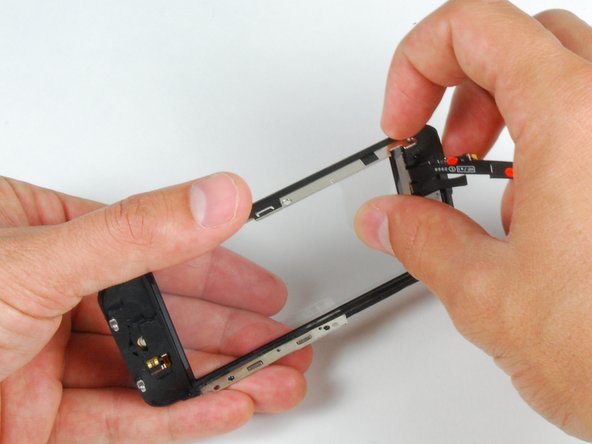
    • Be careful when using a heat gun in the forthcoming steps. Use it at a very low heat setting, and make sure not to melt the touch screen plastics or Home button. The metal frame tends to conduct heat very well so try to avoid touching these hot areas.

    • If the glass has shattered at the top or bottom be especially patient and gentle when removing fragments. In extreme cases you may have to pick off any glass shards that remain glued to the plastics.

    • Using a heat gun or hairdryer, heat the top left area of the touch screen.

    • Use your fingernails to slowly lift up the left corner. The touch screen plastics are held to the touch screen with adhesive. It may take some work to free the corners.

    • If it seems like too much force is being applied to lift the touch screen plastics, try using the heat gun again.

    • Heat and repeat for the right side.

  16. Este paso está sin traducir. Ayuda a traducirlo

    : paso 16, imagen 1 de 2 : paso 16, imagen 2 de 2
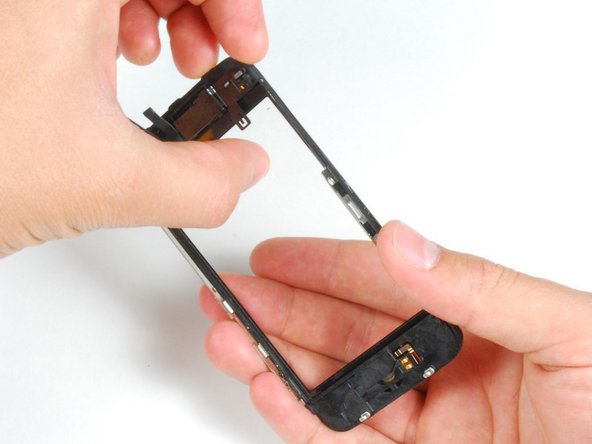
    • Once the top is free, use the heat gun to heat the sides of the touch screen.

    • Use a spudger to free the sides of the touch screen plastics.

  17. Este paso está sin traducir. Ayuda a traducirlo

    : paso 17, imagen 1 de 3 : paso 17, imagen 2 de 3 : paso 17, imagen 3 de 3
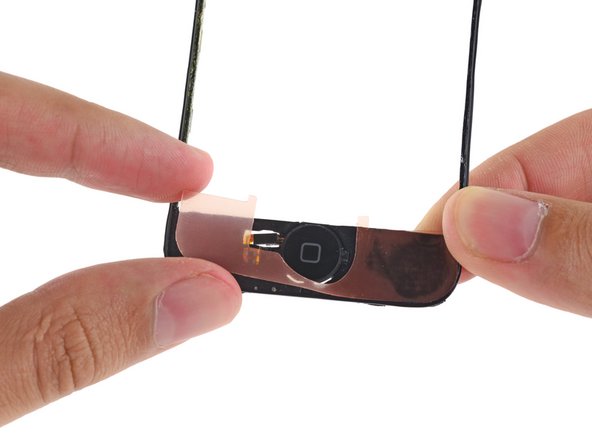
    • Heat the bottom corners with the heat gun.

    • Again, use your fingernails to free the corners.

    • Remove the touch screen plastics from the touch screen.

  18. Este paso está sin traducir. Ayuda a traducirlo

    : paso 18, imagen 1 de 1
    • In order to adhere the new panel, peel as much of the existing adhesive off of the front panel frame as you can.

    • This will ensure a better fit and ensure good attachment of the new adhesive.

  19. Este paso está sin traducir. Ayuda a traducirlo

    : paso 19, imagen 1 de 3 : paso 19, imagen 2 de 3 : paso 19, imagen 3 de 3
    • Place custom fit adhesive strips or double stick tape on the upper area of the front panel plastics.

    • Use the flat end of a spudger to press the adhesive strips to the plastic frame.

    • This will clear out bubbles and ensure good adhesion.

  20. Este paso está sin traducir. Ayuda a traducirlo

    : paso 20, imagen 1 de 3 : paso 20, imagen 2 de 3 : paso 20, imagen 3 de 3
    • Place the second adhesive strip or double stick tape on the home button end of the front panel frame.

    • Run the flat end of a spudger over the strip to stick it down and push bubbles out from under the sticker.

  21. Este paso está sin traducir. Ayuda a traducirlo

    : paso 21, imagen 1 de 3 : paso 21, imagen 2 de 3 : paso 21, imagen 3 de 3
    • Using the tip of a spudger to start, peel the adhesive backings off of the strips on the front panel plastic.

    • The adhesive backing is fairly thin, be sure you are only peeling up the backing and not the adhesive itself.

  22. Este paso está sin traducir. Ayuda a traducirlo

    : paso 22, imagen 1 de 3 : paso 22, imagen 2 de 3 : paso 22, imagen 3 de 3
    • Peel the protective plastic off of the inside of the front panel glass.

    • There are three separate pieces: be sure to peel up the home button piece, center glass piece and the piece under the cables. Failure to peel these up could mean poor adhesion and a murky screen.

    • Try not to touch the inside of the glass to avoid putting fingerprints between the display glass layers.

  23. Este paso está sin traducir. Ayuda a traducirlo

    : paso 23, imagen 1 de 3 : paso 23, imagen 2 de 3 : paso 23, imagen 3 de 3
    • Fold the front panel cables down toward the home button recess to get them out of the way.

    • The cable labeled as "#2" should lay as shown when you merge the two pieces of the front panel.

  24. Este paso está sin traducir. Ayuda a traducirlo

    : paso 24, imagen 1 de 2 : paso 24, imagen 2 de 2
    • Ensuring that the upper cables are folded clear, align the top of the front glass with the front panel frame.

  25. Este paso está sin traducir. Ayuda a traducirlo

    : paso 25, imagen 1 de 2 : paso 25, imagen 2 de 2
    • Press the front panel and front panel frame together, ensuring the the home button ends are aligned.

  26. Este paso está sin traducir. Ayuda a traducirlo

    : paso 26, imagen 1 de 1
    • Firmly press both ends of the phone to ensure the attachment of the adhesive.

Linea de Meta

479 personas más completaron esta guía.

Equipo

iFixit Miembro de iFixit

Staff

136 Miembros

17,430 Guías creadas

17 comentarios

Success! It took me quite abit longer than some of those above, but in under 3hrs, it was complete. I am totally satisfied; the only potential problem I've found is that the rubber originally covering the front panel glass and the front panel plastic on the side--i.e., the rubber filling in the gap between the glass and the metal bevel/bezel?sp?--had been partially destroyed during the repair. Now there are spots at the top and bottom where dust could potentially get into the internals more easily. As it is, I opened my phone and it was extremely dusty, so that if it worked well with that kind of dust, I suppose it'll be alright with some more. Besides, now I know how to open it up and clean it! Thanks iFixit! You saved me $140, which is what Apple would have charged to fix my screen.

ataraxiaone - Contestar

Everything worked except now my home button does not work, help please.

Chelsea - Contestar

Cita de Chelsea:

Everything worked except now my home button does not work, help please.

Is the front panel completely snapped into place? I believe there are some contacts on the front panel that have to touch contacts on the inside of the phone for the home button to work.

bryanboyer - Contestar

I have followed all the steps and the phone has turned on, BUT it wont let me slide to open. HELP!!

sally - Contestar

I'm assuming Sally found the problem to this issue of the phone working but I just had the same problem of no touch screen even though the phone and screen were working otherwise.

Re-open the phone and ensure Cable #2 just isn't attached properly. If this is loose or not correctly connected then the screen will come on but the touch screen won't work.

andrew -

Agregar Comentario

Ver Estadísticas:

Ultimas 24 horas: 0

Ultimos 7 días: 6

Ultimos 30 días: 47

Todo El Tiempo: 680,662