Qué necesitas
Resumen del Video
-
-
If your display glass is cracked, keep further breakage contained and prevent bodily harm during your repair by taping the glass.
-
Lay overlapping strips of clear packing tape over the iPhone's display until the whole face is covered.
-
-
-
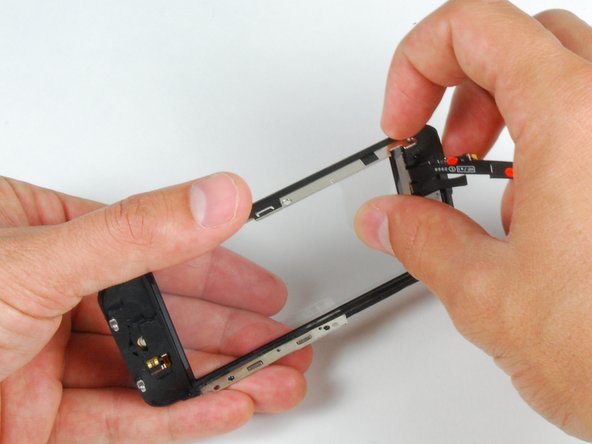
Remove the two Phillips #00 screws from the dock-connector end of the iPhone.
Tip: Stick a piece of double sided tape or regular tape sticky side up, taped down with two smaller pieces of tape on the end to hold it down on your work area to hold the screws. You can also place them on the tape in order you removed them so you remember which ones are which.
-
-
-
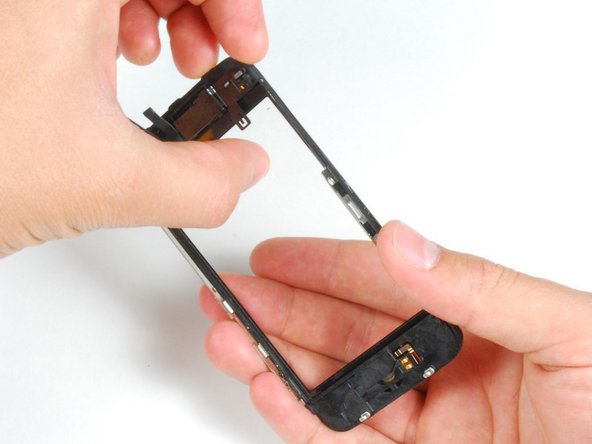
Remove the metal handle from the suction cup. It's easier and safer to grip the suction cup's base instead of the metal handle.
-
Use a small suction cup near the Home button to gently pull up the lower portion of the iPhone's display assembly.
Press the metal spudger between the chrome bezel and the screen, than use the suction cup.
Cita de mauritscassee:
Press the metal spudger between the chrome bezel and the screen, than use the suction cup.
Using a metal spudger might damage the bezel and/or screen. It's definitely doable to separate the two without a metal spudger - I did it myself with no problems - but other iPhone display assemblies may be tougher than the one I took apart.
Hello everyone -- what kind of adjustments, if any, can be made in this step to ensure that the display sits flush with the bezel around all edges when installed? On my iphone, the display is a tiny bit uneven when installed, i.e. the glass is ever so slightly higher than the bezel on the left side, while the glass it just a hair bit lower than the bezel on the right side. Thanks!
Cita de Bespin:
Hello everyone -- what kind of adjustments, if any, can be made in this step to ensure that the display sits flush with the bezel around all edges when installed? On my iphone, the display is a tiny bit uneven when installed, i.e. the glass is ever so slightly higher than the bezel on the left side, while the glass it just a hair bit lower than the bezel on the right side. Thanks!
i had to spend quite a bit of time (30 minutes) on the hair dryer/heat up step to gently heat then gently loosen the adhesive holding the front glass to the rather fragile frame.
after successfully removing the glass (and shards of glass from my broken screen) i also had some clean up to do to remove the excess glue and adhesive from both the top and bottom sections and also the rails. i used the "leaf" end of the metal spudger (not the oar shaped end) for awhile scraping up stray bits but also used a Q-tip dipped in some isopropyl ("rubbing") alcohol which helped dissolve some of the goo left in the corners and the crevices of the rails.
perhaps your screen sits a bit akimbo because you still have some goo in those rails?
I did every step but the screen doesn't work. Phone calls come in and its charging cause I hear the sounds. What might be the problme?
I've done it. The most difficult part was to separate the broken glass from the plastic structure. I've damage the thinner rubber on the top.
Everythig works fine except the GPS. After the repair my gps is not working like it was before. Now rarely gets a constant signal, and the most part the signal is week. Maybe i have damage the antena ?
Any ideas ? It is possible that the adhesives strips can block the signal ?
Thank you very much.
The guide work well with tear down but I have a small problem with the screen fixing with a slight gap ? But the iPhones . How do I fix the gap?
kempc8 -
Hey guys in step two they used a suction cup to remove the screen. Yet my iphone screen is shattered all through out and the cup who stay due to air coming through the glass. Any ideas or work arounds?
Duct tape or 3m double sided tape should do the juob. I had the same problem and solved it with taking a piece of duct tape folding it onto itself and leaving about and inch still undone. I pushed the ens own onto the glass and used the center as a handle. Imagine two capital L's back to back to get an idea of what I am talking about.
Cita de streak1232:
Hey guys in step two they used a suction cup to remove the screen. Yet my iphone screen is shattered all through out and the cup who stay due to air coming through the glass. Any ideas or work arounds?
The number one reason for removing the digitizer and LCD assembly is if the digitizer is smashed. Removing the broken glass from the mid frame is a delicate procedure and can be very tedious and time consuming. The rubber gasket and home button can be easily damaged if you are overzealous with a heat gun. The mid-frame section is now readily available as an orderable spare part and in my opinion you’ll get a much neater, cleaner repair if you replace this part too.
Cita de yosarian:
When reassembling the display and bezel, how should one install the gasket? What happens if the gasket is damaged while the phone is being disassembled? Is there a replacement or some other fix?
All went well, but I should mention that the force required to pull the screen off is much higher than I expected. I kept one hand wrapped around the top of the phone to make sure it didn't fly apart and damage the connectors to the logic board. The other trick is to get the suction cup as close as possible to the button to increase the leverage. In the end I taped over the home button so I could use the suction cup at the very bottom. Keep an eye on it and after a while of constant heavy pressure it should start to separate.
It is easier to separate the glass from the frame at the non cracked/broken end first. I kept my fingers near the end I was heating up - this is a good way to ensure that you are not overheating the plastic. I also used the low setting on the hair drier. This step wasn't too bad, it just takes time and care.
A final tip is there are some small spring contacts behind the home button that look easy to damage. Be careful not to catch these and bend them, especially when working to separate the glass from the frame. If these get broken the home button won't work.
Cita de slidellboy:
I did every step but the screen doesn't work. Phone calls come in and its charging cause I hear the sounds. What might be the problme?
try either cycling power or reinstall the cables to the display where they connect to the main board. cables weren't seated correctly for me and i experienced the same issue.
Cita de JJ246:
i have tried everything but the screen will not budge, i have tried using the tool and also my suction cup and even tape nothing will work to seperate the screen! what should i do??
Make sure the 2 screws are out of the bottom of the phone on either side of the dock connector. If they are, keep trying. Make sure you are lifting from the bottom end of the screen toward the home button. Does take a little bit of force but you'll get it. Keep in mind the connectors for the screen are toward the top end of the phone so don't let it get away from you or you could damage them. Just lift up like you're reading a book, using the top end as a pivot point.
I had exactly the same problem. I persisted and found that, after the connectors were properly seated, I had to 1) completely install the screen, including the screws and 2) perform an iPhone reset. To perform the reset, hold the wake/sleep button (on the top) while at the same time holding the home button (on the screen). Hold them until the apple logo is displayed on the screen (approximately 10 seconds). After the apple logo came on the screen, everything was look'n good! I hope this works for you; i was bummed, not becuase i would have had to spend another $99 but because ATT automatically extends one's contract every time one buys a new iPhone, even if it's a replacement. Good luck!
CAUTION! My 16GB 3G has a cable glued to the bottom left side of the LCD. This cable is marked with a 4 in step 3. There is no way you can open the the screen 45 degrees if your cable is the same!
Those of you who end up with no screen probably ripped the ribbon cable just as I did. This is a huge omission!
I have pictures of the ripped cable if anyone needs clarification.
Clarification to the note above.
On further inspection, cable 4 wasn't glued to the back of the LCD. It just bonded itself there after a year of use.
If this happens, you'll need to replace the dock connector as well.
Good luck!
It strange for me, i opened my iPhone 3G and found something that doesn't apear on your descriptions, on the bottom of the screen just after opening it, there seems to have a connector, maybe it is only some glue that makes it stick to the screen or maybe it realy is a connector which is why i don t want to go any further without asking.
Could anyone help me?
Cita de postnospam:
CAUTION! My 16GB 3G has a cable glued to the bottom left side of the LCD. This cable is marked with a 4 in step 3. There is no way you can open the the screen 45 degrees if your cable is the same!
Those of you who end up with no screen probably ripped the ribbon cable just as I did. This is a huge omission!
I have pictures of the ripped cable if anyone needs clarification.
I have the same problem. I change my husband`s iPhone lcd but i also cannot see anything but i can hear that it`s charging. I tried to open it again just to be sure that its connected. but still not working.Anybody can help?
Cita de pbrookei:
Everythig works fine except the GPS. After the repair my gps is not working like it was before. Now rarely gets a constant signal, and the most part the signal is week. Maybe i have damage the antena ?
Not sure if you are still following this thread, but I came across this while trying to fix a buddies phone. We found out when we re-opened his phone after replacing the glass that the GPS antenna had gotten disconnected when he did the repair. We simply snapped the connector back on, and VOILA, GPS works again. I hope this helps. The connector is in the top left corner of the board, and on his phone was labeled connection 6.
Just did this last week for my GF iPhone awesome results. only problem i found so far is the new adhesive for the front panel wont stick very well. dont know if its a let it set type of adhesive but if i have to replace it again i dont know if ill be able to get the front panel/lcd frame out of the phone.
I replaced my cracked screen and my damaged LCD screen and after I put it all back together, the iPhone turns on and the screen looks great, but the touch screen does not respond at all. I opened it up about 3 more times and unhooked and reattached all the connectors to the motherboard but still no luck. Does anyone know what I should do??
Cita de Miroslav Djuric:
Using a metal spudger might damage the bezel and/or screen. It's definitely doable to separate the two without a metal spudger - I did it myself with no problems - but other iPhone display assemblies may be tougher than the one I took apart.
Sometimes using the metal spudger is necessary-- my screen was entirely too shattered for the suction cup to hold. I slowly pried it open, and yes, there was slight damage to the plastic.
When I applied the suction cup, the screen came loose from the display assembly, the display assembly remained in the phone (the screen had been replaced once before, so probably the adhesive used then was not as strong as the original adhesive). I had to use the metal spudger to separate the display assembly from the phone. Worked fine.
the lifting of the front assembly from the silver bezel would be easier if you are heating the silver bezel with an hair dryer carefully.
because at older IPhones some mess will stuck between the bezel and the gasket AND if glas would be broken it will be a little bigger as the unbroken glas.
And heating the front assembly carefully makes it easier to peel of the glas from the assembly
Be sure the silver bezel stays attached to the bottom plastic "tub"; if it is pulled up, a 2 wire thin film around the lower left will sever.
-
-
-
Continue to hold the display assembly with one hand, and use your other hand and a spudger to disconnect the black ribbon cable labeled "1."
-
Ribbon cable "1" is connected with a plug style connector. The block at the end of the cable is the plug which is simply pushed into a socket on the circuit board. No other locking mechanism is used.
Ok this was not too difficult but not for the faint at heart either. I did run into three problems:
1) I broke one of the connectors that supply power/information to the home button :(.
2) The display works but the buttons do not match up to what I press. If I press the 7 button, I get either the 3 or the 9 button, when I press the 3 button, I get the cancel button, etc.
3) I broke te little white piece that secures piece (3) to the board. Not sure if this ithe reason I am having problems as listed in number 2 above.
Any idea what I can do to fix these problems?
For those of you with a non-responsive home button, I was able to fis mine after watching this youtube video (production values aside):
http://www.youtube.com/watch?v=oZOZp37ON...
The gist is that you gently lift two contacts on the underside of the front panel so that they make better contact with two metal spots on the dock component. Hope this helps.
-
-
-
Slide the ribbon cable out of the connector, and remove the display assembly from the iPhone.
Cita de bbozsik:
I'm unable to get the ribbon back into the connector also. Is there a trick to it that someone can share?
You must understand that there is a tiny ribbon keeper (for lack of a better name) that prys up from the direction shown in the picture... If you didn't see it you probably got the ribbon out by pulling, instead of lifting the keeper tab. Look very closely and you will see this tab... lift it up as shown in the picture and insert the ribbon cable, then press the tab back down which locks the cable in place.
Cita de Splzeug:
You must understand that there is a tiny ribbon keeper (for lack of a better name) that prys up from the direction shown in the picture... If you didn't see it you probably got the ribbon out by pulling, instead of lifting the keeper tab. Look very closely and you will see this tab... lift it up as shown in the picture and insert the ribbon cable, then press the tab back down which locks the cable in place.
Thanks for the reply. Now that made more sense the original directions.
what if the micro small plastic clip breaks off? as mine did.. :( what do you recommend?
Cable #1 is part of the LCD, and is not on the new panel assembly until the LCD is attached to it. So don't worry that you got the wrong part because there is only 2 cables on it initially.
Reply about broken tab on cable #3. I would try using a small piece of clear cellophane(scotch) tape. After getting the cable in the connector, use your third and fourth hands to put a small pre-cut piece of tape on the top of the cable and on to the top of the connector. which should hold it in place until you get it the rest of the way together. I read a note that some non-American models do not have a lock on this piece, so hopefully it will stay in place after assembly.
GTE -
Cita de BigMikesWilly:
what if the micro small plastic clip breaks off? as mine did.. :( what do you recommend?
My plastic tab was white. I couldn't get it to rotate up, so I just pulled the cable out. And then of course I could not get it back in. So I tried to rotate the tab up again using a small flat screwdriver. For my first attempt, I stuck the screwdriver in where the cable is supposed to go and gently lifted up. That just broke a little of the plastic off the tab. For my next attempt, I stuck the screwdriver under the side of the tab and gently lifted. Again, the plastic just started to break. I quickly pushed it back down with my thumb, pretending nothing had happened. I pictured myself walking back to the apple store to buy a new iPhone. :-( The stress was making me burn up. I actually had to take my shirt off at this point. Then I spent the next 5 minutes slowly carefully wiggling the cable back into place without lifting the tab. I put cables 2 and 1 back in and put the phone back together. I crossed my fingers and pressed the power button. It worked.
PLEASE READ:
Do not try prying anything from the top or sides.
Ribbon #3 slides in from the TOP (the black end), but the lock is on the BOTTOM (the white end).
On the BOTTOM, you can open the lock easily by lifting the bottom edge upward... it flips straight up.
With the lock open, insert the ribbon cable into the top, black end. You may need to push slightly (I used a tiny flathead) to get it in as far as possible.
Then, just rotate the lock back down into place. You might need to use a small tool, but it's very easy.
And here's another picture of just the circuit board, top of the phone is on the left.
You should be able to see the connector for #3, but it's not labeled.
And in this picture of the 3GS, the colors are inverted... the top is white and the lock is black.
Cita de Splzeug:
You must understand that there is a tiny ribbon keeper (for lack of a better name) that prys up
Noooooo, this is for 3GS only. dont try to pry the 3G ribbon holder, it will break. ask me how i know :(
That comment should be edited in bold "3GS only" before more people break their connectors
Cita de PileOfMush:
PLEASE READ:
Do not try prying anything from the top or sides.
Ribbon #3 slides in from the TOP (the black end), but the lock is on the BOTTOM (the white end).
On the BOTTOM, you can open the lock easily by lifting the bottom edge upward... it flips straight up.
now I understand.. the pic is of the 3GS, but this is correct for the 3G. Hard to visualize, but the lock is opposite of where the ribbon went in. Doh.
I successfully completed the project, but have one issue. Looking at the iPhone 3G (vertically) the whole right side of the screen linearly about about a quarter of an inch from the edge, will not respond to my touch. Thus, making letter 'o','p', 'l', and 'back space' unresponsive when pressing.
This is entirely a new issue...even with a cracked screen like my original was, it still responded to all touches.
My only guess is that the ribbon wasn't all the way in, but from the looks of your diagram, I believe it is.
Any help would be great. Thanks.
Hi there.
I think I also got a problem with reversing step 6. Tab is open and I tried to get in the ribbon cable. How far back in do I have to push it? There is a white line with an arrow. Is that how far? I tried and tried but can't get it back that far... and now the display remains black. The phoen does sync with iTunes when attached to my Mac - so I guess that I only have a problem with the display.
Please help!
Thank's
Cita de Phil:
I can even take a screenshot (Home and Sleep) and download it to iPhoto. It is a black pic...
HELP!!!! PLEASE!!!!
OK, this information might help some of you. My problem is solved. What happened?
I turned on my iPhone by accident during repair. So it was switched on when I reatached all the connectors. My guess is that the display of the iPhone is simly no "plug and play" component that can be attached while the device is running.
As I wrote in my previous postings: the Phone was running after repair, but the display remained dark. Home and Sleep buttons worked and so I waited until the battery was empty and the Phone turned itself off. After that I charged it and then I already saw the "low battery" screen - I never was so happy to see this screen in my life before!
When the iPhone was ready with all the booting it worked perfectly again.
What a nice day after all the tears.... :-)
just finished the whole process and finally got it to work. By far the hardest part was getting the #2 ribbon to snap back in & know where to place the #3 ribbon. Just trial & error, and it finally worked.
FYI. Instead of using a spudger I gently pulled the glass top from the bottom (after I had removed the 2 bottom screws & gotten the 2 pieces separated) & ribbons 1 & 2 just popped out. I thought I had broken or torn them at first since I didn't see that might happen. I had that 'oh crap' moment u get when something happens that's not specifically mentioned in the directions.
at first when i put it all back together after the glass was replaced it came on and the home button worked, as did the on/off button & sound. But could NOT use the touch screen. So I had to figure out how the 3 ribbons worked. The #1 ribbon snapped in without a problem, but I had to keep sliding around the #2 ribbon and pushing down gently until it felt secured.
A suction cup is the best way to get the glass off the casing. I had a pry tool but didn't need it. This job is not easy & is not for the faint of heart.
Cita de Danfog:
Just like mine :(
OK I broke the little black 'ribbon lock' off too. (sinking feeling). Then I tried to wiggle ribbon three in to the white connector - - then I realized it goes UNDER the white connector. I was trying to wedge it on top of the white connector, and under the black ribbon lock. I managed to get it under the white connector as securely as I could. Then I had to even-more-carefully put connectors 1 & 2 back on. Voila. Power up - - - almost everything works. Only thing still questionable is hearing phone thru the earpiece - - have to use speakerphone . . .
Cita de bobroch:
OK I broke the little black 'ribbon lock' off too. (sinking feeling). Then I tried to wiggle ribbon three in to the white connector - - then I realized it goes UNDER the white connector. I was trying to wedge it on top of the white connector, and under the black ribbon lock. I managed to get it under the white connector as securely as I could. Then I had to even-more-carefully put connectors 1 & 2 back on. Voila. Power up - - - almost everything works. Only thing still questionable is hearing phone thru the earpiece - - have to use speakerphone . . .
i have exactly the same as you, i hope the speaker does not rely on that small connector!
Cita de tommy williams:
i have exactly the same as you, i hope the speaker does not rely on that small connector!
does anyone know if this is vital, if so where can you get the small ribon keeper from?
I would ask if someone can reply ASAP as my iPhone is unsuable really!
Many thanks
Tommy
Cita de Phil:
OK, this information might help some of you. My problem is solved. What happened?
I turned on my iPhone by accident during repair. So it was switched on when I reatached all the connectors. My guess is that the display of the iPhone is simly no "plug and play" component that can be attached while the device is running.
As I wrote in my previous postings: the Phone was running after repair, but the display remained dark. Home and Sleep buttons worked and so I waited until the battery was empty and the Phone turned itself off. After that I charged it and then I already saw the "low battery" screen - I never was so happy to see this screen in my life before!
When the iPhone was ready with all the booting it worked perfectly again.
What a nice day after all the tears.... :-)
Thank you for this post! :)
Same thing happened to me. Accidentally turned on the phone during the repair and I didn't understand why it wouldn't work after I attached the screen. Came on here and read your post. My phoned was hooked up to iTunes so it could see it was working. Did a hard reset (power and home button held until I could see iTunes dropping connection to the phone, then let both buttons go). Waited a sec, powered on and held my breath. After 2 seconds, the familiar apple logo popped up. Man, I'm so happy now. Was my first iPhone screen replacement :)
Replaced the the touch screen and now the phone earpiece no longer work. everything else works but not the ear speaker. A cable might not be connected. any advice.
Cita de bobroch:
OK I broke the little black 'ribbon lock' off too. (sinking feeling). Then I tried to wiggle ribbon three in to the white connector - - then I realized it goes UNDER the white connector. I was trying to wedge it on top of the white connector, and under the black ribbon lock. I managed to get it under the white connector as securely as I could. Then I had to even-more-carefully put connectors 1 & 2 back on. Voila. Power up - - - almost everything works. Only thing still questionable is hearing phone thru the earpiece - - have to use speakerphone . . .
I have that problem but did not break anything. the cable slide out as the instruction and slide back in need advice asap.
When you remove the display/digitizer assembly from the phone, handle it carefully, ensuring that you do not touch the two bent metal tabs that are part of the button. They are extremely fragile and will break off if pushed down.
I have to agree. Step six is not easy to "reverse." I had difficulty getting ribbon 3 in place, and I understood where to place it. I grasped the ribbon with some forceps to slide it in, but given the tiny space, this was tricky. I'm not sure if it is in place properly, or scratched, or what. But the earpiece does not work properly, and I cannot reliably place or receive calls now (bad signal?). What sort of tool would help get this little piece in place properly??
Don't try to unlock the cable 3 THERE'S NO LOCK on the cable 3 on my iPhone 3GS, just slide the cable upside. Almost broke mine, don't try to "unlock", there's no lock actually!
Victor, there most definitely is a lock. The latch pivots up 90 degrees and then the cable slides out just as described. I have done this with several 3GS phones. I don't know what happened to yours, but you risk breaking your cable if you don't open the lock.
I should add that you can't properly reseat the cable unless it is unlocked when you put it back. Look closely at the picture with closeup of it open and closed. It's a very small latch but it's very important.
I opened 2 iPhones, one is a 3G and other is a 3GS, both doesn't have the lock, just a slot without any lock, the ribbon cable detach easily, and both is working fine. I can open it again and take a picture.
Victor -
I tried several times to manually plug the ribbon cable #3 without success. But what worked for me was using tweezers, pinching not the golden end part but the black flat cord and pushing it quite firmly (but of course in the hole).
The locking latch swivels up, away from the board. The ribbon pulls up towards the top of the phone. When putting the phone back together, if this ribbon is not in all the way, the small speaker at the top of the phone will not work (the speakerphone will work, because that uses different speakers). Getting the ribbon to slide in all the way was difficult. I had to use a pair of tweezers to slide it in all the way.
-
-
-
Remove the two Phillips #00 screws from the right side of the display assembly.
Using the PH000 bit is easier
I can't get the screws out from step 8. They look rusted on the other side....any ideas?
Thanks for the comments guys and gals, I spent the WHOLE DAY trying to change the screen assembly of my 3GS now using the 3G which has some issues, if I could only unlock my 4G would be great.... Well it began ok got the strip 3 in then could not get the ones that snap into place, so then the strip 3 loosened itself and wound up breaking the snap to it, till then no problem, placed scotch tape closed the phone and to my sadness the home button was not working so onto opening the phone again and again. The phone was perfect with the exception of the home button, so I kept on trying and trying to fix the problem while the phone was on the whole time. The screen responded about 5 times with all the touch options working, fixed my volume buttons and home buttons but the darn assembly came with a defective home button and now my 3GS does not respond at all :( the screen went from perfect the to white and then to black with no response connecting it to iTunes ): had many notes and voice ideas on that phone, got
all the videos out of the 32 GB old bootroom model, white. Have no idea what happened because I have changed screens and assemblies over 8 times on 2G, 3GS 3xs and 3G 4xs. I really need the data inside the phone, is there any way possible to retrieve it? Does the logic board or another part need to be replaced? I should have left the broken screen, at least it was working perfectly, but now it's just awaiting some compassionate people that understand what could have happened, I even put back the broken screen and that's not working either. Maybe because it was on this al, happened but it would turn on w/o any probs the 1st couple times, just the darn home button, oh and I booted into safe mode turned on Skype by accident and could not get out of the safe mode, so the phone 3GS is non responsive in safe mode ): I really need to get the data out of there. Never thought that changing the screen would give me so much trouble. If anyone can help me out, bless you all eternally, if not,it had to be this way....
-
-
-
-
Turn the display around, and if there is a thin strip of black tape on the edge of the display assembly, carefully peel it up.
There isn't any tape on mine either
I'm guessing its not a big deal and you other guys should not worry about putting it back on if you don't want to.
On iPhone 3GS no black strip along side.
-
-
-
Remove the three Phillips #00 screws from the left side of the display assembly.
If you have trouble removing the screws, carefully examine the back of the screws under a light. If there are blue traces of Loctite, you may need to use the tip of a soldering iron to briefly heat the screw so that you can remove it.
it is the right side not the left!
-
-
-
Turn the display assembly over and again carefully insert a metal spudger between the two metal rails along the edge of the display assembly. Gently rotate the spudger to lift the LCD up from the glass.
While replacing my display, I set the display assembly down and managed to bend back one of the contacts to the Home Button which you can kind of see in this picture. This kept the Home Button from working when I reassembled it. I successfully bent it back and the button works now.
I found step 11 a bit confusing. From the photo it really wasn't clear how the rails should be separated. And the instruction to "..insert a metal spudger between the two metal rails along the edge of the display assembly.." didn't really help.
I can't really describe what I did - once again, this is one of those cases where the photo should be clearer - but suffice to say that you need to closely examine the rail assembly, look at where the "joins" are between the rails and use the spudger accordingly. I found that gently levering the outer rail outwards away from the inner rail and slightly lifteng the display at the same time allowed me to separate the two rails and release the display assembly. Once it's starting to pop out of the rails you can slide it away from the ribbon cable end of the phone and remove it.
Also, be VERY careful separating the LCD from the glass. Even though I worked extremely careful (at least I thought I did), it still got damaged probably by applying a little too much force with the spudger to separate the metal rails. It's till working, but one can clearly see the damage that looks like a crack. Other than that, the replacing worked well.
-
-
-
Separate the LCD and glass by sliding the LCD panel away from the ribbon cables on the glass.
when reattaching the LCD< be VERY careful to not cut the cables to the digitizer/screen as you snap it back as I assembled it, the flat thin ribbon cable got cut/ripped the cable very easily.
so the kit I got sent me all the tools I need including the glass panel but step 12 said to separate the lcd from the glass by separating the 2 metal rails. The new glass I got does not have the other set of rails, the speaker or the button. How do you separate that stuff from the old glass assembly?
I first tried this with a hairdryer for a good 40 seconds and it did not get hot enough to budge the adhesive. 5 seconds with a heat gun on low and the glass separated easily. Be careful with the heat gun, go slowly and only heat small portions at a time but it works much better than a hairdryer.
Another thing that was not in the manual, that really should be in the manual. I powered off the phone before the install, and then powered it on at the last step of attaching the cables, to verify all was connected fine. Then powered off again, closed up the case and powered on again.
BUT the display was clunky and unresponsive, which was strange to me because it was perfectly functional with the shattered glass. I had to power off and on to get it to respond, and even then pressing buttons on the screen was still clunky and unresponsive. Finally I went to troubleshoot the display at Apple (http://support.apple.com/kb/HT1737) where I reset it and then reset all settings. After that the display responded perfectly. I basically followed these steps from the above link:
If iPhone won't turn on, or the display freezes or doesn't respond
See iPhone and iPod touch: Frozen and unresponsive for information on addressing these symptoms.
iPhone OS 2.x and earlier: Press and hold the Home button until the application quits.
iPhone OS 3.x and later: Press and hold the Sleep/Wake button until the red slider appears, then press and hold the Home button until the application quits.
If that doesn't work, turn iPhone off and turn it on again. Press and hold the Sleep/Wake button on top of iPhone for a few seconds until a red slider appears, and then slide the slider. Then press and hold the Sleep/Wake button until the Apple logo appears.
If that doesn't work, reset iPhone. Press and hold the Sleep/Wake button and the Home button at the same time for at least ten seconds, until the Apple logo appears.
If iPhone continues to freeze or not respond after you reset it
Reset iPhone settings. From the Home screen choose Settings > General > Reset > Reset All Settings. All your preferences are reset, but no data or media is deleted.
If that doesn't work, reset iPhone. Press and hold the Sleep/Wake button and the Home button at the same time for at least ten seconds, until the Apple logo appears restore the iPhone software. See Backing up, updating and restoring your iPhone and iPod touch software.
I have been repairing iPhones now for 2 years. This procedure is a waste of time and money, spend the extra 15 bucks and get the glass with the digitizer, you don't have to spend 3 hours to replace your broken glass because you spent 2 of them separating glass from glass. by the way, good luck getting the new glass on with out a scratch or piece of lint/dust in between.
Cita de DAR:
I have been repairing iPhones now for 2 years. This procedure is a waste of time and money, spend the extra 15 bucks and get the glass with the digitizer, you don't have to spend 3 hours to replace your broken glass because you spent 2 of them separating glass from glass. by the way, good luck getting the new glass on with out a scratch or piece of lint/dust in between.
So my iphone decided to get the "white" screen of death. I have opened it up and cant find anything to be broken. What or how could I diagnose the issue in an attempt to purchase the right parts?
Cita de FFPENGUIN:
So my iphone decided to get the "white" screen of death. I have opened it up and cant find anything to be broken. What or how could I diagnose the issue in an attempt to purchase the right parts?
Mine too. Does your iPhone still work?
Mine got wet and I dried it for days in a bag of rice. Eventually it started working again and I managed to have iTunes recognize my iPhone once more. I restored it and now the phone works again. Calls etc. all sound brilliant, but it has got a bright, white screen. Underneath I can make out the clock and all the symbols, and it recognizes my finger gestures instantly, but the screen remains bright white with gray horizontal lines/flickerings. I opened up my iPhone yesterday and this didn't resolve the issue. Would this be an LCD problem or can someone tell me what to do?
Cita de bcs909:
Another thing that was not in the manual, that really should be in the manual. I powered off the phone before the install, and then powered it on at the last step of attaching the cables, to verify all was connected fine. Then powered off again, closed up the case and powered on again. BUT the display was clunky and unresponsive, which was strange to me because it was perfectly functional with the shattered glass. I had to power off and on to get it to respond, and even then pressing buttons on the screen was still clunky and unresponsive. Finally I went to troubleshoot the display at Apple (http://support.apple.com/kb/HT1737) where I reset it and then reset all settings. After that the display responded perfectly. I basically followed these steps from the above link: If iPhone won't turn on, or the display freezes or doesn't respond See iPhone and iPod touch: Frozen and unresponsive for information on addressing these symptoms. iPhone OS 2.x and earlier: Press and hold the Home button until the application quits. iPhone OS 3.x and later: Press and hold the Sleep/Wake button until the red slider appears, then press and hold the Home button until the application quits. If that doesn't work, turn iPhone off and turn it on again. Press and hold the Sleep/Wake button on top of iPhone for a few seconds until a red slider appears, and then slide the slider. Then press and hold the Sleep/Wake button until the Apple logo appears. If that doesn't work, reset iPhone. Press and hold the Sleep/Wake button and the Home button at the same time for at least ten seconds, until the Apple logo appears. If iPhone continues to freeze or not respond after you reset it Reset iPhone settings. From the Home screen choose Settings > General > Reset > Reset All Settings. All your preferences are reset, but no data or media is deleted. If that doesn't work, reset iPhone. Press and hold the Sleep/Wake button and the Home button at the same time for at least ten seconds, until the Apple logo appears restore the iPhone software. See Backing up, updating and restoring your iPhone and iPod touch software.
I thought my wifes phone was a goner - the reset you advised did the trick. Thanks
if your gentle you wont need any heat source. I was able to remove my old screen without any heat. THAT SAID BE VERY CAREFUL.
Also a question for everyone... Any ideas how to get the screen to sit flatter (if thats a word). I have replaced the screen however the glass (when re assembled) seems to sit a bit higher.
My Screen was totally white... the only thing working was the digitizer. I ended up replacing the LCD after some help from a guy at the local ATT Store (we trouble shot the LCD... he had extra go figure). I would probably say look into just the LCD or the entire top assembly (glass, digitizer, lcd, ect). I dont know for sure but I would thing that water probably destroyed something in there.
Cita de Daan Zijlstra:
Mine too. Does your iPhone still work?
Mine got wet and I dried it for days in a bag of rice. Eventually it started working again and I managed to have iTunes recognize my iPhone once more. I restored it and now the phone works again. Calls etc. all sound brilliant, but it has got a bright, white screen. Underneath I can make out the clock and all the symbols, and it recognizes my finger gestures instantly, but the screen remains bright white with gray horizontal lines/flickerings. I opened up my iPhone yesterday and this didn't resolve the issue. Would this be an LCD problem or can someone tell me what to do?
I changed everything but the mother board on my iPhone and when I turn it on it gets stuck on the apple logo. I think I may have done something wrong when putting the screen together because when I pull a complete screen assembly off a working iPhone and put it on the one I am repairing, everything works fine. I tried pinpointing the problem to see which part might be not functioning. I pulled the new LCD and put it into a functioning iPhone and it booted up fine. Can it be that the ribbon on the digitizer is messed up? Is my connection faulty?
I totally agree with you. When removing the glass, you risk breaking a rubber seal which will allow dust to penetrate. If you get that combo of digitizer+glass and all the frames in one, you get new home buttons, flex cables, speaker and sensor as well. I am going for that one as I feel this step is too laborious.
Cita de DAR:
I have been repairing iPhones now for 2 years. This procedure is a waste of time and money, spend the extra 15 bucks and get the glass with the digitizer, you don't have to spend 3 hours to replace your broken glass because you spent 2 of them separating glass from glass. by the way, good luck getting the new glass on with out a scratch or piece of lint/dust in between.
This guide is how to separate the glass from the frame. The glass has the digitizer on it. We aren't separating glass from glass.
Cita de FFPENGUIN:
So my iPhone decided to get the "white" screen of death. I have opened it up and cant find anything to be broken. What or how could I diagnose the issue in an attempt to purchase the right parts?
Check cable number 1
Before you part the rails & slide the LCD out, ALWAYS check you have all the screws out. I accidentally left one in and as a result the lcd twisted slightly on this & was ruined. (bleeding around area of screw & white screen on rest). Never apply too much force or twist LCD as you slide it out as its VERY fragile and expensive to replace.
Read the steps before, do NOT memorize them!
Be prepared. RIGHT tools, parts, proper workspace, no disturbance for the next hour.
Patience!
Be "OCD" cautious and systematic!
Study carefully the positions of every little tabs, holes, screws, cables... Take notes, mark your screws, etc...
Proceed like a neuro-surgeon. Very gently, but firmly, precisely. And do not improvise! Follow the steps as described!
Be extra carefull on your way back to rebuild:
*At step 7, there is a small black metallic tab that should go UNDER the metallic screw hole tab. Invisible before you remove the metallic plate holding the LCD.
Consider that before screwing back anything from step 10 onward to step 1.
Inserting the FPC connector at step 6 is easier when you aim externally, from where you can see the top edge and the glass plate, holding the casing and the glass plate at a 90deg angle from one another. Between these two parts, with a proper lighting, it is easier to see where to insert the connector.
Tweezers are helpful here.
This guide does not mention the step needed to separate the front glass from the rails. If you have a broken screen and have placed tape over it to hold it together, make sure you don't tape over the home button. It is attached to the part you are removing and you will tear the ribbon cable if it is taped to the front.
-
-
-
This is what should be left after removing the LCD.
Agree with DAR and Riz. Since I needed a new home button anyway, I read the procedure for replacing the home button and figured out it was much safer to replace the whole assembly - which it was. A quicky job could be done in a few minutes. Replacing the black tape on the edge makes it all a bit more fiddly, but I wanted to improved on dust sealing. Plus my new assembly didn't have foam on the back of the #2 connector - so I fashioned a replacement with adhesive transfer tape and thin black foam recovered from printer toner packaging.
-
-
-
If the glass has shattered at the top or bottom be especially patient and gentle when removing fragments. In extreme cases you may have to pick off any glass shards that remain glued to the plastics.
-
Using a heat gun or hairdryer, heat the top left area of the touch screen.
-
Use your fingernails to slowly lift up the left corner. The touch screen plastics are held to the touch screen with adhesive. It may take some work to free the corners.
-
Heat and repeat for the right side.
the heat gun step took me the longest, but i actually used a hair dryer. i had to get the assembly quite hot before it would budge at all -- hotter than i could comfortably handle with my bare fingers. i set the entire thing on my jeans-protected thigh while heating the assembly's edges, then trying to pry, then heating, then attempting to pry again.
i seemed to find a bit more success heating from the glass side (the front side) than from the back with all the electronics and whatnot in the way.
i might recommend safety glasses here at this step because when the adhesive gave, it gave quickly and i ended up spreading quite a few very tiny pieces of my broken screen glass everywhere.
OMG - that was freakin hard! Make sure you don't burn yourself. I agree with satanders and ridges comments. Heat from the outside and use the spudger to prise the cover. And make sure you don't harm the button!
At least one YouTube video shows using a spudger to try and free the parts from the glue after heating. The spudger is shown being used close to the flex cable (the yellowish flat plastic thing) for what I believe is the speaker. There is a risk you will damage the flex cable. You might want to be really careful not to damage it. Let us suppose the phone was working okay except for a cracked screen before you began the replacement procedure. If something goes wrong with your installation and you need to reassemble the phone for any reason (such as realizing you need a new front screen in addition to the digitizer), and you have damaged that flex cable, you probably won't have any sound in the phone.
i held the corners up to my stove burner on low heat. worked quickly and easy.
Tip for dealing with a badly shattered screen:
I placed a piece of packing tape over the broken glass before trying to remove it. This kept it all together when prying it away from the plastics instead of having to remove each broken shard individually.
How's this for homespun? The hairdryer was taking FOREVER. I put masking tape on the the shattered outer screen surface (great suggestion!) and used a teflon coated electric griddle to get the plastics off! I set it to the lowest setting (WARM) and moved the tape covered surface around on the griddle for even heating. After about two to three minutes of intermittent heating and checking for effect, the plastics pretty much peeled off top to bottom with little to moderate effort. Plastic was warped about 5mm maximum afterward but nothing show stopping. All went together afterward and works fine. Probably should be wearing some protective eye wear for this and be careful of glass shards.
Great tips, thanks! Gas stove on low heat worked perfectly. Used an oven mit to hold the display with one hand and the other hand to slide the spudger around the whole seam. I did manage to tear a very small piece (< 1/8") of the rubber gasket off so be very careful.
Cita de satanders:
the heat gun step took me the longest, but i actually used a hair dryer. i had to get the assembly quite hot before it would budge at all -- hotter than i could comfortably handle with my bare fingers. i set the entire thing on my jeans-protected thigh while heating the assembly's edges, then trying to pry, then heating, then attempting to pry again.
i seemed to find a bit more success heating from the glass side (the front side) than from the back with all the electronics and whatnot in the way.
i might recommend safety glasses here at this step because when the adhesive gave, it gave quickly and i ended up spreading quite a few very tiny pieces of my broken screen glass everywhere.
It should be heated to any temperature with the heat gun? And how many inches the glass? Thanks
When I did this repair, everything went to plan until step 15. My original front panel glass was severely broken, and it was quite hard to get the touch screen plastics and front panel separated. The result was a non-working touch screen after putting it all together again, but the LCD and Home button was all working perfectly.
So I'm considering buying the front panel assembly in stead, since I don't have to dismantle the whole front panel there.
Btw, great product and quick delivery. From iFixit to Norway in four days without additional costs of taxes, etc. Thumbs up :)
Cita de Lars:
When I did this repair, everything went to plan until step 15. My original front panel glass was severely broken, and it was quite hard to get the touch screen plastics and front panel separated. The result was a non-working touch screen after putting it all together again, but the LCD and Home button was all working perfectly.
So I'm considering buying the front panel assembly in stead, since I don't have to dismantle the whole front panel there.
Btw, great product and quick delivery. From iFixit to Norway in four days without additional costs of taxes, etc. Thumbs up :)
I just found out I should check all the cable connections, so I went through step 1 to 5 and found out it was just a connection issue. Everything is working good now. :)
I have been having a very difficult time with this step, im not even sure what im taking apart from what? hehe the picture number 2 shows the finger close to the edge but not really wehere hes nail is.. if any one could help it would be greatly apreciated, sorry for bad spelling..
But I agree with Lars great product and good service, fedEx **%%^$ up big time but nothing to do with iFixit..
It's kind of hard to see which pieces are being separated in these photos. I found it helpful to separate the sides first (shown in step 16) by pressing outward on the glass while holding the metal edge. This allows you to see what you're separating and makes it easier to separate the top and the bottom.
You probably want to avoid scraping off the rubber coating around the edge.
Gloves and eye protection are a really good idea for the next few steps. You want to keep from getting glass splinters or burnt fingers. Maybe I'm not as talented as the ifixit guys, but heat guns and separating things with my fingernails just don't mix well for me. I used a pair of very sharp tweezers.
Make sure not to bend the home button contacts. These are just two pieces of exposed metal pieces from the home button that make contact with pads on the main board on the phone when the phone is assembled. When I had put my phone back together again, the home button didn't work. After opening it up again I realized that one of the home button contact points had gotten bent.
This was challenging. An Ikea Espressivo desk lamp was my saving grace. I think it would help to have a photo of some of the intermediate steps of gradually wedging the part off because I wasn't sure what I was trying to do at first...the best I can describe it is that the whole thing you're trying to remove is a sort of wrap around frame holding the glass in place. I think I screwed up the rubber edging a little...won't know how it looks until I put it back together...the tape was a good way to keep most of the glass together but I still had to use a spudger to scrape out the last little bits of glass and adhesive.
Like others here, I used a hair dryer on a low/medium setting. I kept my finger in the airflow as a temperature monitor and heated both the front and the rear of the assembly by regularly turning it around. I found that this just takes a lot of time. You have to allow the heat to travel through the plastic and glass into the glue. You then need to allow time for the glue to soften. Just be patient - it took me at least 20-30 minutes to get the two parts completely separated. If you have to protect your skin from burning you're getting everything FAR TOO HOT and you risk damaging (or even melting) some of the components of your lovely iPhone!
Just be prepared to take this VERY slowly. Allow the glue to soften, use your fingernail to initially find the join between the two components and gently, VERY GENTLY, keep the heat going and prise them apart. Once they're starting to part you can use a plastic spudger instead of your fingernail, but don't force it - be GENTLE. If you have any doubts, just continue to use your fingernail until it's started to separate all the way round the screen.
Be careful not to damage the rubber-like seal on the glass side of the assembly. Despite using my fingernail very carefully I inflicted (albeit minor) damage on a very small area of the seal. In the long term this might allow dust to find its way in between the glass and the display. If you can avoid damaging the seal you'll reduce the risk of dirt and dust ingress.
Initially I was clueless as to what part was supposed to be separated from what. It only became clear when I looked closely at the complete assembly edge-on. Even with my less-than-perfect eyes I could see that there was a join about half way through the edge. Heating it in the corner (as per the guide instructions) and gently pressing in a finger nail fully revealed the join. Once it starts to come apart, just work your way round the edge and you can eventually separate them enough to get a plastic spudger between the two parts to help prise them apart. NEVER force it. Just keep gently heating it (with your finger in place to tell you if things are getting too hot) and the glue will melt giving you a clean separation without risk of damage to either component.
An earlier poster suggested that a good way to start the separation of the two parts is to hold the rail and push on the glass on one of the long edges of the iPhone. I found this worked very well. If you have difficulty starting the separation in the corner (as per the guide), try this approach, but don't push too hard on the glass - especially if it is already broken.
A) This is the step at which you wish you had paid a pro $75 to do this for you, or at the least bought the entire display, rather than try to pry the glass off.
B) You need a very strong & thin tool to wedge between the glass and the plastic panel of the frame. The spudger is too thick. I used a high quality paring knife. An Exacto knife may break. I suppose I could have melted the glue more so that the two pieces separate easier, but the heat made me nervous about damaging the electronics.
C) There is a thin rubber gasket that wraps around the outer edge of the two pieces you're trying to pry apart. It's nearly impossible to not damage this while prying the two pieces apart in this step. However, I think people should be advised to run a pin along the edges of separate the gasket from the glass, and then try to pry the glass off only after the glass edge has been separated from the trim. The new glass has to nestle back inside the rectangle formed by the gasket.
To get the glass off the frame easily & safely, I removed the earphone assembly & speaker, and the home button, then soaked the screen assembly in near boiling water and detergent - after a while, was able to prize apart using a credit card. After cleaning off old tape & then rinsing in deionized water and drying, reassembled - works fine & no hot hair guns or melting!!
I placed this piece in a toaster oven on the middle rack and set the temp to warm, a temp where my hand could comfortable be in the oven and not feel hot. I shut the door so some heat could escape and every two minutes pulled the piece out and started pulling from the sides. After 3 times doing this I could tell the adhesive was releasing and just kept working it, placing in oven, pulling out and repeating. I used a razor blade to remove the adhesive and shards of glass. Most came off in big strips. Make sure to keep temp very LOW and watch the ribbons for any curling. This worked great.
-
-
-
Once the top is free, use the heat gun to heat the sides of the touch screen.
-
Use a spudger to free the sides of the touch screen plastics.
I would have to say it did take a good 3 hrs to complete the installation. It is a hard repair but, very worth it. My husband and i both done the repair. The hardest part is getting the damaged screen off of the adheasive.My phone looks and works great .THANK YOU so much for the kit to repair my phone .I also like being abel to get a repair kit that I can do at home .
I also plan on doing my sons repair on his iPhone now .
Cita de tommylynnbolling:
I would have to say it did take a good 3 hrs to complete the installation. It is a hard repair but, very worth it. My husband and i both done the repair. The hardest part is getting the damaged screen off of the adheasive.My phone looks and works great .THANK YOU so much for the kit to repair my phone .I also like being abel to get a repair kit that I can do at home .
-
-
-
Heat the bottom corners with the heat gun.
-
Again, use your fingernails to free the corners.
-
Remove the touch screen plastics from the touch screen.
Also.. I had it put back together and noticed that the HOME BUTTON didnt work... Took it back apart and saw the #4 wire had become disconnected.. Over all, Im happy! iFixed it!
i did the repair, and now the screen wont turn on. It will receive texts and calls (I know because the sounds are audible) but the screen will not work. I feel I have tried everything. I assume this is an issue with ribbon 2?
Cita de chrisbatten:
i did the repair, and now the screen wont turn on. It will receive texts and calls (I know because the sounds are audible) but the screen will not work. I feel I have tried everything. I assume this is an issue with ribbon 2?
Iphone should be off or sim should be removed b4 you take glass screen apart. This sometime causes the screen to be blank when reassembling the iphone.
possible fix is that you will have to SHut the iphone off ( like holding home & power button down for a few seconds.
I melted my iphone home button with heat gun. so I had to borrow the assembly glass/digitizer/lcd/home button from another working iphone to perform the power RESET. If your button is ok. just reassemble and do the power reset IE...holding power and home buttons down...
Somehow I broke one of the two springy contacts that connect the home button from the front assembly to the main/back. (You can see them in the upper left corner of the step 17 picture.) I've got it working again mostly, by soldering in a bit of metal to bridge the gap. Unfortunately it isn't springy so I'm not sure how long it will last. I guess I might be able to solder in some tiny wires to connect them, or maybe some different springs. Ugh. Great guide, wish I wasn't such a goof!
thank you! quite simply one of the easiest fixes i have come across lately.. follow the directions i.e, (be CAREFUL not to melt the home button) and a bit of common sense i.e,(the heat gun will be plenty hot to melt plastic, follow the directions in reverse to put back together.. like plug the cables back in??) will go a long way here.. all in all very happy with the purchase. directions good..saved me 125.00 bucks doing it myself.. thanks again!!
tip 1: try to keep the plastic tape around the display as intact as possible. It keeps out dust at the edges.
tip 2: you can affix (stick) the replacement screen to the upper and lower part without removing the protective plastic on the inside of the panel.
Remove the plastic on the inside just before you re-afix the lcd panel. Thus you get a dust and particle free LCD and touch panel.
tip 3: use the suction cup to place the new screen.
Good luck, WernerT
Used this guide to replace my home button. Worked great. I have a heat gun but opted to use a hairdryer and had no issues. i used a utility knife to separate the glass from the frame and that made it really east. make sure to tilt the sharp edge toward the frame and not the glass or you can scratch the black paint off the glass. Longest step was removing the old glue. Rubbing alcohol seemed to work good. Thanks for the how-to!
A heat gun is really overkill. I used a hairdryer on LOW heat and a spudger. It worked very well, just have faith... It feels like an impossibly strong bond for about a minute or more and then the adhesive warms up and it just pops.
If the screen is shattered over an area where there is adhesive under it, plan on a lot of time picking at little pieces of broken glass. If you can get a spudger under the old piece of adhesive and peel it off a big pice with many shards stuck to it it saves some work. Be super careful if it's shattered right over a component like the home button cables. Mine was shattered over the proximity sensor to the right of the earpiece and I came way too close to stabbing it, hard, with one end of a shard of glass while I lifted the other.
But my phone is good as new now. You'd never know it had been repaired. Yeay!
I had the same thing happen with mine, per the quoted item below. Broken in all the wrong places. I'd probably add that in addition picking out the glass, it's not a bad idea to get an exacto knife and spend some time peeling up the old residue.
The frame on mine was pretty torqued by the time I got all the glass out (it was pretty shattered). Amazingly the tape wouldn't quite hold the corners down, even with a fair amount of pressure. That's strong tape but it just wouldn't sit. A couple of droplets of superglue and some clamps on the corner and everything secured down just fine. It's not coming apart if the screen goes again, but by that time the 4G should be out and it's time for a new phone anyway.
Cita de peterjb:
A heat gun is really overkill. I used a hairdryer on LOW heat and a spudger. It worked very well, just have faith... It feels like an impossibly strong bond for about a minute or more and then the adhesive warms up and it just pops.
If the screen is shattered over an area where there is adhesive under it, plan on a lot of time picking at little pieces of broken glass. If you can get a spudger under the old piece of adhesive and peel it off a big pice with many shards stuck to it it saves some work. Be super careful if it's shattered right over a component like the home button cables. Mine was shattered over the proximity sensor to the right of the earpiece and I came way too close to stabbing it, hard, with one end of a shard of glass while I lifted the other.
But my phone is good as new now. You'd never know it had been repaired. Yeay!
I reassembled mine, but before i snapped my front glass into place and putting in the final two screws, I tried to verify everything was working. All worked except the home button. Long story short, I believe that the the front panel has to be snapped into place for the home button to work (something on the front panel seems to contact the back panel for the home button).
I used this tutorial to replace the glass in my iPhone 3G last August. Everything works great. The only problem I have had is that dust is collecting between the lcd and the new glass. I guess the rubber gasket isn't secure anymore. I am probably going to take mine apart again to clean away the dust. I wonder if anyone has tried a little rubber cement or something similar to reseal the rubber gasket in place. Any ideas?
I was considering using black silicone to seal it.
I ever use this silicone to seal the gap on my car bodykit,just worry about the heat of the melted silicon but maybe this can help to keep the dust out.
Cita de bjelliott:
I used this tutorial to replace the glass in my iPhone 3G last August. Everything works great. The only problem I have had is that dust is collecting between the lcd and the new glass. I guess the rubber gasket isn't secure anymore. I am probably going to take mine apart again to clean away the dust. I wonder if anyone has tried a little rubber cement or something similar to reseal the rubber gasket in place. Any ideas?
Cita de ebay7795:
iPhone should be off or sim should be removed b4 you take glass screen apart. This sometime causes the screen to be blank when reassembling the iPhone.
possible fix is that you will have to SHut the iPhone off ( like holding home & power button down for a few seconds.
I melted my iPhone home button with heat gun. so I had to borrow the assembly glass/digitizer/lcd/home button from another working iPhone to perform the power RESET. If your button is ok. just reassemble and do the power reset IE...holding power and home buttons down...
Cita de jera lynn whitlaw:
I DID EVERYTHING PUT THE iPhone TOGETHER BUT NOW THE iPhone DOESN"T WORK THE PANEL IS ALL WHITE.
Be cautious! Or you could "spudger" your home button circuit in two at this point!
I used a hair dryer, not a heat gun. If you can't hold the screen with the hot air blowing on your hand then reduce the heat, lower fan speed, or move the hair dryer a little farther away. If you can stand the heat you probably won't melt the plastic.
-


To reassemble your device, follow these instructions in reverse order.
To reassemble your device, follow these instructions in reverse order.
Cancelar: No complete esta guía.
479 personas más completaron esta guía.


17 comentarios
Success! It took me quite abit longer than some of those above, but in under 3hrs, it was complete. I am totally satisfied; the only potential problem I've found is that the rubber originally covering the front panel glass and the front panel plastic on the side--i.e., the rubber filling in the gap between the glass and the metal bevel/bezel?sp?--had been partially destroyed during the repair. Now there are spots at the top and bottom where dust could potentially get into the internals more easily. As it is, I opened my phone and it was extremely dusty, so that if it worked well with that kind of dust, I suppose it'll be alright with some more. Besides, now I know how to open it up and clean it! Thanks iFixit! You saved me $140, which is what Apple would have charged to fix my screen.
Cita de Chelsea:
Everything worked except now my home button does not work, help please.
Is the front panel completely snapped into place? I believe there are some contacts on the front panel that have to touch contacts on the inside of the phone for the home button to work.
I have followed all the steps and the phone has turned on, BUT it wont let me slide to open. HELP!!
I'm assuming Sally found the problem to this issue of the phone working but I just had the same problem of no touch screen even though the phone and screen were working otherwise.
Re-open the phone and ensure Cable #2 just isn't attached properly. If this is loose or not correctly connected then the screen will come on but the touch screen won't work.
andrew -
All went smoothly when removing the glass but when removing cables, cable #3 appeared to break off at the attachment and the small plastic "comb" like cover came apart and it doesn't seem like it will be able to be re-attached.
Does anyone have experience with this? Should I continue with replacement or am I destined for a new phone? Help!
When performing Step 2, be sure not to harm the rubber gasket! Doing so will obviously break the seal it provides, which will quickly result in a "dusty" screen. Using the suction cup by itself should be enough to get the screen up. Once you can see a gap between screen and case, you can use spudger to apply leverage. (Not before, however.)
I ripped my gasket and received a dusty screen (dust trapped between LCD and glass) for my troubles. I'm looking for a screen protector that will cover that gap now.
Especially for putting things back together, if you're over 40 I'd recommend something like this magnifying lamp Illuminated Magnifier Table Lamp My eyes are hurting, but I did it! iFixit - would you consider throwing in a spare #00 screw or two with this kit? One of mine disappeared somewhere along the way - it'd be a nice little extra :-)
Beware when reattaching the lcd to the glass. The flex cable on it is much stronger than on the digitizer, and can slice right through the digitizer cable. I speak from experience of 5 minutes ago. Now I need another digitizer. FML.
Tengo un problema, y es que aproximadamente 3cm de la parte superior del touch screen no me funciona, no tiene sensibilidad... que podria ser el problema, talvez el conector #3, o hay que hacer cambio del touch screen
Espero su pronta respuesta...
I have a problem, and is about 3cm from the top of the touch screen did not work, has no feeling ... that could be the problem, maybe the connector # 3, you either need to change the touch screen
I await your prompt response ...
I got to step 15, then something went awfully wrong: the golden bar holding connector #3 to the screen actually remained attached to the old glass instead.
I tried to remove it carefully but it bent a bit on one end…In any case, at the end of the repair the touch screen doesn't work at all, it seems I've brought my phone from barely usable to completely unusable. :(
Any idea on what to do? Connectors seem to be in place so my guess is on that golden bar…
To add a complication to the issue, my power button has been broken for a long time, so I can't even shutdown the phone anymore (I can reboot using RecBoot on the computer, tough).
My ribbon cable plug socket #3 is semi-torn apart from a previous endeavor so I forced the ribbon in (locking action not strong enough any more to keep the ribbon from being pushed in) and I put sliced ESD foam pads above it and between the other overlapping ribbon cables and a thicker ESD foam pad on top of them all the cable ribbons in order to have permanent pressure applied by the front cover assembly to the #3 messed-up ribbon-plug connection. It seems to be holding up properly and everything works ok!