Esta versión puede contener ediciones incorrectas. Cambiar a la última instantánea verificada.
Qué necesitas
-
-
Calienta un iOpener y aplícalo en el borde izquierdo durante dos minutos.
-
-
-
Coloca una ventosa hasta la mitad del lado calentado.
-
Asegúrese de que la taza esté completamente plana en la pantalla para obtener un sello hermético.
-
Mientras sostiene el iPad hacia abajo con una mano, tire de la ventosa para separar ligeramente el conjunto del panel frontal de la carcasa trasera.
-
-
-
Deja la púa de plástico en el iPad, después de haber pasado la cámara frontal.
-
Coge una segunda púa e insértala a la izquierda de la cámara frontal, justo donde estaba antes la primera púa. Deslízala hacia la esquina para despegar el resto del adhesivo.
-
Deja la segunda púa ahí, para evitar que el adhesivo de la esquina vuelva a pegarse.
-
-
-
-
Retira los cuatro tornillos Phillips de 1.2mm que se encuentran sobre el soporte que conecta la batería y la pantalla.
-
-
-
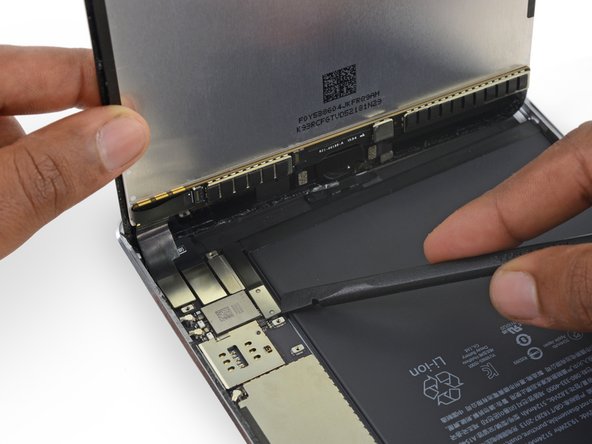
Usa el extremo puntiagudo de un spudger para desconectar el conector de datos de la pantalla de su zócalo en la placa lógica.
-
Usa el extremo puntiagudo de un spudger para desconectar el conector del cable del digitalizador de su zócalo en la placa lógica.
-
-
Este paso está sin traducir. Ayuda a traducirlo
-
Use the pointed tip of a spudger to flip up the retaining flap on the home button ZIF socket.
-
-
Este paso está sin traducir. Ayuda a traducirlo
-
Use tweezers to unplug the home button ribbon cable from the ZIF socket.
-
Continue peeling the ribbon cable up to the EMI shield.
-
-
Este paso está sin traducir. Ayuda a traducirlo
-
Use tweezers to lift the home button control hardware module off the display assembly.
-
-
Este paso está sin traducir. Ayuda a traducirlo
-
Use an opening pick to continue separating the home button ribbon cable from the display assembly.
-
-
Este paso está sin traducir. Ayuda a traducirlo
-
Use a plastic opening tool to pry the home button bracket off the display assembly.
-
-
Este paso está sin traducir. Ayuda a traducirlo
-
Heat an iOpener and lay it over the lower edge of the front panel to soften the adhesive holding the home button in place.
-
-
Este paso está sin traducir. Ayuda a traducirlo
-
Slowly push the home button up and out of the display assembly to separate the gasket from the front panel.
-
-
Este paso está sin traducir. Ayuda a traducirlo
-
Examine your replacement part, and your original display carefully to be sure they match.
-
Your replacement screen may be missing the sleep/wake sensor that is necessary for Smart Cover use. If you want to maintain functionality you will need to transfer the component.
-
Desolder the six solder pads from the lower left of the display to remove the sensor assembly cable.
-


Cancelar: No complete esta guía.
28 personas más completaron esta guía.

4 comentarios
Not only is that part in step 39 crucial to Smart-Cover function, but the regular sleep/wake function will not work if this isn’t transferred. Wish the replacements were shipped with this part attached, because soldering those tiny points is near impossible to do! Buyer/repairer beware.
Its better to have reassemble instruction, like where i am going to put the new adhesive?
The iFixIt replacement part did not come with adhesive, so I had to reuse the old adhesive that got pulled and torn during removal of the bad screen.
Also, the iFixIt replacement part does not come with the sleep/wake sensor (Step 39). Following my repair, the iPad is no longer capable of going to sleep (neither by the button on top nor through AssistiveTouch), so we have to resort to waiting for the lock screen timer to turn the screen off whenever we’re done using it. I feel the soldering that is required to maintain this functionality (I would imagine it would need a millimeter-diameter drop of solder on six contacts that are then pressed together with the transplanted part to form the bond without solder spilling onto a neighboring contact) is not within the capability of most casual repairers.
If I were to do this repair again, I would find a part that has fresh adhesive and the sleep/wake sensor already attached.
My kit did come with the adhesive, but it's a little tricky to figure out (and there is an embedded link to the adhesive). Needs some more pictures/pointers about re-installing the home button, ended up with a gap in the adhesive near the home button. Also, tips on how to remove shattered glass? Otherwise, thanks for the tutorial, looks new.