Esta versión puede contener ediciones incorrectas. Cambiar a la última instantánea verificada.
Qué necesitas
-
-
Si el cristal de la pantalla está agrietado, evita que se siga rompiendo y evita daños corporales durante la reparación pegando el cristal con cinta adhesiva.
-
Coloca tiras superpuestas de cinta de embalar transparente sobre la pantalla del iPad hasta cubrir toda la cara. Para roturas especialmente graves, puede que tengas que poner dos capas.
-
Haz todo lo posible por seguir el resto de la guía tal como se describe. Sin embargo, una vez roto el cristal, es probable que siga agrietándose mientras trabajas, y puede que tengas que utilizar una herramienta de palanca metálica para sacar el cristal.
-
-
-
Calienta un iOpener y aplícalo en el borde izquierdo durante dos minutos.
-
-
-
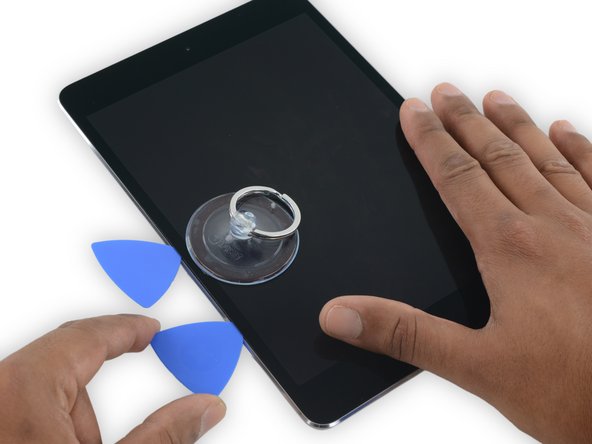
Coloca una ventosa hasta la mitad del lado calentado.
-
Asegúrese de que la taza esté completamente plana en la pantalla para obtener un sello hermético.
-
Mientras sostiene el iPad hacia abajo con una mano, tire de la ventosa para separar ligeramente el conjunto del panel frontal de la carcasa trasera.
-
-
-
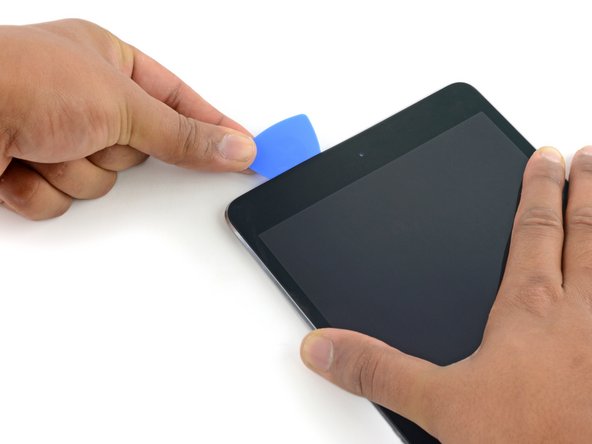
Mientras sostiene el vaso con la ventosa, inserta la punta de una púa de apertura en el espacio entre el vidrio y el cuerpo del iPad.
“Don't insert the opening pick any deeper than the black bezel on the side of the display. Inserting the pick too far may damage the LCD.”
Unfortunately, you only know you have inserted it too far when you have, and you start seeing little bubble veins form between the glass screen and the LCD.
The adhesive can be very stiff/hard, and if pushing through it can result in the pick plunging into the LCD when the adhesive finally gives way.
Take your time, use alot of heat, and if you need to try and push the pick in, try and do so in a slicing motion along the edge, use the wide edge, or hold the pick so that your finger will hit the edge of the screen before the pick tip will pass the bezel.
Adhesive strips are only 1mm wide on sides. Up to 5mm wide top and bottom. I used the Isclack. Screen seemed ok bending without breaking. Worth looking for a photo of the replacement adhesive strips so you know what you have to separate. Be extra careful at the lower right corner where the cables are.
This is a failure of a guide as it doesn’t tell you to insert at a downward angle so you don’t potrude into the LCD… Now I have to spend more money to replace the screen as I pushed adhesive between the LCD and the screen even though I went no farther than a millimeter short of the screen...
can you open the right side if the left is too cracked to use a suction cup on?
This guide needs amending urgently.
You MUST NOT put the pick or whatever you are using more than 2mm under the sides of the screen, or you will cut through the adhesive tape securing the backlight assembly to the LCD glass.
This will push adhesive into the viewable area of the LCD and cause the backlight assembly to no longer be secured against the LCD fully.
I now need a new screen.
This line below from the guide is absolutely INCORRECT and will ruin your expensive display:
”Don't insert the opening pick any deeper than the black bezel on the side of the display.”
The black bezel is 5mm to 6mm wide; you MUST NOT insert anything to that depth or you will destroy your display. 2mm maximum!
thanks. will take this into account for my repair
Adab Abu -
I too damaged my display because of this absolute nonsense (The German version, which I used, still had this INCORRECT portion in it). I can't believe how long it took iFixit to update this, even though people have been reporting this for years on end. Sadly iFixit still haven't updated a variety of other things that are still at the very least high risk instructions. I just messaged them the other day, but they don't seem to care about or understand the remaining issues that this guide has. At least they updated one of the most severe things, but they just plainly told me 'I'm wrong' about the rest. I liked iFixit it so far, and I've worked on a variety of (difficult) repairs - but this experience was a very huge let down.
A few thoughts after opening a number of Mini 4’s.
1) if the display is warm enough you can squeeze the digitizer and LCD back together after a minor incursion with the opening pick and it will reseal.
2) I’ve started going in at the top just to the right of the camera (I use an iFlex to get in then switch to a pick). Then I run down either side with my fingers choked up on the pick so there only a mm or 2 sticking out. Usually after running down one side, I can get the display open enough to get the pick in behind the LCD when I do the other side
-
-
-
Vuelve a calentar y vuelve a aplicar el iOpener en el borde izquierdo durante unos minutos.
If your iPad is cold, consider leaving the iOpener on for longer than 5 minutes. The aluminum housing is a very large thermally dissipating mass and will quickly cool off the glass and make you have to start over and wait the 10 minutes to reheat. There’s a very slim window in which you’re able to insert the pick into the glass adhesive before it solidifies once again. I’ve been fighting with it for like 20 minutes following these instructions and it’s not working. You really need to leave it for longer than just 5 minutes to get the back housing hot too.
Heat is essential. I used a 3d printer’s heated set at 65 degrees. Chris Storer’s stip above saved me as you really need to let it sit for quite a while to soften the adhesive. Since I was doing a battery change, I heated both sides as the aluminum back is a huge heatsink that really sucks up the heat. Don’t try forcing it; if the suction cup isn’t pulling a gap in the screen, leave it on the heater for additional time.
Love the 3d printer idea, I hadn’t thought of that! I have used a heat gun as well but you have to be very careful to not use too much heat. Also watch for inserting the pick too far, it is really easy to delaminate glass from the display!
russ -
-
-
-
Inserta una segunda púa de apertura junto con la primera y desliza la selección hacia abajo a lo largo del borde del iPad, liberando el adhesivo sobre la marcha.
-
-
-
Deja la púa de plástico en el iPad, después de haber pasado la cámara frontal.
-
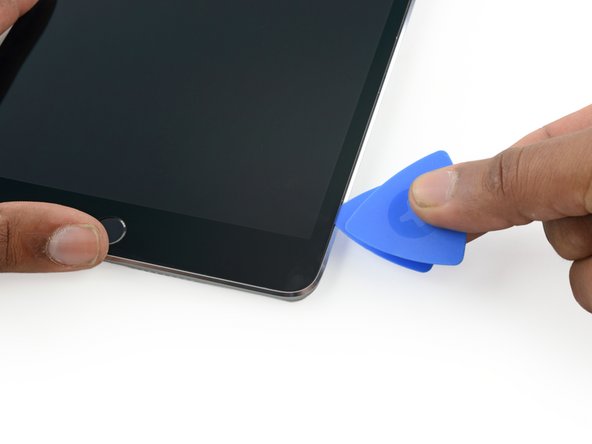
Coge una segunda púa e insértala a la izquierda de la cámara frontal, justo donde estaba antes la primera púa. Deslízala hacia la esquina para despegar el resto del adhesivo.
-
Deja la segunda púa ahí, para evitar que el adhesivo de la esquina vuelva a pegarse.
-
-
-
-
Gira las dos púas de las esquinas superiores del iPad para despegar los últimos restos del adhesivo que mantienen la pantalla en su lugar.
-
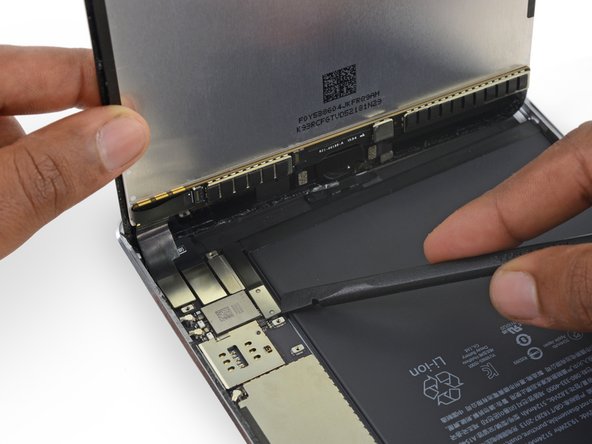
Levanta la pantalla por el borde superior para abrir el dispositivo.
"Twist the two picks at the top edge of the iPadTwist the two picks at the top edge of the iPad "
When I did this twisting motion, and I thought I was being gentle, one of the picks cracked nearly in half. That adhesive is very strong! I probably did not cut into it far enough before applying the twisting to open the screen.
-
-
-
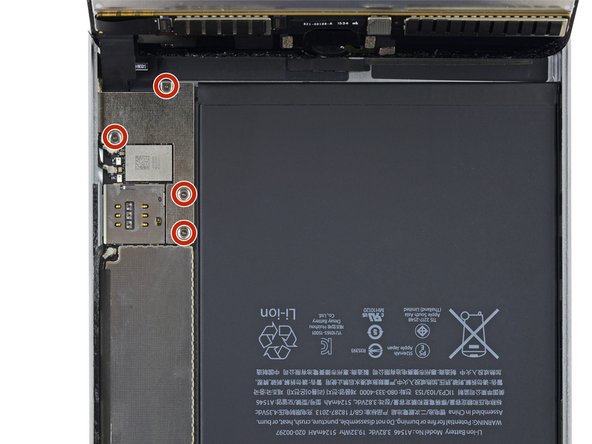
Retira los cuatro tornillos Phillips de 1.2mm que se encuentran sobre el soporte que conecta la batería y la pantalla.
-
-
-
Retira el soporte del cable que une la batería y la pantalla.
Is it the end of the world if the bracket is not reinstalled, will the device function normally or will it eventually have issues with the connectors coming loose following shock?
-
-
-
Usa la punta plana de un spudger para desconectar el conector de la batería de su zócalo en la placa lógica.
When i was starting to disconnect the lcd to the board i hit the black film and it lit and now even the new display wont display anything how to fix it? The black film near the lcd connector.
-
-
-
Usa el extremo puntiagudo de un spudger para desconectar el conector de datos de la pantalla de su zócalo en la placa lógica.
-
Usa el extremo puntiagudo de un spudger para desconectar el conector del cable del digitalizador de su zócalo en la placa lógica.
-
-
-
Retira el conjunto de la pantalla.
Ich habe eine Bücherstütze benutzt um das Display in senkrechter Position zu halten, während ich die vier Schräubchen gelöst habe.. So zieht man nicht so an den Flexkabeln….!
Because the 3-piece adhesive strips shown in the Display Adhesive Application Guide link were different from iPad Mini 4 Adhesive Strips (item code IF316-013-1), it wasn't easy to figure out the exact location of the bottom adhesive. It would be helpful to include a separate application guide or an additional picture showing the exact location of each strip) on the guide.
-
-
Este paso está sin traducir. Ayuda a traducirlo
-
Use the pointed tip of a spudger to flip up the retaining flap on the home button ZIF socket.
-
-
Este paso está sin traducir. Ayuda a traducirlo
-
Use tweezers to unplug the home button ribbon cable from the ZIF socket.
-
Continue peeling the ribbon cable up to the EMI shield.
-
-
Este paso está sin traducir. Ayuda a traducirlo
-
Use tweezers to lift the home button control hardware module off the display assembly.
-
-
Este paso está sin traducir. Ayuda a traducirlo
-
Use an opening pick to continue separating the home button ribbon cable from the display assembly.
-
-
Este paso está sin traducir. Ayuda a traducirlo
-
Use a plastic opening tool to pry the home button bracket off the display assembly.
The tip about the high-bond tape is great, but high-bond tape is something that should be mentioned at the beginning in the list of supplies we need. Because I have the whole thing taken apart, and now I’m told I need something that I don’t have on hand. So what am I supposed to do, just let everything sit around open, until I get to the store to see if they have some high-bond tape?
-
-
Este paso está sin traducir. Ayuda a traducirlo
-
Heat an iOpener and lay it over the lower edge of the front panel to soften the adhesive holding the home button in place.
-
-
Este paso está sin traducir. Ayuda a traducirlo
-
Slowly push the home button up and out of the display assembly to separate the gasket from the front panel.
-
Cancelar: No complete esta guía.
15 personas más completaron esta guía.
4 comentarios
Great tutorial but you should change the title to button removal. You never show how to replace it as suggested by the title.
I would have appreciated some points on installing the button. I clearly missed something and the button is not solid. When I push on it it sinks into the iPad. It works but it isn’t right and I’m not willing to risk breaking the glass to try something different, especially since I still am not sure what needs to be done differently.
I replaced the new screen of iPhone Mini 4 with same original home button. But Home button does not work. Does it requires any microsoldering to home button work?


