Introducción
Use esta guía para reemplazar el cable conector del puerto de su iPad.
Qué necesitas
-
-
Si está agrietado el cristal de la pantalla, mantenga aún más la rotura contenida y prevenir daños físicos durante su reparación con cinta adhesiva el vidrio.
-
Coloque tiras de cinta adhesiva transparente sobre la pantalla del iPad se solapan hasta que toda la superficie está cubierta.
-
Haga todo lo posible para seguir el resto de la guía como se ha descrito. Sin embargo, una vez que el vidrio se rompe, es probable que continúe a agrietarse a medida que trabaja, y es posible que necesite usar una herramienta de palanca de metal para recoger el vaso.
-
-
-
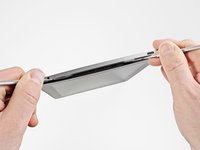
Inserta un spudger de metal entre el borde superior del ensamblaje de la pantalla y el ensamblaje del panel posterior.
-
Gira el spudger en dirección opuesta a ti para liberar las pestañas a lo largo del borde superior de la pantalla.
-
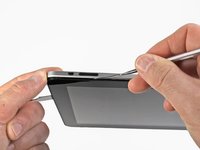
Inserta un segundo spudger de metal entre el borde superior del ensamblaje de la pantalla y el ensamblaje del panel posterior para evitar que las pestañas vuelvan a encajar en su lugar.
-
-
-
Con un spudger, avanza a lo largo del borde derecho del iPad.
-
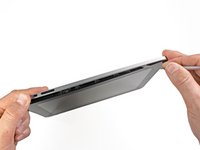
El panel frontal se sujeta a la parte posterior de aluminio mediante clips metálicos en los lados superior, inferior e izquierdo. El lado derecho tiene pestañas de plástico que se deslizan dentro de los huecos de la placa posterior.
-
Una vez que se sueltan los clips, levanta el lado izquierdo del panel frontal y deslízalo hacia la izquierda para quitar las pestañas de la placa posterior de aluminio.
-
-
-
-
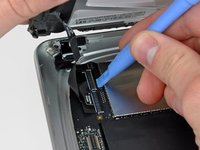
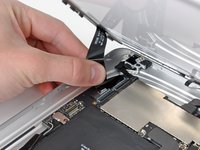
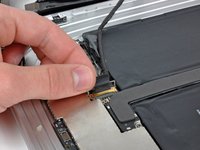
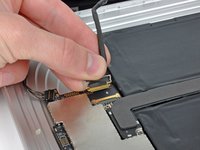
Retire los dos tornillos Torx T5 de 4.56 mm que sujetan el cable del conector de la base a la placa principal.
-


Para volver a armar su dispositivo, siga estas instrucciones en orden inverso.
Para volver a armar su dispositivo, siga estas instrucciones en orden inverso.
Cancelar: No complete esta guía.
36 personas más completaron esta guía.
Un agradecimiento especial a estos traductores:
100%

¡ irlanda nos está ayudando a reparar el mundo! ¿Quieres contribuir?
Empezar a traducir ›

4 comentarios
How much if I repair my ipad air 1 for the damaged 30-pin dock here in the philippines