Esta versión puede contener ediciones incorrectas. Cambiar a la última instantánea verificada.
Qué necesitas
-
-
Llena una olla o cacerola con suficiente agua para sumergir completamente el iOpener.
-
Calienta el agua hasta que hierva. Apaga el fuego.
-
Coloca un iOpener en el agua caliente durante 2-3 minutos. Asegúrate de que el iOpener esté completamente sumergido en el agua.
-
Utiliza unas pinzas para extraer el iOpener calentado del agua caliente.
-
Seca bien el iOpener con una toalla.
-
Tu iOpener está listo para ser utilizado. Si necesita recalentar el iOpener, calienta el agua hasta que hierva, apaga el fuego y coloca el iOpener en el agua durante 2-3 minutos.
-
-
-
Si tu pantalla de cristal está rota, evita que se produzcan más roturas y evita daños corporales durante la reparación encintando el cristal
-
Coloca tiras superpuestas de cinta de embalaje transparente sobre el display de la iPad hasta que la caratula este completamente cubierta.
-
Haz lo mejor para seguir el resto de la guía como se describe. Aun así, una vez que el vidrio esta roto, este continuará rompiéndose conforme trabajas, y puede que necesites una herramienta de palanca de metal para sacar el cristal.
-
-
-
Con cuidado coloca e una ventosa en la mitad del lado calentado.
-
Asegúrate que la ventosa este completamente plana en la pantalla para conseguir un cierre hermético.
-
Mientras sostengas el iPad con una mano, jala con la ventosa para separar un poco el cristal del panel frontal de la cubierta trasera.
-
-
-
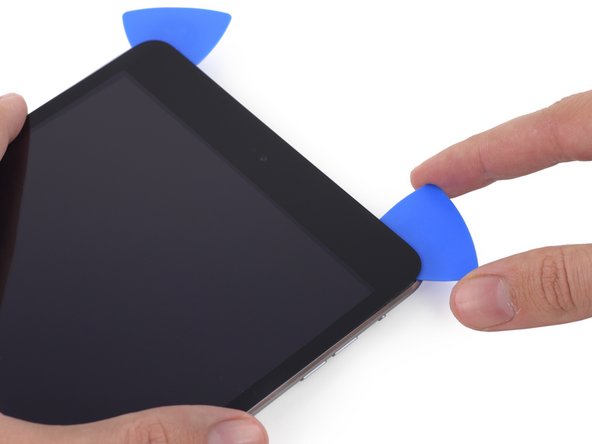
Toma la primer púa que insertaste y deslízala hacia la esquina superior de la iPad.
-
Si puedes ver la punta de la púa de apertura a través del cristal frontal, no te asustes-solo jala la púa hacia afuera un poco. Lo mas probable es que todo este bien, pero trata de evitar esto ya que puede colocar adhesivo en el frontal del LCD el cual es difícil de limpiar.
-
-
-
Deja la púa de apertura en el iPad ligeramente pasando la cámara frontal,
-
Toma una segunda púa e insértala a la izquierda de la cámara; donde la primer púa estaba. Deslízala hacia la esquina para quitar por completo el adhesivo restante.
-
Deja la segunda púa en este lugar para prevenir que el adhesivo de la esquina vuelva a sellar mientras se enfría.
-
-
-
Desliza la púa del lado inferior izquierdo hacia la esquina inferior izquierda para cortar el adhesivo en esa esquina.
-
Deja la púa en la esquina. No palanquees más, y no remuevas la púa del iPad.
-
Antenas
-
Cavidad del botón de inicio
-
Cable digitalizador
-
Los siguientes pasos te indicarán donde hacer palanca para evitar hacer daño a estos componentes. Solo aplica calor y has palanca donde se indique.
-
-
-
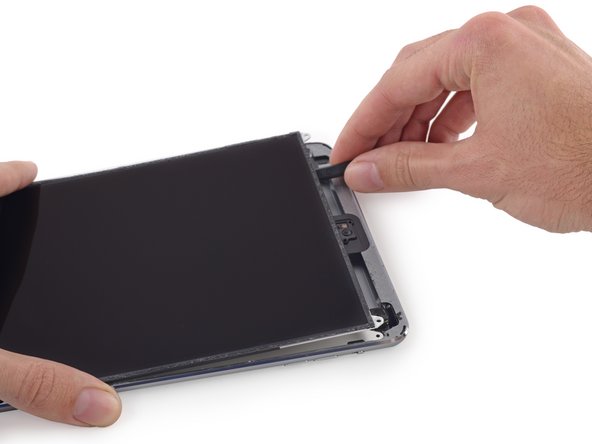
Una vez que todo el adhesivo se halla separado, abre el cristal frontal como una página de un libro y colócala en tu espacio de trabajo.
-
Si se reutiliza el conjunto del panel frontal durante el montaje, necesitarás reemplazar el adhesivo de tu display. Usa nuestra guia de aplicación de adhesivo de display para reaplicar el adhesivo al display y sellar tu dispositivo.
-
-
-
Inserta la punta plana de un spudger debajo del LCD, entre este y la placa protectora del LCD y levante gentilmente.
-
Corre una cuerda delgada (como hilo dental o hilo de pesca) bajo la pantalla, comenzando desde la parte superior y luego trabajando hacia abajo
-
Usa una delgada, tarjeta flexible o dinero en plástico para cortar a través del adhesivo empezando desde arriba.
-
-
-
-
Remueve los siguientes tornillos Phillips #00 del soporte del cable del display.
-
Un tornillo de 2.7 mm
-
Dos tornillos de 1.4 mm
-
-
-
Usa la punta de un spudger para levantar el conector del cable digitalizador directamente de su socket.
-
-
Este paso está sin traducir. Ayuda a traducirlo
-
Remove the following Phillips #00 screws from the left antenna:
-
One 2.6 mm screw
-
Two 1.5 mm screws
-
-
Este paso está sin traducir. Ayuda a traducirlo
-
Use the flat end of a spudger to loosen the foam adhesive securing the Wi-Fi antenna to the left speaker.
-
-
Este paso está sin traducir. Ayuda a traducirlo
-
Use the flat end of a spudger to fold the wide left-hand piece of tape away from the left speaker.
-
-
Este paso está sin traducir. Ayuda a traducirlo
-
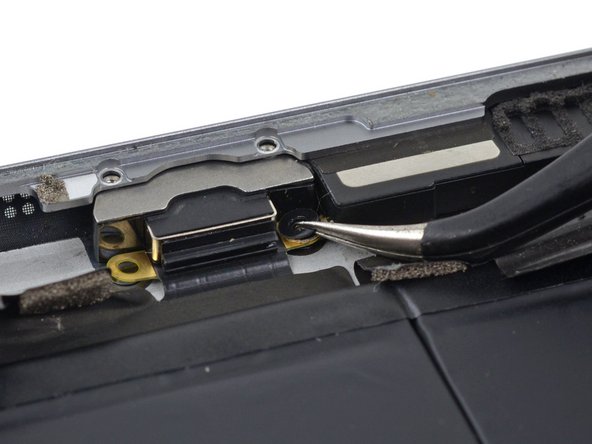
Use the tip of a spudger to pry the antenna cable tape up from the rear case of the iPad.
-
Gently pull the antenna cable out of the way as you work along the piece of tape to free it and keep it from resealing.
-
-
Este paso está sin traducir. Ayuda a traducirlo
-
Pull the antenna cable from the clip behind the Lightning connector.
-
-
Este paso está sin traducir. Ayuda a traducirlo
-
Pull the wide tape toward the battery, applying constant force to peel it from the antenna cable lodged between it and the speaker.
-
Insert a plastic opening tool into the gap between the wide tape and the antenna cable, to break the adhesive connecting the two.
-
Slide the plastic opening tool along the length of the antenna cable to completely separate it from the piece of tape.
-
-
Este paso está sin traducir. Ayuda a traducirlo
-
Lift the antenna cable tape up from behind the right speaker.
-
-
Este paso está sin traducir. Ayuda a traducirlo
-
Pull the antenna cable out from under the corner of the right speaker.
-
-
Este paso está sin traducir. Ayuda a traducirlo
-
Remove the following Phillips #00 screws from the right antenna:
-
Three 1.5 mm screws
-
One 2.6 mm screw
-
-
Este paso está sin traducir. Ayuda a traducirlo
-
Use the flat end of a spudger to cut the foam adhesive securing the antenna to the right speaker.
-
-
Este paso está sin traducir. Ayuda a traducirlo
-
Pull the bend of the antenna cable out of the corner of the case.
-
Fold the antenna out of the way of the right speaker.
-
-
Este paso está sin traducir. Ayuda a traducirlo
-
Remove the following Phillips #00 screws securing the right speaker to the rear case:
-
One 1.9 mm screw
-
One 1.7 mm screw with a large head
-
-
Este paso está sin traducir. Ayuda a traducirlo
-
Push the speaker with the flat end of a spudger to begin sliding it out of its recess in the rear case.
-
-
Este paso está sin traducir. Ayuda a traducirlo
-
Insert the tip of a spudger into the gap between the left speaker and the bottom left side of the rear case.
-
-
Este paso está sin traducir. Ayuda a traducirlo
-
Use a set of tweezers to remove any tape covering the front-facing camera cable clips.
-
-
Este paso está sin traducir. Ayuda a traducirlo
-
Use a plastic opening tool to fold the front-facing camera cable clips outward, away from the cable, freeing the cable connector.
-
-
Este paso está sin traducir. Ayuda a traducirlo
-
Use a plastic opening tool to lift the front-facing camera cable connector straight up off of its socket on the logic board.
-
-
Este paso está sin traducir. Ayuda a traducirlo
-
Use a plastic opening tool to gently fold the front-facing camera cable upwards (roughly at a 90-degree angle), exposing the bottom side of it.
-
-
Este paso está sin traducir. Ayuda a traducirlo
-
Use a set of tweezers to peel up the small piece of tape covering the microphone cable connector.
-
-
Este paso está sin traducir. Ayuda a traducirlo
-
Use the tip of a spudger to gently lift the tab on the microphone ribbon cable's ZIF connector.
-
-
Este paso está sin traducir. Ayuda a traducirlo
-
Slide the tip of a tweezer under the microphone cable to separate it from the adhesive holding it to the headphone jack cable.
-
-
Este paso está sin traducir. Ayuda a traducirlo
-
Use tweezers to pull the microphone cable straight out from its ZIF socket.
-
Gently bend the microphone cable up and out of the way of the headphone jack cable.
-
-
Este paso está sin traducir. Ayuda a traducirlo
-
Remove any tape covering the headphone jack cable connector.
-
-
Este paso está sin traducir. Ayuda a traducirlo
-
Use a plastic opening tool to fold the headphone jack cable clips outward, away from the cable, freeing the cable connector.
-
-
Este paso está sin traducir. Ayuda a traducirlo
-
Use a plastic opening tool to pry the headphone jack cable's connector up from its socket on the logic board.
-
-
Este paso está sin traducir. Ayuda a traducirlo
-
Lift the headphone jack cable up out of the way of the logic board.
-
-
Este paso está sin traducir. Ayuda a traducirlo
-
Remove the 1.4 mm Phillips #00 screw securing the rear-facing camera cable bracket.
-
-
Este paso está sin traducir. Ayuda a traducirlo
-
Use a set of tweezers to grip the rear-facing camera cable bracket and push it toward the rear-facing camera.
-
Lift the rear-facing camera cable bracket up off of the logic board.
-
-
Este paso está sin traducir. Ayuda a traducirlo
-
Use the flat end of a spudger to lift the rear-facing camera connector up off of its socket on the logic board.
-
Gently push the rear-facing camera cable away from the logic board.
-
-
Este paso está sin traducir. Ayuda a traducirlo
-
Remove the 1.8 mm Phillips #00 screw securing the case button cable bracket.
-
-
Este paso está sin traducir. Ayuda a traducirlo
-
Use the point of a spudger to lift the case button cable connector straight up out of its socket on the logic board.
-
Fold the cable out of the way of the logic board.
-
-
Este paso está sin traducir. Ayuda a traducirlo
-
Use the point of a spudger to lift the two antenna cable connectors straight up off of their sockets on the logic board.
-
-
Este paso está sin traducir. Ayuda a traducirlo
-
Use the point of a spudger to pull the antenna cable clip toward the battery to allow access to the cables.
-
-
Este paso está sin traducir. Ayuda a traducirlo
-
Remove the following Phillips #00 screws securing the left speaker to the rear case:
-
One 1.9 mm screw
-
One 1.7 mm screw
-
-
Este paso está sin traducir. Ayuda a traducirlo
-
Insert the tip of a spudger into the gap between the left speaker and the bottom left side of the rear case.
-
Push the spudger in to slide the speaker out from its recess in the rear case.
-
-
Este paso está sin traducir. Ayuda a traducirlo
-
Push from the Lightning connector end with the flat end of a spudger to free the speaker from the lip of the rear case.
-
-
Este paso está sin traducir. Ayuda a traducirlo
-
Heat an iOpener and place it in the center of the back of the iPad case.
-
After a minute, reheat the iOpener and place it on the right side of the iPad, the side farthest from the camera.
-
-
Este paso está sin traducir. Ayuda a traducirlo
-
Flip the iPad back over and insert a plastic card between the logic board side, speaker end of the battery and the rear case.
-
-
Este paso está sin traducir. Ayuda a traducirlo
-
Remove the plastic card and insert it under the cell nearest the edge of the case.
-
-
Este paso está sin traducir. Ayuda a traducirlo
-
Insert a second plastic card beneath the battery on the logic board side near the front-facing camera.
-
-
Este paso está sin traducir. Ayuda a traducirlo
-
Insert the second card under the battery near the headphone jack.
-
-
Este paso está sin traducir. Ayuda a traducirlo
-
Grasp both cards and slowly pull the case-side cell of the battery up about two inches from the rear case.
-
Peel slowly and try not to bend the battery cell.
-
-
Este paso está sin traducir. Ayuda a traducirlo
-
Move the right-hand card up under the other battery cell.
-
-
Este paso está sin traducir. Ayuda a traducirlo
-
Grip both cards and use them to lift the battery up off the rear case.
-
Remove the battery from the iPad.
-
-
Este paso está sin traducir. Ayuda a traducirlo
-
Peel up the tape covering the Lightning connector cable.
-
-
Este paso está sin traducir. Ayuda a traducirlo
-
Use a set of tweezers to remove the small plastic covers on the screws in the Lightning connector housing.
-
-
Este paso está sin traducir. Ayuda a traducirlo
-
Remove the two 2.8 mm Phillips #00 screws from the Lightning connector housing.
-
-
Este paso está sin traducir. Ayuda a traducirlo
-
Remove the single 1.3 mm Phillips #00 screw from the logic board.
-
-
Este paso está sin traducir. Ayuda a traducirlo
-
One under the upper component tab, and one under the Lightning connector ribbon cable.
-
In the following steps only pry where directed so as to avoid damaging your logic board.
-
-
Este paso está sin traducir. Ayuda a traducirlo
-
Place a heated iOpener on the bottom of the rear case for one minute.
-
-
Este paso está sin traducir. Ayuda a traducirlo
-
Carefully insert an opening pick under the ribbon cable near the Lighting connector housing.
-
Slide the opening pick toward the logic board, but stop half an inch from the bend in the cable.
-
-
Este paso está sin traducir. Ayuda a traducirlo
-
Reinsert the opening pick under the Lightning connector ribbon cable from the case-side edge.
-
Slide the pick along the Lightning connector ribbon cable and under the logic board.
-
-
Este paso está sin traducir. Ayuda a traducirlo
-
Reheat the iOpener and place it at the top of the rear case of the iPad for one minute.
-
-
Este paso está sin traducir. Ayuda a traducirlo
-
Carefully insert an opening pick under the logic board to the right of the front-facing camera.
-
-
Este paso está sin traducir. Ayuda a traducirlo
-
Place a plastic opening tool in the hole in the logic board near the rear-facing camera connector.
-
Pry the logic board up from the last of the adhesive.
-
-
Este paso está sin traducir. Ayuda a traducirlo
-
Lift the logic board by the camera end and gently pull the Lightning connector housing out of the rear case.
-
Remove the logic board from the iPad mini.
-


Cancelar: No complete esta guía.
27 personas más completaron esta guía.


4 comentarios
This guide uses an iPad mini 3 not a 2.
This guide is overkill, you really don't need to remove EVERY SINGLE PART From the IPad to replace a logic board. Just unplug everything and you can just unscrew it and replace.
Well, there was a part of the logic board under the battery, so they need to remove that. Sure, they likely could have removed it without taking everything out, but it would probably be a lot harder if things were in the way.
Kyan -
You dont need to remove battery!