Esta versión puede contener ediciones incorrectas. Cambiar a la última instantánea verificada.
Qué necesitas
-
Este paso está sin traducir. Ayuda a traducirlo
-
Remove the two 2.1 mm Phillips #00 Phillips screws securing the home button control board to the home button mounting bracket.
-
-
Este paso está sin traducir. Ayuda a traducirlo
-
Wedge the flat edge of a plastic opening tool in between the right end of the home button control board and the home button mounting bracket.
-
Depress the plastic opening tool downwards to pry the adhesive securing the home button control board from the home button mounting bracket.
-
-
Este paso está sin traducir. Ayuda a traducirlo
-
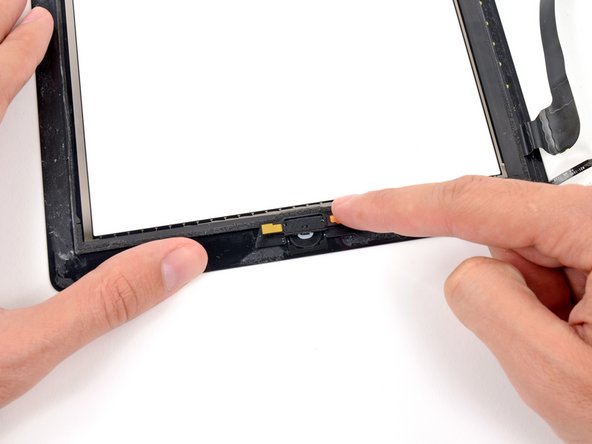
Lift and remove the home button control board up off the home button mounting bracket.
-
-
Este paso está sin traducir. Ayuda a traducirlo
-
Use the flat edge of a spudger to scrape the old adhesive off the bottom right corner of the front panel assembly.
-
-
Este paso está sin traducir. Ayuda a traducirlo
-
Gently place the home button control board on top of the home button mounting bracket.
-
-
-
Este paso está sin traducir. Ayuda a traducirlo
-
Insert the two 2.1 mm Phillips #00 Phillips screws back into the home button control board to secure it against the home button mounting bracket.
-
-
Este paso está sin traducir. Ayuda a traducirlo
-
In the following steps, you will be placing the remaining pieces of adhesive on the front panel.
-
Do not peel the clear backing off the strips just yet.
-
Place the bridge shaped adhesive strip between the top edge of the inner frame of the front panel and the camera mounting bracket.
-
Smooth the strip down from the center out, taking care to not trap any air bubbles between the strip and the front panel.
-
-
Este paso está sin traducir. Ayuda a traducirlo
-
Place the elongated C shaped adhesive strip on the right side of the front panel.
-
-
Este paso está sin traducir. Ayuda a traducirlo
-
Place the straight, medium length adhesive strip on the bottom right side of the front panel, underneath the home button ribbon cable.
-
-
Este paso está sin traducir. Ayuda a traducirlo
-
Place the tabbed rectangular adhesive strip on the bottom right side of the front panel.
-
-
Este paso está sin traducir. Ayuda a traducirlo
-
Place the long L-shaped adhesive strip on the bottom left corner of the front panel.
-
-
Este paso está sin traducir. Ayuda a traducirlo
-
Place the short rectangular shaped adhesive strip on the top left side of the front panel.
-
-
Este paso está sin traducir. Ayuda a traducirlo
-
Place the last, short L-shaped adhesive strip on the top left corner of the front panel.
-
-
Este paso está sin traducir. Ayuda a traducirlo
-
Use a pair of tweezers to peel the clear backing up off the adhesive strip directly underneath the home button ribbon cable.
-
Lay the home button ribbon cable down on the adhesive strip and smooth the cable down from the center out, taking care to not trap any air bubbles between the strip and the front panel.
-
-
Este paso está sin traducir. Ayuda a traducirlo
-
Use a dry microfiber cloth to clean the LCD and inside of the front panel glass. You may want to use canned air or an air compressor to blow away and dust.
-
Use a pair of tweezers to peel the clear backing up off each adhesive strip.
-


Cancelar: No complete esta guía.
18 personas más completaron esta guía.
