Saltar al contenido principal

iMac Intel 27" Retina 5K Display Hard Drive Replacement

Qué necesitas

  1. iMac Intel 27" Retina 5K Display Hard Drive Replacement, Display: paso 1, imagen 1 de 1
    Herramienta utilizada en este paso:
    iMac Intel 27" Cardboard Service Wedge
    $4.99
    Comprar
    • With the hinge free to move, the iMac will be unbalanced and hard to work on. Repairs can be completed with the iMac laying down, but are faster and easier with an iMac service wedge.

    • If you are using the iFixit cardboard service wedge, follow these assembly directions to put it together.

  2. iMac Intel 27" Retina 5K Display Hard Drive Replacement: paso 2, imagen 1 de 3 iMac Intel 27" Retina 5K Display Hard Drive Replacement: paso 2, imagen 2 de 3 iMac Intel 27" Retina 5K Display Hard Drive Replacement: paso 2, imagen 3 de 3
    • Starting on the left of the display, near the power button, insert the iMac Opening Tool into the gap between the glass panel and the rear case.

    • The hub on the iMac Opening Tool will keep you from pushing the wheel in too far. If using a different tool, insert no more than 3/8" (9.5 mm) into the display. You risk severing antenna cables and causing serious damage.

  3. iMac Intel 27" Retina 5K Display Hard Drive Replacement: paso 3, imagen 1 de 3 iMac Intel 27" Retina 5K Display Hard Drive Replacement: paso 3, imagen 2 de 3 iMac Intel 27" Retina 5K Display Hard Drive Replacement: paso 3, imagen 3 de 3
    • Use the tool like a pizza cutter—roll it along through the gap, and it will cut the foam adhesive through the center.

    • Be sure to always push with the handle behind the cutting wheel. If you pull, the wheel might get pulled out of the handle.

    • Run the tool up along the left side of the display.

  4. iMac Intel 27" Retina 5K Display Hard Drive Replacement: paso 4, imagen 1 de 3 iMac Intel 27" Retina 5K Display Hard Drive Replacement: paso 4, imagen 2 de 3 iMac Intel 27" Retina 5K Display Hard Drive Replacement: paso 4, imagen 3 de 3
    • Continue wheeling the tool up around the top left corner.

  5. iMac Intel 27" Retina 5K Display Hard Drive Replacement: paso 5, imagen 1 de 2 iMac Intel 27" Retina 5K Display Hard Drive Replacement: paso 5, imagen 2 de 2
    • Cut the adhesive along the top left of the display.

  6. iMac Intel 27" Retina 5K Display Hard Drive Replacement: paso 6, imagen 1 de 2 iMac Intel 27" Retina 5K Display Hard Drive Replacement: paso 6, imagen 2 de 2
    • Continue along the top of the display.

    • You may want to run the tool back and forth through what you've already cut a few times, to ensure you get as much of the adhesive separated as possible.

  7. iMac Intel 27" Retina 5K Display Hard Drive Replacement: paso 7, imagen 1 de 3 iMac Intel 27" Retina 5K Display Hard Drive Replacement: paso 7, imagen 2 de 3 iMac Intel 27" Retina 5K Display Hard Drive Replacement: paso 7, imagen 3 de 3
    • Push the tool around the top right corner of the display.

  8. iMac Intel 27" Retina 5K Display Hard Drive Replacement: paso 8, imagen 1 de 2 iMac Intel 27" Retina 5K Display Hard Drive Replacement: paso 8, imagen 2 de 2
    • Wheel the tool down along the right side of the display.

  9. iMac Intel 27" Retina 5K Display Hard Drive Replacement: paso 9, imagen 1 de 2 iMac Intel 27" Retina 5K Display Hard Drive Replacement: paso 9, imagen 2 de 2
    • Finish pushing the opening tool to the bottom of the right side of the display.

    • At this point, you'll want to run the tool back around the entire display, to ensure you cut as much adhesive as possible.

  10. iMac Intel 27" Retina 5K Display Hard Drive Replacement: paso 10, imagen 1 de 3 iMac Intel 27" Retina 5K Display Hard Drive Replacement: paso 10, imagen 2 de 3 iMac Intel 27" Retina 5K Display Hard Drive Replacement: paso 10, imagen 3 de 3
    Herramienta utilizada en este paso:
    Plastic Cards
    $2.99
    Comprar
    • While the opening tool did the lion's share of the work, the display will still be slightly adhered to the case. A plastic card will be necessary to free up the last of this adhesive.

    • Set the iMac face-up on a table.

    • Starting from the top right corner of the iMac, insert a plastic card between the display and frame.

    • Be careful not to insert it more than 3/8" (9.5 mm), or you may damage internal components.

  11. iMac Intel 27" Retina 5K Display Hard Drive Replacement: paso 11, imagen 1 de 2 iMac Intel 27" Retina 5K Display Hard Drive Replacement: paso 11, imagen 2 de 2
    • Gently twist the plastic card to open the space between the display and frame, and cut any remaining adhesive near the corner.

    • Using too much force will crack the glass. Work carefully, and don't try to create a gap any larger than about 1/4" (6 mm).

  12. iMac Intel 27" Retina 5K Display Hard Drive Replacement: paso 12, imagen 1 de 3 iMac Intel 27" Retina 5K Display Hard Drive Replacement: paso 12, imagen 2 de 3 iMac Intel 27" Retina 5K Display Hard Drive Replacement: paso 12, imagen 3 de 3
    • Be sure to stop cutting before the iSight camera in this step, or you may damage it.

    • Slide the card toward the center of the display, to cut any remaining adhesive.

  13. iMac Intel 27" Retina 5K Display Hard Drive Replacement: paso 13, imagen 1 de 2 iMac Intel 27" Retina 5K Display Hard Drive Replacement: paso 13, imagen 2 de 2
    • Put the card into the corner again and let it stay there to keep the adhesive from resettling.

  14. iMac Intel 27" Retina 5K Display Hard Drive Replacement: paso 14, imagen 1 de 3 iMac Intel 27" Retina 5K Display Hard Drive Replacement: paso 14, imagen 2 de 3 iMac Intel 27" Retina 5K Display Hard Drive Replacement: paso 14, imagen 3 de 3
    • Insert a second card into the gap between the display and frame in the top left corner.

  15. iMac Intel 27" Retina 5K Display Hard Drive Replacement: paso 15, imagen 1 de 2 iMac Intel 27" Retina 5K Display Hard Drive Replacement: paso 15, imagen 2 de 2
    • Gently twist the card, slightly increasing the space between the display and frame.

    • As with the other side, move slowly to allow the adhesive to break, and be careful not to over-stress the display glass.

  16. iMac Intel 27" Retina 5K Display Hard Drive Replacement: paso 16, imagen 1 de 3 iMac Intel 27" Retina 5K Display Hard Drive Replacement: paso 16, imagen 2 de 3 iMac Intel 27" Retina 5K Display Hard Drive Replacement: paso 16, imagen 3 de 3
    • Slide the plastic card toward the center, again stopping just before the iSight camera.

  17. iMac Intel 27" Retina 5K Display Hard Drive Replacement: paso 17, imagen 1 de 2 iMac Intel 27" Retina 5K Display Hard Drive Replacement: paso 17, imagen 2 de 2
    • Insert the card back into the top left corner.

  18. iMac Intel 27" Retina 5K Display Hard Drive Replacement: paso 18, imagen 1 de 3 iMac Intel 27" Retina 5K Display Hard Drive Replacement: paso 18, imagen 2 de 3 iMac Intel 27" Retina 5K Display Hard Drive Replacement: paso 18, imagen 3 de 3
    • Only lift the display a few inches—it is still attached to the iMac by data and power cables.

    • With the cards inserted as shown near the corners, gently twist the cards to increase the gap between display and case.

    • If there are any sections that seem to stick and won't separate, stop twisting and use one of the cards to cut the adhesive in the problem area.

    • Begin to lift the top of the display up from the frame.

  19. iMac Intel 27" Retina 5K Display Hard Drive Replacement: paso 19, imagen 1 de 2 iMac Intel 27" Retina 5K Display Hard Drive Replacement: paso 19, imagen 2 de 2
    • While holding the display up with one hand, use the other to unplug the display power cable.

    • Lift the display up enough to have easy access to the connections, but not so much that you stretch the cables and stress their connections (about 8").

  20. iMac Intel 27" Retina 5K Display Hard Drive Replacement: paso 20, imagen 1 de 3 iMac Intel 27" Retina 5K Display Hard Drive Replacement: paso 20, imagen 2 de 3 iMac Intel 27" Retina 5K Display Hard Drive Replacement: paso 20, imagen 3 de 3
    • Flip up the metal retaining bracket on the display data cable.

    • Disconnect the display data cable.

    • This is a delicate connection that can easily be broken. Be sure to pull the display data cable connector straight out of its socket, toward the top of the iMac.

  21. iMac Intel 27" Retina 5K Display Hard Drive Replacement: paso 21, imagen 1 de 2 iMac Intel 27" Retina 5K Display Hard Drive Replacement: paso 21, imagen 2 de 2
    • Lift the display up to a near-vertical position.

    • At this point there is still a strip of adhesive along the bottom of the display, that will hold the display to the frame like a hinge. You can loosen this adhesive by working the display up and down a few times.

    • Remove as much of the adhesive as possible by grabbing it at the outer edges, and then pulling or rolling it towards the middle.

  22. iMac Intel 27" Retina 5K Display Hard Drive Replacement: paso 22, imagen 1 de 3 iMac Intel 27" Retina 5K Display Hard Drive Replacement: paso 22, imagen 2 de 3 iMac Intel 27" Retina 5K Display Hard Drive Replacement: paso 22, imagen 3 de 3
    • Be very careful not to touch the capacitor leads or any exposed solder joints on the back of the power supply (boxed in red).

    • If necessary, a plastic card can be used to cut any remaining sections of the bottom adhesive strip.

  23. iMac Intel 27" Retina 5K Display Hard Drive Replacement: paso 23, imagen 1 de 3 iMac Intel 27" Retina 5K Display Hard Drive Replacement: paso 23, imagen 2 de 3 iMac Intel 27" Retina 5K Display Hard Drive Replacement: paso 23, imagen 3 de 3
    • Be very careful handling the display—it's big, heavy, and made of glass. The display has fragile edges. Avoid lifting the display by the corners.

    • Lift the display up from the frame and remove it from the iMac. Lay the display face down on a flat, soft surface.

    • It may be necessary to slowly lift from one side, to peel against the remaining adhesive.

    • After the adhesive is cut, it cannot be used to re-seal the display in place. Follow this guide when your repair is complete to replace the adhesive strips that secure the display to the rear enclosure.

  24. iMac Intel 27" Retina 5K Display Hard Drive Replacement: paso 24, imagen 1 de 1
    • If you are replacing the display panel, you may need to transfer additional components from the old panel to the new one. Compare the back of the old display with the replacement display. Note all cables, sensors, and foam cushioning that are missing from the new display.

    • If there is a wire or cable underneath adhesive tape, always pull the tape off first.

    • If the cable is glued to the chassis, use a heated iOpener or a hair dryer to soften the adhesive first. You can then slide an opening pick underneath the cable to loosen it. Never pull directly on the delicate connectors.

    • Slide an opening pick underneath the foam cushion pieces to separate them from the display, and gently pull them off. You may need some double sided tape to re-attach them to the new display.

  25. iMac Intel 27" Retina 5K Display Hard Drive Replacement, Remove the left speaker: paso 25, imagen 1 de 1
    • Remove two 10 mm T10 screws.

  26. iMac Intel 27" Retina 5K Display Hard Drive Replacement: paso 26, imagen 1 de 3 iMac Intel 27" Retina 5K Display Hard Drive Replacement: paso 26, imagen 2 de 3 iMac Intel 27" Retina 5K Display Hard Drive Replacement: paso 26, imagen 3 de 3
    • Unplug the left speaker cable by pulling it straight up out of its socket on the logic board.

    • De-route the cable from the gap between the hard drive and logic board.

    • If the gap between the hard drive and logic board is too narrow for the speaker cable, disconnect it and leave the cable in place.

  27. iMac Intel 27" Retina 5K Display Hard Drive Replacement: paso 27, imagen 1 de 3 iMac Intel 27" Retina 5K Display Hard Drive Replacement: paso 27, imagen 2 de 3 iMac Intel 27" Retina 5K Display Hard Drive Replacement: paso 27, imagen 3 de 3
    • Be careful not to touch any solder joints on the back of the power supply. Capacitors may be charged enough to give you a dangerous shock.

    • Use a spudger to disconnect the power button connector from its socket on the logic board.

  28. iMac Intel 27" Retina 5K Display Hard Drive Replacement: paso 28, imagen 1 de 2 iMac Intel 27" Retina 5K Display Hard Drive Replacement: paso 28, imagen 2 de 2
    • Lift the left speaker straight up, until the power button cable is exposed (about 0.5 inches).

  29. iMac Intel 27" Retina 5K Display Hard Drive Replacement: paso 29, imagen 1 de 3 iMac Intel 27" Retina 5K Display Hard Drive Replacement: paso 29, imagen 2 de 3 iMac Intel 27" Retina 5K Display Hard Drive Replacement: paso 29, imagen 3 de 3
    • Gently de-route the power button cable from its groove in the left speaker.

  30. iMac Intel 27" Retina 5K Display Hard Drive Replacement: paso 30, imagen 1 de 3 iMac Intel 27" Retina 5K Display Hard Drive Replacement: paso 30, imagen 2 de 3 iMac Intel 27" Retina 5K Display Hard Drive Replacement: paso 30, imagen 3 de 3
    • Lift the left speaker straight up and remove it from the iMac.

    • If the gap between the hard drive and logic board was too narrow to free the speaker cable earlier, gently pull it free as you remove the speaker.

    • Push from the connector end as you pull from the speaker end to thread the cable under the hard drive's right bracket.

  31. iMac Intel 27" Retina 5K Display Hard Drive Replacement, Hard Drive: paso 31, imagen 1 de 2 iMac Intel 27" Retina 5K Display Hard Drive Replacement, Hard Drive: paso 31, imagen 2 de 2
    • Pull straight up on the SATA data/power cable to disconnect it from the drive.

  32. iMac Intel 27" Retina 5K Display Hard Drive Replacement: paso 32, imagen 1 de 1
    • Remove two 7.3 mm T10 screws securing the left hard drive bracket to the rear case.

  33. iMac Intel 27" Retina 5K Display Hard Drive Replacement: paso 33, imagen 1 de 3 iMac Intel 27" Retina 5K Display Hard Drive Replacement: paso 33, imagen 2 de 3 iMac Intel 27" Retina 5K Display Hard Drive Replacement: paso 33, imagen 3 de 3
    • Grab the hard drive and left hard drive bracket together.

    • Tilt the left side up away from the rear case, and slide the assembly to the left.

    • Remove the hard drive and left hard drive bracket from the iMac.

  34. iMac Intel 27" Retina 5K Display Hard Drive Replacement: paso 34, imagen 1 de 2 iMac Intel 27" Retina 5K Display Hard Drive Replacement: paso 34, imagen 2 de 2
    • Remove the left hard drive bracket.

  35. iMac Intel 27" Retina 5K Display Hard Drive Replacement, Hard Drive: paso 35, imagen 1 de 1
    • Remove the four 8.1 mm T8 screw posts from the hard drive, and transfer them to the replacement drive enclosure.

  36. iMac Intel 27" Retina 5K Display Hard Drive Replacement, SSD (2012-2017 IcyDock): paso 36, imagen 1 de 3 iMac Intel 27" Retina 5K Display Hard Drive Replacement, SSD (2012-2017 IcyDock): paso 36, imagen 2 de 3 iMac Intel 27" Retina 5K Display Hard Drive Replacement, SSD (2012-2017 IcyDock): paso 36, imagen 3 de 3
    • Only follow the next 8 steps if you are replacing your hard drive with an SSD kit.

    • Depress the enclosure's front plate latch with your finger. While holding the latch down, swing the plate out.

    • Remove the front plate.

  37. iMac Intel 27" Retina 5K Display Hard Drive Replacement: paso 37, imagen 1 de 3 iMac Intel 27" Retina 5K Display Hard Drive Replacement: paso 37, imagen 2 de 3 iMac Intel 27" Retina 5K Display Hard Drive Replacement: paso 37, imagen 3 de 3
    • Line up the small SATA connector so that the short side on the SSD connector matches the short side on the enclosure connector.

    • Slide the drive in through the front of the enclosure until the SATA connector is fully seated.

    • The SSD connects with the enclosure in only one way. If the connectors are not lining up, rotate the SSD and try again.

  38. iMac Intel 27" Retina 5K Display Hard Drive Replacement: paso 38, imagen 1 de 2 iMac Intel 27" Retina 5K Display Hard Drive Replacement: paso 38, imagen 2 de 2
    • You may optionally install two Philips #1 screws that came with the enclosure kit to secure the SSD in the enclosure.

    • Replace the front plate.

  39. iMac Intel 27" Retina 5K Display Hard Drive Replacement: paso 39, imagen 1 de 2 iMac Intel 27" Retina 5K Display Hard Drive Replacement: paso 39, imagen 2 de 2
    • Plug the included sensor-enabled SATA cable into the enclosure's port.

    • Line up the narrow side of the cable connector with the narrow side of the enclosure connector. The cable is keyed to connect in only one way. If you can't connect the cable, rotate it 180°, and try again.

  40. iMac Intel 27" Retina 5K Display Hard Drive Replacement: paso 40, imagen 1 de 3 iMac Intel 27" Retina 5K Display Hard Drive Replacement: paso 40, imagen 2 de 3 iMac Intel 27" Retina 5K Display Hard Drive Replacement: paso 40, imagen 3 de 3
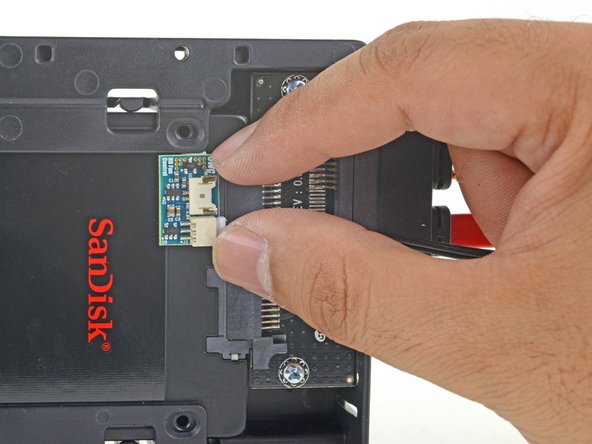
    • Peel the backing off of the adhesive back of the small temperature sensor board.

    • Adhere the temperature sensor board to an exposed, metal area of the surface of the SSD, as close as possible to the SATA connector.

    • Fold the excess temperature sensor wires so that they are out of the way while you install the enclosure.

  41. iMac Intel 27" Retina 5K Display Hard Drive Replacement: paso 41, imagen 1 de 1
    • Install the mounting pins from the old hard drive onto the sides of the enclosure.

    • The holes on the enclosure may not be threaded, so screwing the mounting pins into them may require extra effort. Take your time and screw them in slowly, making sure they go in straight.

  42. iMac Intel 27" Retina 5K Display Hard Drive Replacement: paso 42, imagen 1 de 2 iMac Intel 27" Retina 5K Display Hard Drive Replacement: paso 42, imagen 2 de 2
    • Attach any mounting brackets removed from the old hard drive onto the enclosure.

  43. iMac Intel 27" Retina 5K Display Hard Drive Replacement: paso 43, imagen 1 de 2 iMac Intel 27" Retina 5K Display Hard Drive Replacement: paso 43, imagen 2 de 2
    • Attach the iMac's SATA-combo cable to the new temperature-capable SATA-combo cable.

    • Route the SATA cables where they will not interfere with any other components.

    • Try to keep the cables free from any sharp bends and route them such that they are not pinched.

Conclusión

To reassemble your device, follow these instructions in reverse and use our Adhesive Strips Guide to reattach the display glass.

Take your e-waste to an R2 or e-Stewards certified recycler.

Repair didn’t go as planned? Try some basic troubleshooting, or ask our Answers community for help.

310 personas más completaron esta guía.

Sam Goldheart

Miembro Desde 10/18/12

465,116 Reputación

538 Guías creadas

Equipo

iFixit Miembro de iFixit

Staff

135 Miembros

16,475 Guías creadas

64 comentarios

I did successed this. But after just turn on, main fan spins faster than ordinary status. About 1600 rpm. Ordinary rpm is just 1200.

How can I fix it? Not by software solution(i.e., fan control app), help me by hardware solutions, plz.

*Replacement HDD : WDC WD40EZRX-00SPEB0

*iMac (Retina 5K, 27-inch, Late 2014)

*3.5 GHz Intel Core i5

*AMD Radeon R9 M290X 2048 MB

Changwon - Contestar

Dear Changwon, i also own a Retina imac (i7 Radeon 295). Harddisk has been changed by the distributor – they sell customized "Edition iMacs". Now i have the same problem as you subscribed - from day one. Fan speeds up to 1700 / 1750 rpm after a few seconds after power on. Next week my Apple certified distributor will check my iMac and hopefully fix that "noisy" problem. I will inform you, when we will be successful ... Have a great time so long. Greetings, Markus (mr@i-map.de)

Markus -

Did you use a original HDD with apple Firmware or a normal HDD? If u use a nomal HDD with non apple Firmware, you have the Fan Problem.

Klausi -

And it just show 1.8TB but that HDD is 4TB.. :( Help me anybody..

Changwon - Contestar

Agregar Comentario

Ver Estadísticas:

Ultimas 24 horas: 42

Ultimos 7 días: 343

Ultimos 30 días: 1,509

Todo El Tiempo: 477,624