Introducción
Sigue esta guía para reemplazar el disco duro para tu iMac.
Reemplazar el disco duro requiere separar la pantalla y mover la bocina izquierda.
Esta guía también incluye pasos para actualizar el disco duro de tu iMac a un SSD. También describe como instalar el sensor de temperatura del SSD para que los ventiladores de la iMac operen a la velocidad correcta.
Antes de empezar algún trabajo en tu iMac: Desconecta la computadora y presiona y mantén presionado el botón de encendido por 10 segundos para descargar los capacitores de la fuente de poder.
'''Ten cuidado de no tocar los cables de los capacitores o algún cable expuesto en la parte trasera de la fuente de poder.
Qué necesitas
-
-
Con la bisagra libre para moverse, la iMac estará desequilibrada y será difícil trabajar en ella. Coloca una cuña de servicio en el soporte para estabilizar la iMac.
-
Si utilizas la cuña de servicio de cartón iFixit, sigue estas instrucciones de montaje para armarla.
-
-
-
Desde la la izquierda de la pantalla, cerca del botón de encendido, inserta la herramienta de apertura de la iMac en el hueco entre el panel de cristal y la carcasa posterior.
-
-
-
Usa la herramienta como un cortador de pizza, pásala por el hueco y cortará el adhesivo de espuma por el centro.
-
Pasa la herramienta por el lado izquierdo de la pantalla.
-
-
-
Continúa pasando la rueda alrededor de la esquina superior izquierda.
-
-
-
-
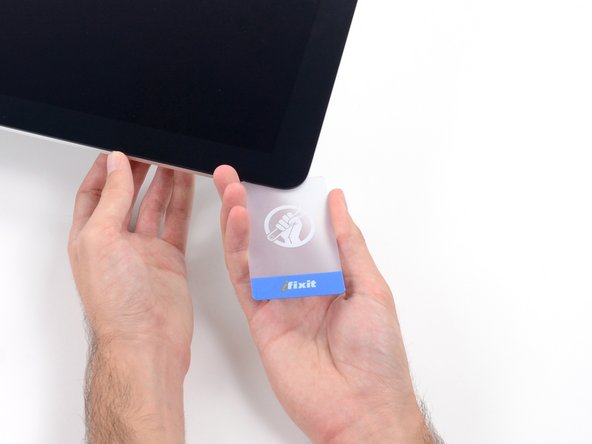
Con las tarjetas insertadas como se muestra cerca de las esquinas, gira suavemente las tarjetas para aumentar el espacio entre la pantalla y la caja.
-
Si hay alguna sección que parece pegarse y no se separa, deje de retorcer y use una de las tarjetas para cortar el adhesivo en el área del problema.
-
Comienza a levantar la parte superior de la pantalla del marco.
-
-
-
Mientras sostienes la pantalla con una mano, usa la otra para desenchufar el cable de alimentación de la pantalla.
This is not a picture of the 2019 model. On the 2019, the cable is angled and very close to a metal part that looks like it could be a wireless card. This makes it difficult to squeeze in the edges required to release the cable. I was able to unfasten it using my fingernail, doing one side at a time.
Same issue. You can't just pull it out. I used a plastic "spudger" to push the clips in. The photo here shows where to press
https://www.icloud.com/sharedalbum/#B0qG...
See also my comment in step 20
-
-
-
Levanta el soporte metálico de retención del cable de datos de la pantalla.
-
Desconecta el cable de datos de la pantalla.
on the 2020 model there is also a connector from the camera that is connected ted to the screen.
This isn't the photo of my IMac 27 2019.
To remove this clip, lift up the plastic tag sticking down & the metal clip will lift too
-
-
-
Agarra la pequeña pestaña al final de una de las tiras adhesivas de la pantalla del borde inferior y tira del adhesivo hacia la parte superior de la iMac para quitarlo
-
Repita este paso con la otra tira adhesiva y quítala.
-
-
-
Levanta la pantalla del marco y sácala del iMac. Coloca la pantalla boca abajo sobre una superficie plana y suave.
-
Puede que sea necesario levantarla lentamente por un lado, para despegar el adhesivo restante.
-
-
-
Usa un destornillador T10 para remover los dos tornillos de 10 mm que sujetan el altavoz izquierdo.
-
-
-
Tira directamente del cable combinado SATA para desconectarlo de la unidad.
-
-
-
Utiliza un destornillador T8 para quitar los dos tornillos de 7.3 mm que fijan el soporte izquierdo del disco duro a la carcasa trasera.
-
-
-
Quita los cuatro postes de tornillo T8 de 8.1 mm del disco duro y transfiérelos al receptáculo de la unidad de reemplazo.
-
-
-
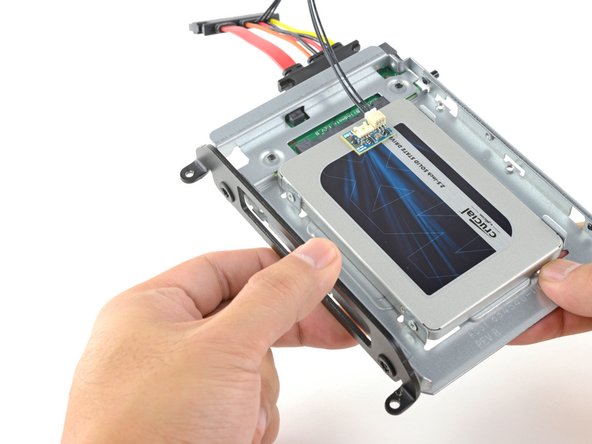
Alinea los conectores de la SSD con las tomas de la caja metálica.
-
Presiona la unidad contra las tomas de la carcasa hasta que la SSD quede firmemente asentada.
what if I’m installing a hard drive?
Didn’t bother with the SSD caddy. Some 3M sticky pads did the trick!
Been using them for years...works great.
Two thoughts on SSD replacement/upgrade:
1) It would help if some references were made to help us determine what we need in terms form factors. I’ve never used an SSD and see a 2.5” one that would work, but I don’t know if 2.5” SSDs are different (in form factor) from 2.5” HDs. A lot of us are still learning about SSDs and isn’t that what this site is about? (Learning new things about hardware and using hardware?)
2) I’m not clear if I definitely need a new temperature sensor if I put in an SSD or if
Can I buy the kit without the SSD. I'm thinking of replacing my 3TB hard drive with a 4TB SSD.
Also, would you happen to know what the maximum hard drive dimension that can fit inside of this iMac? I may try a 14TB hard drive instead.
A 14Tb HDD does not represent any problem. But I will care about rising temperature. Must attach a heat sensor. If rise to high, it will suddenly shutdown to protect it.
-
-
-
Conecta el cable de alimentación SATA habilitado para sensores incluido en el puerto del recinto.
Is the thermal sensor needed? I fitted a replacement SSD and it’s all back together and the iMac’s fans are fine. They don’t go into full max speed mode.
If you have a problem with the fans, you can always use Macs Fan Control (free) to set the speed. The sensor is not needed.
-
-
-
Despega el revestimiento blanco de la parte posterior de la pequeña placa del sensor de temperatura para exponer el adhesivo.
-
Pega la placa del sensor de temperatura a una superficie metálica expuesta del SSD, cerca del conector SATA.
-
Dobla los cables del sensor de temperatura sobrantes para que estén fuera del camino mientras instalas la caja.
Great pics ! Is that “temp sensor board” is already on my HDD IMAC ?? Or must I buy one ?
Don’t bother with the thermal sensor. I didn’t fit one and the iMac is working fine and no fans are kicking in.
Instructions say to attach sensor to the SSD, but all pictures show it being attached to the SSD carrier. This may not represent accurate SSD temp as much of the carrier dissipates the heat absorbed from the SSD
Confirmed, no need for the extra temp sensor on Mid-2015 iMac. (EMC 2806, Mid-2015 27" iMac). Just changed the old 1TB HDD to SSD, no extra fan RPM after power on.
-
-
-
Coloca los soportes de montaje que se hayan retirado del disco duro antiguo en el recinto.
i don't have a combo cable.i also didn't have asata drive. just a blade ssd. i don't see wwhere i could add a cable
-
-
-
Desliza el recinto del SSD en el espacio que ocupaba anteriormente el disco duro.
-
Encamina los cables SATA para que no interfieran con ningún otro componente.
The SATA cable on my Late 2012 was not long enough to comfortably attach to the end of the temperature sensor array after it was plugged into the new SSD. I had to fold the array and slide it under the SSD and housing. There was much resistance to the folding so I took it slowly to let the wires adjust gradually to the fold so they would not break.
Unfortunately, the adapter that comes with it isn't long enough to avoid pushing against the screen in the front. One week after upgrading to SSD my screen fell off shattering and breaking the power connector on the systems board. A new screen is ordered but I'm hoping the power connector isn't damaged beyond repair. I'm going to try to adhere the HD adapter to the back inside of the case with 3m adhesive to avoid pressure against the screen.
As a newbie, the only other upgrade I have done is to replace my iPhone 7 battery. I had trouble on reassembly.
This is a great upgrade guide, but it would be important to me to see the reassembly instructions including the cautions.
For example, I had issues with reattaching the plugs in the phone. I could see having an issue with them here, as well as repositioning the display back into the cabinet.
I do PCB board repair work and repair pinball machines. But I won’t try this.
Try 3m double sided tape from Amazon, it available in 3mm width which is ideal for iMac screen. It has a very thin foam and is much better quality than the cheap Chinese kits available on Amazon. You will have to trim it to size with a sharp craft blade as you fit. Don’t risk your screen falling off from using cheap tape in the so called fitting kits!
In my Late 2012 27" iMac I Scotch-taped the SATA connector to the case to stop it from pushing against the screen after reassembly.
Only 39 steps!
Is it possible to clone the internal disk and have the imac boot off the external SSD?
The extension cable is too long. I folded it over carefully & stuck it down to the case using a double sided sticky pad. Photo here
-


Compara tu nueva parte de reemplazo con la parte original --puede que necesites transferir componentes restantes o remover soportes adhesivos de la nueva parte antes de instalarla.
Para reensamblar tu dispositivo, sigue los pasos siguientes en orden inverso.
Lleva tu basura electrónica a un R2 or e-Stewards certified recycler.
La reparación no fue como lo planeado? Checa nuestro Answers community para ayuda.
Cancelar: No complete esta guía.
21 personas más completaron esta guía.
Un agradecimiento especial a estos traductores:
100%

¡ Fernando Salazar Garcia nos está ayudando a reparar el mundo! ¿Quieres contribuir?
Empezar a traducir ›

11 comentarios
Hola.
¿Es realmente necesario colocarle el sensor de temperatura al iMac A2115 de 2019?
Gracias. Saludos
A great and very carefully and detailed instruction. But what about glueing the glass pane back to the iMac? How does that work?
Thanks for any hint!
Hi Hans,
The instructions on how to glue the display back is embedded in step 23. Here is a quick link to the instructions!
If I replace a factory 1T SSD with a new 2T SSD . . .
am I correct in assuming it will already have the temperature sensor attached?
Would I need to replace the adhesive?
If you purchase the bundle from iFixit, the bundle will come with a temperature sensor. You can’t re-use the existing adhesives and will need to replace them. They are also included in the bundle.
Cual es el part-number del cable Sata? Sabéis si el iMac 27” 2019 con disco duro pci-express 512gb viene con el cable Sata para instalar un disco duro Sata?
gracias
What is the part-number of the Sata cable? Do you know if the iMac 27 ”2019 with 512gb pci-express hard drive comes with the Sata cable to install a Sata hard drive?
Thank you
Can I install an additional SSD to my blade? Is the SATA cable already in or has Apple saved a few cent¿
My 2019 iMac had a 2tb Fusion drive. This consisted of a 128gb blade and a 2tb SATA Seagate spinning HDD. I replaced the spinning disk with a SATA Samsung SSD + temp sensor, and then recreated a Fusion drive with the blade SSD and SATA SSD. As per this guide, I re-used the original SATA cable. Not sure if this would be different if your original spec was SSD only.
I am using the late 2019 version of iMac 27". Currently, the iMac has installed 3TB fusion drive but I want to replace the larger capacity of the HDD. So what is the maximum storage capacity of the HDD? Is it possible to install a 16TB HDD like NAS HDD? Thank you for the feedback in advance.
iMac19,1,3.6 GHz Core i9 (I9-9900K)。可以,我更换的型号是:HDD西部数据WDC WUH721816ALE6L4,NVME海康威视(慧荣主控)HS-SSD-C2000Pro 2048G。融合硬盘,缺点是更换HDD没有加装温度传感器风扇狂转,不知道更换希捷的硬盘会不会好点,我现在的解决办法是Macs Fan Control。还有就是更换硬盘前需要做U盘系统。
大木木 -
Die Anleitung ist wirklich sehr gut geschrieben und funktionierte bei mir soweit problemlos.
Allerdings heißt es zum Zusammensetzen lediglich, dass man die Schritte in umgekehrter Reihenfolge durchgehen soll. Dabei muss man aber natürlich die Kleberreste entfernen und neue Klebestreifen verwenden
UND: Man muss dabei darauf achten, das Mikro nicht zu überkleben! An der Kante über dem Apfel-Logo, wo das Display aufgesetzt wird gibt es etwas rechts von der Mitte zwei kleine Löcher - das sind die Mikros und diese dürfen nicht vom Klebestreifen verdeckt werden.