Introducción
Use this guide to replace the Apple custom blade SSD (NVMe/PCIe x4).
This guide is intended for iMac Intel 21.5" EMC 2545 models that are equipped with an SSD (Fusion Drive or blade SSD configurations).
If your system does not already have a blade SSD installed you won’t be able to install it later as the connector and the support components are not present on the logic board.
Qué necesitas
-
-
-
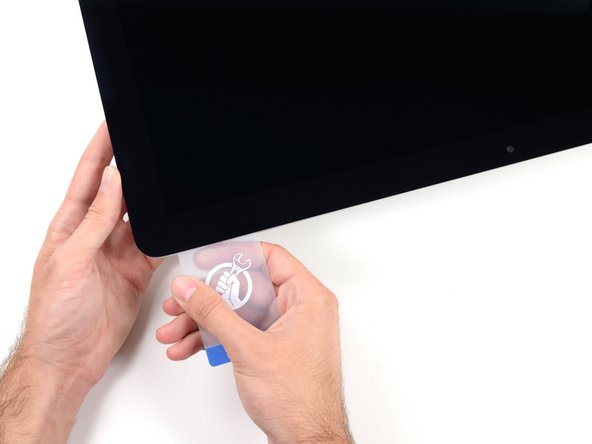
Starting from the top right corner of the iMac, wedge a plastic card between the display and frame.
So sorry. Thanks for that caution.
Using suction cups (the ones that were made for removing the magnetic front glass on the 2011 and earlier iMacs) work well too. Place one in each top corner, while the Mac is lying face up on a table, and gently pull and it will separate the display from the main body. You might need to do a little more slicing around the edges if you did not get all the way through the first time with the roller. Then you can lift the display up at an angle to disconnect the cables.
This was a great idea, worked well for me. Thanks!
Florin -
-
-
-
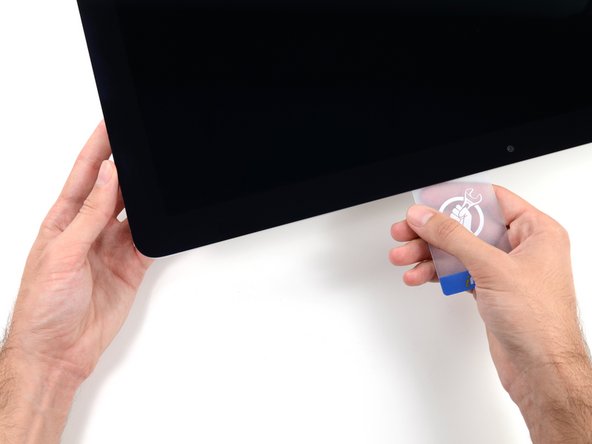
With both plastic cards inserted as shown near the corners, gently twist the cards sideways to increase the gap between display and case.
-
Begin to lift the top of the display up from the frame.
-
-
-
While holding the display up with one hand, use the other hand to unplug the display power cable. Make sure that you pull the cable out from the plastic tab, and not by pulling on the color wires.
-
-
-
Lift the display up to a near-vertical position.
-
-
-
-
Grasp the small tab at the end of one of the bottom edge display adhesive strips and pull the adhesive toward the top of the iMac to remove it.
-
Repeat this step with the other adhesive strip and remove it.
The roller tool for slicing open the display works great for this step. Get in there like using the card and roll across the bottom to slice through the remaining adhesive.
-
-
-
Lift the display up from the frame and remove it from the iMac.
-
It may be necessary to slowly lift from one side, to peel against the remaining adhesive.
After removing the display, I also removed the 3 screws for the processor fan, disconnected the power connector for it and set the fan shroud aside. Disconnecting the remaining cable (similar style to 1 of the cables for the display) that is in the way of the RAM chips is all that's left to do. I was then able to access and quickly remove the two Apple-provided RAM chips, and replace them with 3rd party RAM. Turning the iMac on its side, so that it's in a position where you're physically putting the RAM chips DOWNWARD into their respective slots is the best way to go about uninstalling and reinstalling the chips. Using a narrow but long'ish plastic spudger tool is the best way to defeat the spring-tabs which hold the RAM chips in place. After removing the LCD display, changing the RAM is about a 10 minute process!! And I'd SURE prefer not to remove all the parts and risk damage to the iMac via the standard procedure listed. As per usual, take your time and work gently :-)
Teardown the whole machine just to change RAM? While preparing to comment on this procedure I just noticed the comment made by Mitch K above. I ran pretty much the same procedure that he describes this afternoon (steps 1-23, 43-45, and step 55). Then I swapped out the original 2x4GB RAM chips for 2x8GB chips by reaching behind the logic board, releasing the spring retaining clips one chip at a time (starting with the chip further away from the logic board), pivoting the RAM towards the back of the machine, and then carefully sliding it out of the slot. I easily slid in the new chips and then pivoted them to lock them down. No hassle, no time lost. As Mitch K states above, not only is this “shortcut” method much quicker and easier, but it provides less risk of damaging cables, sockets and other delicate components during a total teardown. Why mess with the power supply board just to change RAM? I do not advise to follow the current iFixit.com procedure written by Sam Lionheart, regardless of user skill-level.
THAT sounds one !&&* of a lot easier than the full tear down. I wonder if there’s a video of the process described by Mitch K? Adding that to these verbal instructions would really help relieve the apprehension and anxiety around the process! I do sometimes find the additional warnings, though appreciated from a “safety first” perspective, are somewhat overstated. It’s been a very long time since I shorted out RAM, or fried a PCB, or broke a connector, regardless of how finicky, fragile or awkwardly designed and positioned. I may have WANTED to break something, and the air might be blue for a few seconds, but inevitably, things go back together, the start button gets pressed, the startup chime sounds, and we’re in business. Practice DOES make as close to perfect we are likely to get.
Mitch has the exact method that works a treat. You don’t need to follow steps 24-37 and also 40-63. Step 51 is the step to remove the camera cable and is needed. Steps 38 and 39 are for the Fan. That is all that is needed. Done quite a few like this.
Be careful not to drop the RAM down the back of the logic board!
By NOT removing all the other stuff you can avoid either damaging it or forgetting to plug in a cable.
I just trued this shortcut and it was not successful. I was not able to seat both RAM chips with this shortcut, and managed to slightly damage one of the retainer clips. I simply could not manipulate the chips into and out of the slots effectively without taking everything apart as described in the full set of steps.. I ended up retracing my steps and following the entire procedure, carefully, and that worked without incident. So, bottomline, it is definitely more work to follow all the steps but from my experience, it is decidedly safer. Your mileage may, of course, vary. It was successful in the end, and I swapped out the hard drive with an ssd during the same procedure and my machine is very, very much faster.
I have completed by following the Mitch K post and it is much easier than stripping down the whole thing, just be aware that to remove and replace the ram chips means working in a tight space, you need slim fingers and don’t be tempted to use force, take your time.
Well, I have slim fingers, but they are 60 years old, and they don’t work like they used to! LOL.
Agree with Mitch K’s procedure. The only added tip I would throw in is to use two 45 degree tweezers with their plastic covers still installed to easily pop loose the RAM. I couldn’t get the plastic spudger tool to work myself, but the tweezers easily reach the RAM clips. Just make sure the plastic covers are installed and you won’t be in danger of scratching or shorting anything out.
So thankful I discovered these comments. Saved me a TON of time! Thank you!!
These comments were very useful. Thank you. I just needed to modify a pair of tweezers to allow me to seat the new RAM more easily. The ifixit screwdriver wasn't able to turn some of the screws as they were installed too tightly, and I didn't want to wait to order and reveive a pair of right angled Torx screwdrivers that would give me more leverage to get those boards off.
-
-
-
Remove the following five Phillips screws holding the lower support bracket in place:
-
Four 3.2 mm screws
-
One 1.7 mm screw
-
-
-
Remove the lower support bracket from the iMac enclosure.
Of all the parts of this entire procedure, replacing this one piece is the hardest part! The screws are tiny and they just don’t seem to want to grab the support piece. Also it seems to perform no function which is also annoying.
I left mine out. LOL
Line up the screw holes and press on the bracket from the back to help the screws grab. If your fingers are too big, press with the flat side of your spudger. As long as there’s no gap between the bracket and the iMac’s frame, the screws should grab easily.
I put it in at a slight angle lining up the right hand side holes, screwed in the two screws and gently pressed my finger behind it on the rest
If you only want to replace the HD and RAM, take a big shortcut and leave the logic board in, as well as all the parts needed to remove it (speaker, power supply etc). Once the display is removed, just take out the fan and the top two logic board screw. There is than sufficient space to gently remove and insert the two ram modules. HD can easily be replaced with an SSD by just removing the HD mounting brackets...
Voces mudaram de modelo iMac, desta foto para proxima, esse modelo desta foto nao tem slot nvme. O da proxima foto sim. Voces me fizeram comprar un nvme por engano...
-
-
-
Use a spudger to loosen the right speaker cable's connector from its socket on the logic board.
-
Pull the connector downwards to remove it from its socket.
I highly recommend doing steps 27 and 28 first and then pull out the cable. It will give you more room on the right side of the cable to work with making this step that much easier.
The two corners of the connector are latches that need to be pushed toward the center of the connector to release. This is easily done with the pointed end of the spudger. Once the two corner latches are released, the connector comes apart easily.
-
-
-
Pull the right speaker straight up about an inch, toward the top of the iMac.
-
Lift the right speaker straight up and remove it from the iMac. This may take some force, both hands and rocking the speaker right and left to get it out.
-
-
-
Remove the following screws securing the hard drive bracket to the rear enclosure:
-
Two 21 mm T10 Torx screws from the left-hand hard drive bracket.
-
One 9 mm T10 Torx screw.
-
One 27 mm T10 Torx screw.
Pay attention to this photo and where the fan is. It is 180° from where the previous step shows it is oriented to you.
-
-
-
Use the tip of a spudger to push each side of the power button cable connector and gently "walk" it out of its socket.
-
-
-
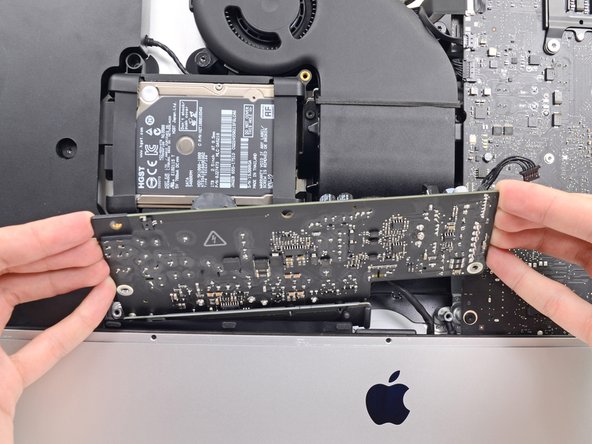
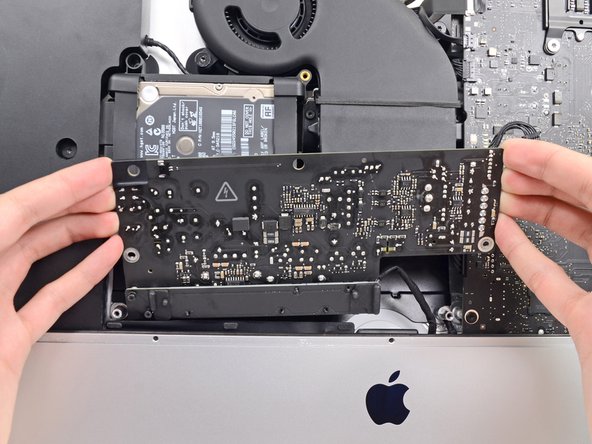
Remove the two 7.2 mm T10 screws securing the power supply to the rear enclosure.
What if these are too tight to remove?
Hi Rafael,
Be very careful not to strip these screws. Use a new, accurate T10 bit and a driver with good leverage to loosen these screws.
They are T9 in my iMac
They were T8 screws on my machine.
-
-
-
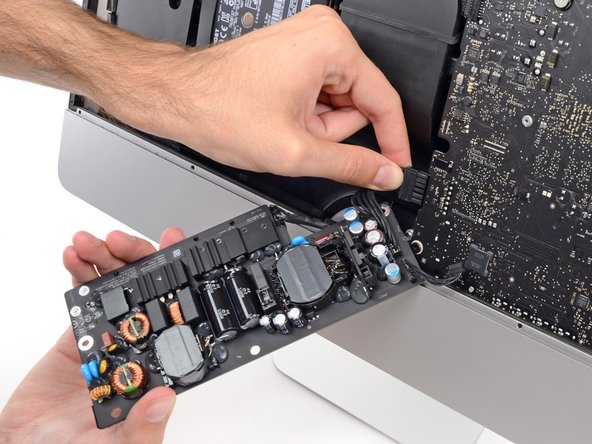
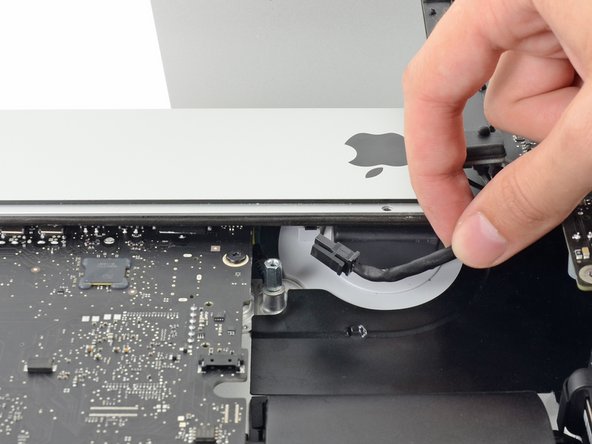
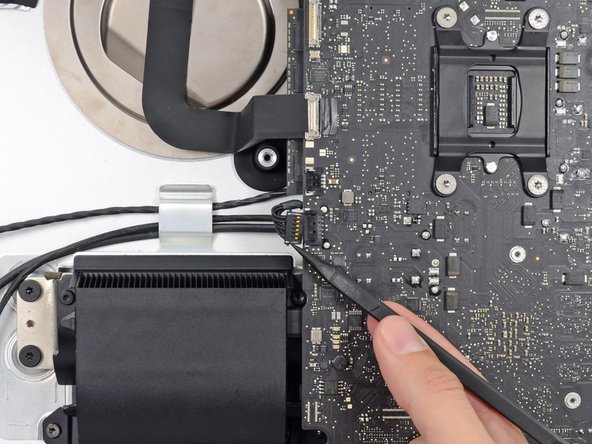
Squeeze the DC power cable connector tab and pull it straight out of its socket on the back of the logic board.
what happens if you damage the power socket on the logic board?
The tab is on the bottom of the connector. You can’t see it. Squeeze the bottom of the connector close to the cables to properly release tab. Pulling straight out is important.
This step might be easier if you do the next step first (step 41) and then come back to this step.
I loosened the logic board attached to the power supply board. I then could easily remove the 2 power cables.
In the photo above, the index finger is shown squeezing the connector locking tab. Do this while using the flat end of a spudger to release the latch. Once the connector is moved about an eigth of an inch the latch is released and the connector should come out freely.
-
-
-
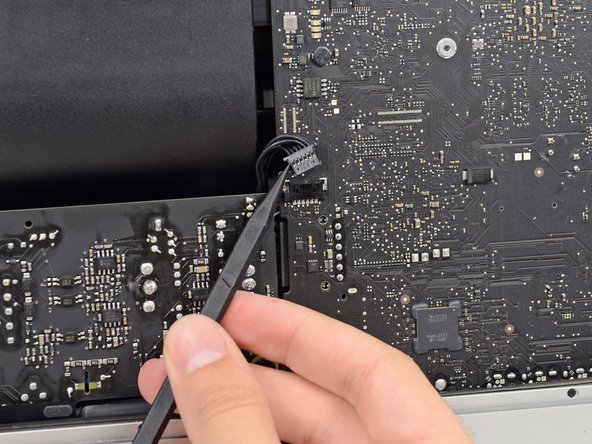
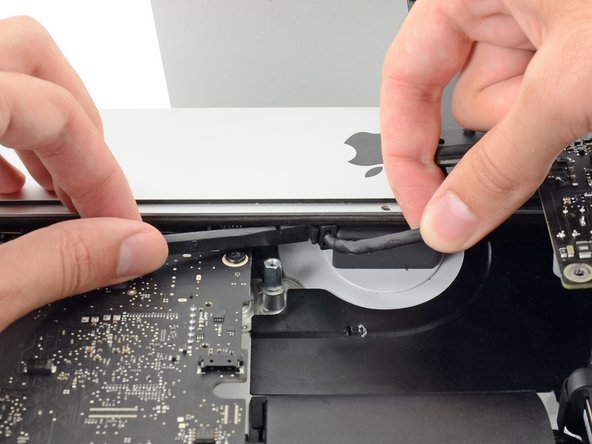
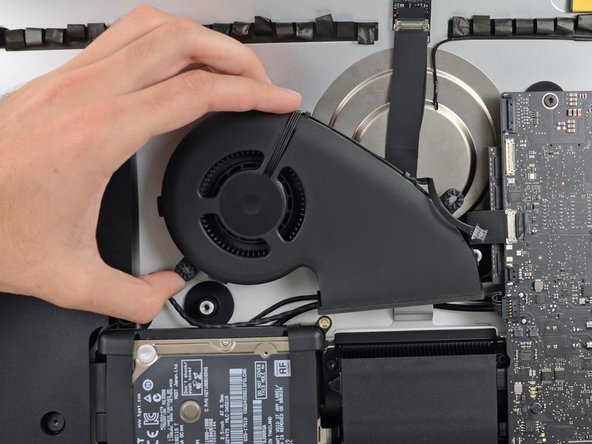
Gently pull the fan cable connector straight away from its socket on the logic board.
I don’t like to pull on wires as shown in the photos above. I used my index fingernail on the top corner of the connector and the pointed end of a spudger on the bottom corner to pull the connector straight out of its socket.
-
-
-
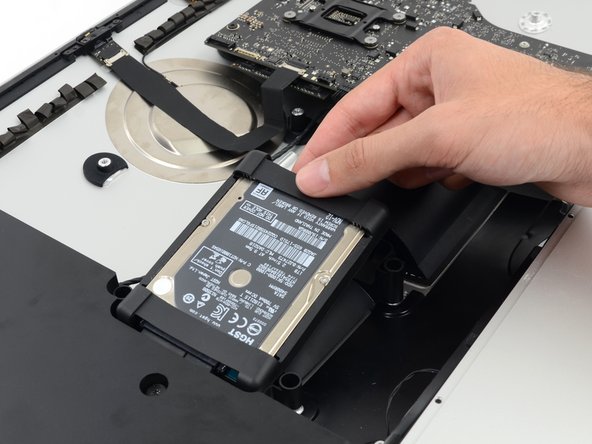
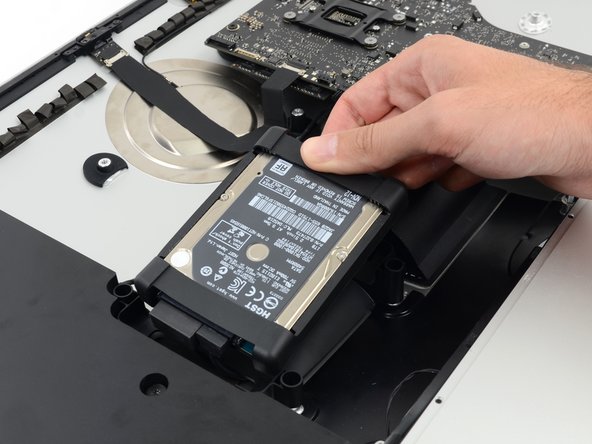
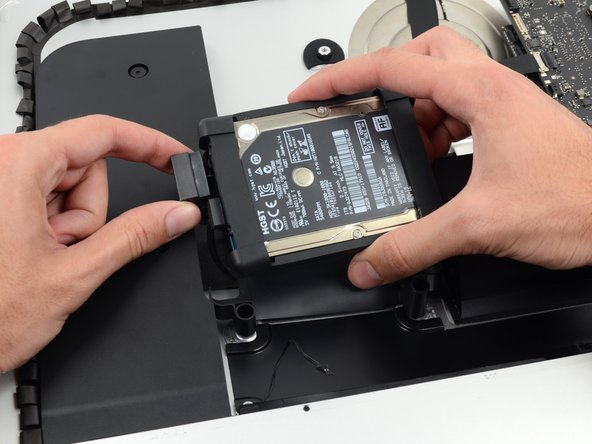
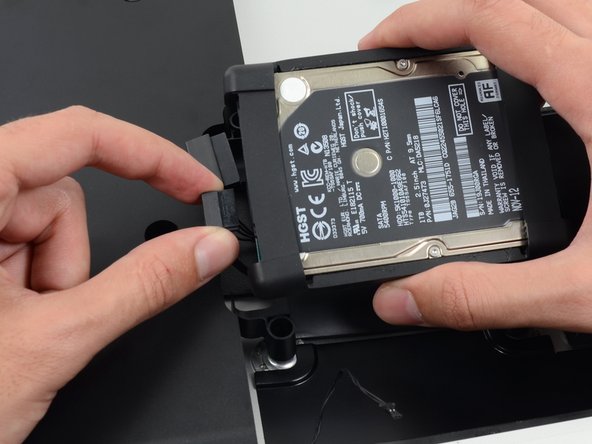
Lift the hard drive from the edge nearest the logic board and pull it slightly out of its recess.
-
-
-
Remove the single 7.2 mm T10 screw securing the hard drive tray to the rear enclosure.
-
-
-
Remove the hard drive tray from the rear enclosure.
Cables are routed through the backside of the tray. Take a picture for reassembly.
-
-
-
Push on each side of the left speaker cable connector with the tip of a spudger and gently "walk" it out of its socket.
As noted in the right speaker cable section, the two corners of the connector are latches that need to be pushed toward the center of the connector to release. This is easily done with the pointed end of the spudger. Once the two corner latches are released, the connector comes apart easily.
-
-
-
Use the flat edge of a spudger to flip up the metal retaining bracket on the iSight camera cable connector.
-
Pull the iSight camera cable straight out of its socket on the logic board.
-
-
-
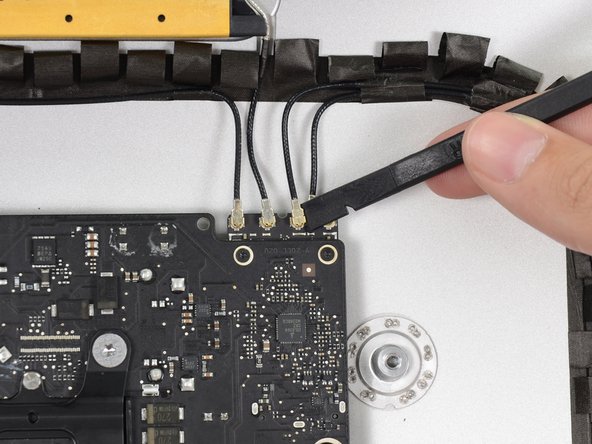
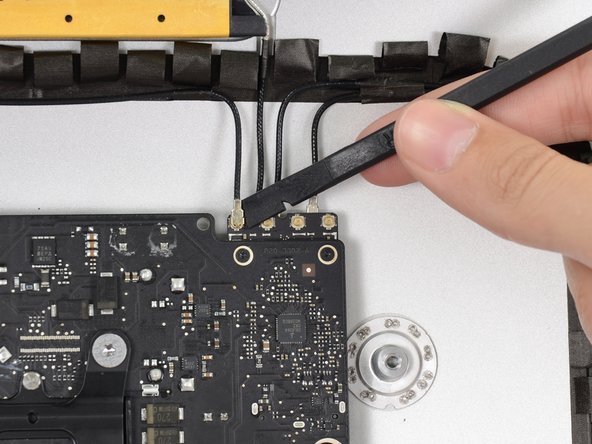
Use the flat edge of a spudger to disconnect each of the four antenna connectors from the AirPort/Bluetooth card.
I broke off one of the antenna connectors when I took off the antenna wires, but the new 802.11ac card is working:) I seems the way to take off the wires is lifting it up from the wire side. In hindsight I just wasn´t careful enough.
how do I check a working logic board
If you have a pair of angled tweezers, they work well for grabbing under the connector so that you aren’t pulling on the wire. The head of the T10 screwdriver works well for pressing them back on.
iMac 2017 EMC 3069 this has the antenna brackets with two T5
-
-
-
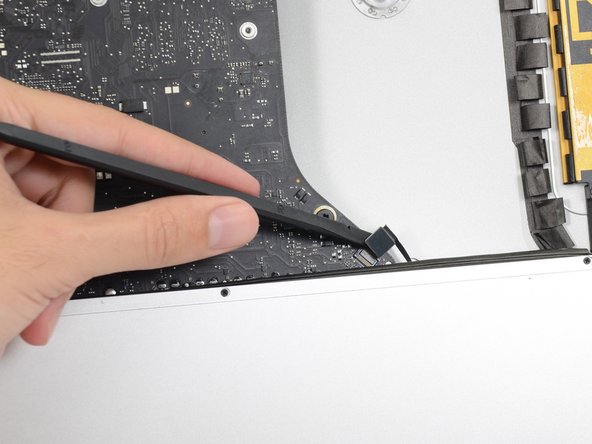
Use the flat edge of a spudger to pry the headphone jack cable connector from its socket on the logic board.
Unlike the rest of the connectors on the logic board, this one lifts up away from the board rather than to the side. That “Push the cable slightly to the right.” notation is after the connector is free.
-
-
-
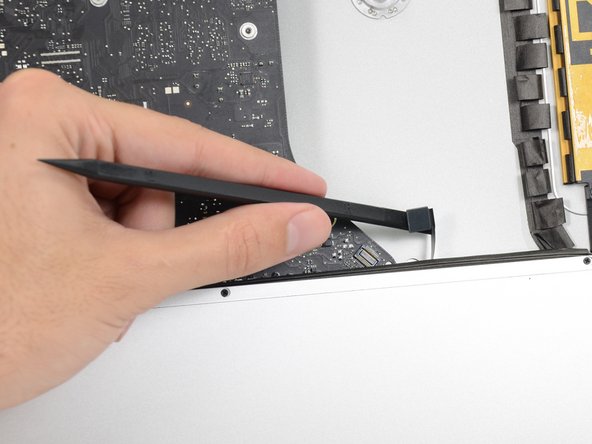
Remove the following screws securing the exhaust duct to the rear enclosure:
-
Two 6.3 mm T8 screws
-
Two 4.7 mm T8 screws
Weirdly, these screws didn’t work with my T8 driver. Not with T6 or T10.
Every other screw (to this point) has been fine. Hmm.
??? The T8 worked fine for me. Not sure what the difference would be.
Fare molta attenzione alla vite in fondo a destra, è facile (soprattutto se la punta del proprio cacciavite non è magnetizzata) che la vite si perda sotto alla Logic board. Se la punta del cacciavite non è magnetizzata consiglio o di utilizzare un magnete esterno o di utilizzare delle pinze mentre si svita la vite in modo da non incorrere in questo problema.
-
-
-
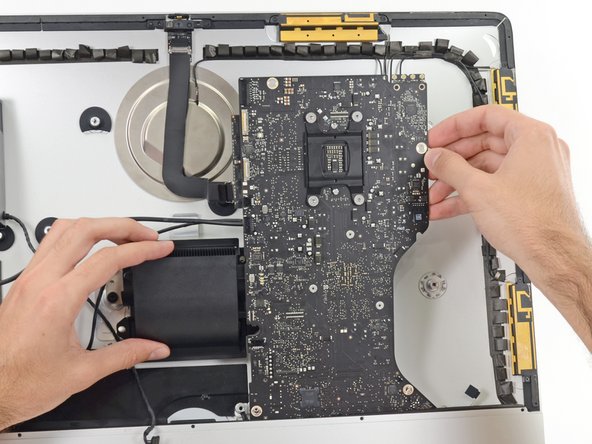
Remove the four 7.2 mm T10 screws securing the logic board to the rear enclosure.
When reinstalling the logic board, install four screws loose. Insert thumb drives into the back in all slots to ensure alignment. Once aligned, then tighten screws.
On some models there is a tiny microphone cable connector, just above the lower left logic board screw. Remove by carefully pulling straight down. There is also a piece of insulating plastic w/adhesive on top of the screw which can be pulled off prior to removal. Save and reuse with the same screw on installation.
-
-
-
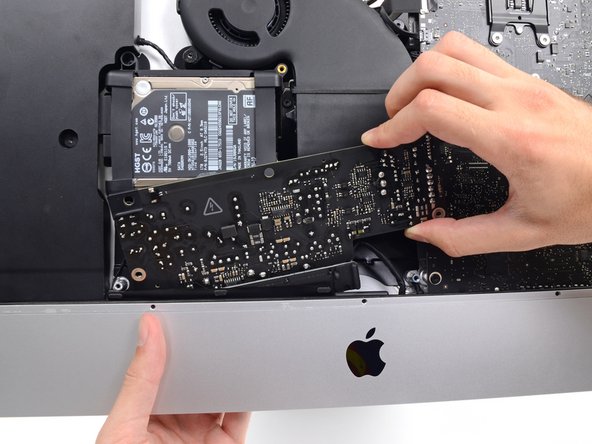
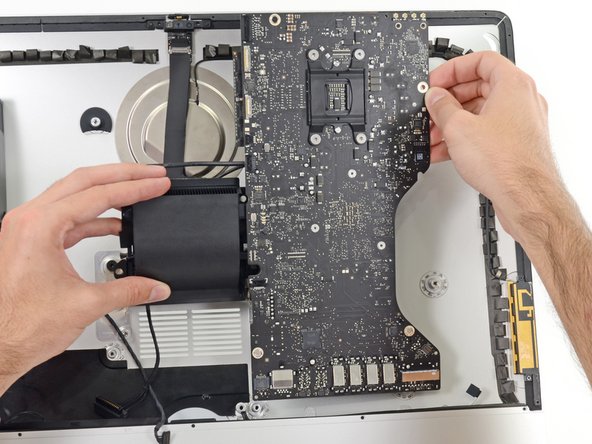
Tilt the top of the logic board away from the rear enclosure.
-
Lift the logic board straight up and out of the iMac.
When inserting the logic board back, pay attention of the position of the I/O connectors. When it is back in place, put a USB / Thunderbolt cable into the connectors to ensure the perfect alignment.
This is fantastic advice. I used a combination of USB and display port plugs to ensure proper alignment and help keep the logic board steady while i screwed it back in. Thank you!!
kazoodac -
ive gotten this far and i still have one question, i’m replacing my HDD With A SSD should i also remove the original Blade drive ? and run exclusively off the ssd, ? i wasn’t 100 on whether or not i was getting the fusion set up so i’m not in possession of a upgraded blade, so i though this was a good question id hadn’t seen asked.
-
-
-
Remove the single Torx screw securing the SSD to the logic board.
My wife’s iMac Late 2013 21.5” did not originally have a blade SSD installed, so there was no existing Torx T8 screw available to use on the Aura 6G I was installing. Had to use one of the 4 T8 screws from the Exhaust Duct to get the job done.
Was the iMac have a fusion drive? I´ve just read that 21,5" iMacs without Fusion Drive or SSD don´t have the PCI-e slot activated. Could you confirm please?
@danielcalde2053 - A HDD only system won’t have the connector or added circuitry to support the Blade SSD. With that said people have altered systems! Taking out the wimpy Fusion Drive cache SSD as they often fail. So you might find a HDD system with a working slot!
Dan -
Read somewhere that a certain type of adapter is needed to use a "Samsung 970 EVO Plus NVMe M.2" in either a 21.5" or 27" 2017 iMac. Does anyone (most likely @danj ) know if it will work?
Long term goal...have both sizes of 2017 iMacs. Plan is to install a faster i7 cpu in 27" and migrate 3.4 GHz i5 to 21.5" to replace 3.0 GHz i5 in 21.5". While inside 27", will replace fusion drive with the EVO plus and perhaps had a larger 7200 rpm HD or perhaps a 2.5" SSD.
While inside 21.5", i plan to upsize SSD from 500 Gb to 1 or 2 Tb. Not sure which ssd form factor is currently inside but i believe it is a 2.5". Does anyone know if there is a drive cavity in a 2017 21.5" iMac to fit a full size HD (to possibly use a stacked pair of notebook size SSDs?
Thanks to all in advance!
I really don’t recommend using M.2 SSDs in iMacs as they are a bear to open up to get to the SSD socket and many adapters/SSD sets are flaky!
If this is a system which has important work I would stick with either an Apple or OWC bade SSD. Yes, I know! You want something with more performance. Sometimes it doesn’t pay 😖I had wished Apple would have gone with the standards based M.2 SSD’s their greed set the course! The rub is Apple has other lines in their SSD’s these adapters and M.2 SSD’s don’t offer which will bite you when your drive gets full as the wear-leveling and housekeep functions use these lines.
As far as Samsung 970 EVO Plus drives you will need to update its firmware as they did have a few interoperability issues with macOS when used in MacBook Pro’s
Dan -
@danj I did get this blade SSD from OWC and it is working fine. My wife only uses this for non mission critical work now since she has a 16" MBP, but it sure beats the pants off of the old HD that shipped with the system. :-)
Sorry I grabbed the wrong text to reply. Even still you wouldn’t want to loose your stuff 😢
Dan -
-


To reassemble your device, follow these instructions in reverse order.
To reassemble your device, follow these instructions in reverse order.
Cancelar: No complete esta guía.
33 personas más completaron esta guía.

Equipo

Self employed contract worker Miembro de Self employed contract worker
Business
1 Miembro
9 Guías creadas
48 comentarios
Many thanks for the tutorial? Very detailed and helpful. Now, my question is, can I replace the existing SSD PCIe blade by ANY PCIe blade?
I mean, the 2017 4K iMacs have a PCIe v3 with 4 channels. Will it admit an older PCIe version (such as v2)?
Apple uses a different interface than the M.2 blades as such you ned to use theirs or either of the two 3rd party drive makers OWC or Transcend
- BeetsTech - The Ultimate Guide to Apple’s Proprietary SSD’s (Apples SSD’s)
Dan -
Hello Dan! Many thanks for your answer, but none of the webpages you mention has a blade PCIe SSD compatible with the iMac 4K 2017… :(
I’ve put in few of the BeetsTech blades in with no issues. Are you trying to install the SATA drive?
Dan -
Hi Dan! The initial intention was to replace the current 28GB blade PCIe SSD by a bigger one, 225 or 500GB, and keep the current sATA 1TB drive. This way, I could have a decent and fast FusionDrive, as the current configuration is pretty slow…
Finally, I’ve decided to replace the current 1TB sATA 5400rpm drive by a 1TB sATA SSD, as the total cost is arround the same as replacing the blade PCIe drive. In adittion, I am not 100% sure which blade PCIe drive will work on my iMac… the support guys from OWC say that they don’t have a compatible drive yet :(
Aleix -
Hi Dan, how can I be sure that my imac’s logic board has a socket for a blade ssd? As I’ve found on web some of 21.5 imacs doesn’t have it.
Apple sold the 21’5 models in three configs HDD only (no SSD connecter), SSD only or a Fusion drive which has both HDD & SSD (has SSD connector).
Dan -
Hi Dan, are you positive the JetDrive 820 (https://us.transcend-info.com/Products/N...) will work with the 21.5 4K iMac that's the 3.4Ghz 1TB Fusion Drive model? What about the Aura Pro X2 (https://eshop.macsales.com/item/OWC/S3DA...)?
The difference in price between these and the used original parts from beetstech is pretty beefy in my opinion.
g.nobre -
OWC & Transcend offer s few different drives for the different series Apple has produced. Here’s a good reference on the Apple custom SSD’s: The Ultimate Guide to Apple’s Proprietary SSDs. Cody has it updated it with the newest models but they are using the same drives as the last listed.
Dan -
hi if the logic board has the slot for ssd does that mean it's the 2017 model?
also great tutorial thank you
steve
The SSD blade slot in the 21.5” 2017 model is not consistently present! Apple did not populate some of the logic boards when the system was only a SATA drive’d system. The Fusion Drive’d and blade SSD models both have the connector.
Best to look up your system here: EveryMac - Index of all iMac’s
Dan -
Please can you confirm where I can order a 2TB blade SSD compatible with 2017 4K iMac model identifier iMac18,2 ?
Please can you confirm the pin layout used on the SSD ?
Many thanks.
Your systems specs: 21.5” iMac 4K Retina (Mid-2017)
As noted: This model has a Serial ATA (6 Gb/s) connector for a 2.5" hard drive. If configured with a "Fusion" Drive or an SSD at the initial time of system purchase, it also has a PCIe connector, but this connector is not present if the system only is configured with a hard drive. >> Your system may not have the needed connector! <<
You need a custom Apple SSD or either an OWC or Transcend 3rd party SSD’s
Dan -
Does anyone know if anybody ever upgraded the “none-ssd-board” by soldering the connector to the board? Is there anything else missing than the connector? Is there a special efi-version on the “none-blade” board to prevent to do so? Would be an interesting project…..
There’s more to it than the connector, there is a bit of logic also needed.
Dan -
como saber si mi iMac tiene el puerto para ssd sin desarmarlo
Si tiene un modelo solo HDD, entonces no tiene el conector blade SSD y su lógica de soporte.
Una unidad Fusion o un sistema con un SSD instalado de fábrica lo tendrá
Dan -
if i have the standard hdd of my mac 21.5, 4k 2017. Can i add with an ssd name m2 of 500 gb ?.. it’s my doubt
Sorry It is not M.2, the custom Apple blade SSD connector is not present.
Dan -
Hi, if i clone my HDD, all my Files, pictures, documents will be copyed to the New ssd? What about Windows partition? It will be clone too? I have a Fusion drive in thia moment.Thanks
No you do’t want to use cloning software what was possible years ago it not possible with Apples new APFS file system. If you drive is not clean (unfragmented) or has any errors even Mac cloning won’t work reliably! Because of this I haven’t used it in over 15 years now I only use Apples Migration Assistant tool as well as TimeMachine.
When you have a Windows partition you need to use the proper backup and restore tools under it.
Dan -
Let me reformulate. I have an imac 21.5 inch (4k) 2017 with 1 TB fusiondrive and I want to upgrade to 32 gb ram and a new ssd (samsung Evo 860 Sata3 1 tb) and I don't know how to keep all my documents and pictures. I have read that i can make a copy (clone) with the TimeMachine. The problem is that I also have a windows partition that I would like to keep. The question was whether the windows partition should be reinstalled again after copying the old hdd or it will be done automatic with TimeMachine. Will the new ssd automatically be recognize as part of the fusiondrive or should something extra be done? Or what is your recommendation for this move? Thank you so much.
Very easy! Get a big enough external drive for your mac partition and just plug it in! Magically macOS will ask you what to do. tell it you want to use it as a TimeMachine backup and let it rip! It will asked you a few questions and backup your macOS partition.
Now you’ll need to get a backup program for your Windows partition and a second drive for it. Depending on what you get you’ll follow the instructions it offers.
Done!
Now setup a USB thumb drive as a bootable OS installer (make sure it works)
Next install your new drive. Restart your system off of the USB thumb drive to install a fresh copy of your macOS. Now restore your stuff from the TimeMachine backup again magically when you connect it macOS will ask you if you want to restore! Again answer the questions as needed and let it go. Enjoy your coffee come back in a hour or so depending how much you have.
Now re-setup BootCamp and your Windows partition. run the restore function of your Windows backup, done!
Again don’t use cloning software!
Dan -
If I use a 2 TB for instance the Samsung EVO 970 plus, can I remove the SATA drive? Does the system work without the sata HD?
There is no requirement to use one drive interface than another. So yes, you can swtichout your SATA drive with a faster PCI/NVMe SSD drive.
But you may not be able to! Apple only shipped the PCIe/NVMe SSD drive’d and Fusion Drive models with the needed blade connector on the logic board. The bottom line here is you may not have the option to use the PCIe/NVMe blade SSD drive if you got a straight SATA HDD model.
Last important point is Apple did their own thing! The connector is custom! So a M.2 SSD will not directly fit and I don’t recommend using them. Here’s more on the Apple SSD’s The Ultimate Guide to Apple’s Proprietary SSDs
Dan -
Hello. I have the 2017 21.5” iMac, 16GB, 512GB SSD, 3.6 GHz i7. I am almost out of room on the SSD. Can I just add a SATA 1TB or 2TB SSD where a SATA HDD would have been if I had a Fusion drive, or, do I need to replace the NVMExpress blade SSD?
Sure you can add in a second SATA drive if your system already has a blade PCIe/NVMe SSD. It won’t be as fast as your 512GB blade SSD. So to maximize your blade SSD after you install your second drive and format the drive to GUID with a journaled file system (not APFS) copy off your media and data files to the new drive. Ideally, you’ll want at least a 1/4 of the blade SSD free (if you can free up more than do that) The reason is your boot drive (blade SSD) uses the space for virtual RAM, caching and depending on your apps scratch space. So other than your OS and Apps keep your content on the slower SATA drive.
If you are doing music or video work you can use the blade drive to speed things up but given the size you have here you may hit issues.
Dan -
Thanks, Dan. I already replaced a failed HDD in an older Mac with an SSD (using all iFixit know-how and tools!) so I am comfortable going in as far to the space where the SATA drive would be. Sounds like there should be a connector there. Understand completely moving the data files, not the OS over to the SATA drive; that would have been my intent. I have no knowledge of GUID so I need to research that. So the only new things I need to purchase besides the 1 or 2 TB drive are the adhesive strips to re-seal the screen? Thanks so much!—Don
You’ll need the Adhesive kit with the special pizza cutter tool. Four credit cards or iFixit plastic cards. If the system didn’t have the SATA drive you’ll need the cable and the rubber mounts to mount it to the drive in.
∙ iMac 21.5" (Late 2013-2017) SATA Cable
∙ 21.5” iMac Hard Drive Rubber Frame v2
Dan -
Great. I have the cards and 2 pizza cutters from my previous operation and the iFixit kit my wife bought me. So I guess I need the frame, cable and strips. Is there a brand of SSD you have found works best? I see Samsung, WD and Mercury 6G units popping up.
I used Samsung drives 860 EVO is the current series.
Dan -
Hi Dan. Will the 870 series from Samsung also work? They appear to be newer and lower in price than the 860 but I wanted to confirm compatibility. I have purchased an 860 but can return it if the 870 is preferred. Thanks!
Sometimes newer is not necessary better! The construct of the NAND chips need to be investigated. The 860 uses MLC (Multi Level Cell) whereas the 870 uses TLC (Triple Level Cell). While TLC is cheaper it is slower and may not last as long as the MLC. To improve the speed Samsung uses a MLC buffer area but the depth of this space is limited so large data moves slow down once you exceed it. In addition we also face the same issues all NAND flash chips hit the total number of rewrites.
The bottom line here is stick with the 860 as that’s better drive.
Reference: EVERYTHING YOU NEED TO KNOW ABOUT SLC, MLC, & TLC NAND FLASH
Dan -
Roger! Thanks for the explanation. I will hold tight with what I have. Much appreciated.—Don
I have an iMac 21,5” retina 4k 2017 model A1468 and EMC 3069 with a Fusion drive that seeking to upgrade. Does my iMac have a blade drive installed? If no, would be the port available to install one and have the Osx boot up from the blade drive?
Thanks a lot
A Fusion Drive is leveraging both drive ports your system offers! Basically you have a 2.5” SATA based HDD and a PCIe/NVMe blast SSD.
So depending on what your direction is deeper storage and/or faster storage! As an example you could replace your HDD with a much larger HDD and re-enable the Fusion Drive setup (depending on the SSD units size this might not offer much)
You could just replace the HDD with a SSD but I would not bother with the blade SSD leaving it unused. The performance will be better but you are then limited to the limits of the SATA III (6.0 Gb/s) interface.
You could replace the blade SSD with a much larger unit (500 GB/1 or 2TB depending on your work flow needs) making it your OS boot drive and holding your applications. Ideally, leaving the rest unused for virtual RAM, scratch space. If you are into video production then using the space to hold your current project, and using your current HDD as your data drive. This is the best performance setup!
Dan -
Hi Dan,
I successfully added the Samsung EVO 860 today. Thanks for all your support. Long (3.5-4 hours) but straightforward thanks to the guides and your assistance. There was one TINY connector on the logic board near the frame that I did not see covered and getting it back on was a son of a gun. The real concern was the adhesive package…a couple of the pieces tore prematurely and I had to be creative to try and pull out the remainder. I think I will mention that to customer service as the last time I removed a screen I did not have that problem. Thanks again!
Don
Is it needed to disable the Fusion HDD in the terminal, when removing and upgrade to aa NVME SSD?
How do you do that?
Yes, that is needed as the HD has the expectation the caching SSD is present. Different versions of macOS use different methods. The newer OS's require reformatting the HD, so you'll need to back up any data first.
Dan -
You do realize this systems blade I/O is custom to Apple while it does offer a PCIe/NVMe interface there are other lines used for housekeeping. So while a M.2 3.0 spec’ed drive will fit they don’t last as long as a real Apple or even OWC’s drive.
Now you want to install the newest M.2 version 4.0 into a system which can’t interface with it? It won’t play well if at all and you won’t get the benefits of the newer standard.
Dan -
Also, after I install the drive, will the iMac recognize it as part of the fusion drive (as it did with the current 32 GB blade)? Or will it be a separate drive?
toeyoe -
I guess I wasn’t clear 😞This SSD won’t work in your system as the I/O in the system is based on an older standard even if it worked, you won’t get the performance the newer standard this SSD offers, basically you’re over buying! Then the dual interface you are forcing the data to travel is not ideal using an M.2 drive. I wouldn’t even attempt it as it’s a lot of work only to find out it wasn’t worth it.
As far as the Fusion Drive… Apple loves to confuse! Different MacOS versions worked a bit differently as far as breaking the Fusion Set which you will want to do as you don’t want to setup the blade drive that is quite large (128 or larger) as a Fusion Drive cache drive.
A dual drive setup is much more effective where the blade drive is the boot and app drive with a sizable amount of free space for Virtual RAM, OS caching and depending on your apps scratch space. Then using the slower SATA drive as your data drive!
Hello ifixit Team,
Is every SSD capable of installation? Or do I have to pay attention to something specific
Boy! You asked quite a sizable question! Let’s use an analogy to see the different facets. You collect all of your families shoes into a pile there are many choices grabbing your kids shoes won’t fit you and your wife’s high heels don’t help you on your morning jog! But each meet the needs of who they are intended to use them and when.
In the case of SSDs we face similar issues! Knowing the interface and the physical space it needs, the needed storage space and the costs.
So think through what you need for storage and performance and your skill level. Review the different guides to see what you think you can do.
Dan -
I have (21.5 inch, mid 2017, 2.3 ghz) base model same as this but not 4k. How much max ram can I install in my iMac??
Narendra Verma - Contestar
This guide contains many extra steps for what should be a straight forward, simple parts replacement without disturbing more than the display, left hand speaker and removal of 4 logic board screws for play. Nothing else except for the left hand speaker wire & iSight cable from logic board, the lower support bracket and loosening the speaker so as to move it around a bit.
For the ram, I bent a pair of cheap tweezers long ago supplied with these replacement kits to the perfect angle for holding, locating and inserting the ram into the slots under the logic bd after moving each retainer w/spudger and popping out the old. Pay attention to the orientation of the ram when removing/inserting the ram! An automotive mirror is handy along with a small flashlight for closeups. Once the ram is aligned properly substitute your fingers for the tweezers, ease it into the slot, push up & engage! Reinstall screws and all else. I have done this job successfully this way countless times. For a tweezers pic contact me!
Ross Elkins - Contestar
Additionally, if a blade is present, I install the OSx system on the blade and everything else, apps and home folders on the new SSD. You get the very fast boot off of the blade and the full ssd for all else!
Ross Elkins - Contestar