Esta versión puede contener ediciones incorrectas. Cambie a la última instantánea verificada.
Qué necesitas
-
Este paso está sin traducir. Ayuda a traducirlo
-
Loosen the two captive Phillips screws securing the access door to the iMac.
-
Remove the access door from the iMac.
-
-
Este paso está sin traducir. Ayuda a traducirlo
-
Remove the following four screws:
-
Three 6 mm T8 Torx.
-
One 8 mm T8 Torx.
-
-
Este paso está sin traducir. Ayuda a traducirlo
-
Flip your iMac over and lay it stand-side down on a flat surface.
-
To lift the front bezel off the iMac, simultaneously:
-
Use your thumbs to press in the RAM arms and hold the iMac down.
-
Use your index fingers to pull the small bridge of material on the front bezel toward yourself.
-
Pull the Front bezel up with your index fingers.
-
Once the small bridge of material has cleared the RAM arms, lift the front bezel by its lower edge just enough to clear the bottom edge of the rear case.
-
-
Este paso está sin traducir. Ayuda a traducirlo
-
Insert a plastic card up into the corner of the air vent slot near the top of the rear case.
-
Push the card toward the top of the iMac to release the front bezel latch.
-
Pull the front bezel away from the rear case.
-
Repeat this process for the other side of the front bezel.
-
If the bezel refuses to release, try pressing the lower edge back onto the rear case and repeat this opening process.
-
-
Este paso está sin traducir. Ayuda a traducirlo
-
Lay your iMac stand-side down on a table.
-
Lift the front bezel from its lower edge and rotate it away from the rest of your iMac, minding the RAM arms that may get caught.
-
Lay the front bezel above the rest of the iMac.
-
-
Este paso está sin traducir. Ayuda a traducirlo
-
If necessary, remove the piece of kapton tape(it is ok to toss this) wrapped around the microphone and camera cables.
-
-
Este paso está sin traducir. Ayuda a traducirlo
-
Remove the two 4.8 mm T6 Torx screws securing the display data cable to the logic board.
-
Grab the display data cable connector by its black tab and pull it straight up off the logic board.
-
-
Este paso está sin traducir. Ayuda a traducirlo
-
Inverter cable on 24inch iMac pulls off to the left.
-
Pull the inverter cable connector straight up off its socket on the logic board.
-
-
Este paso está sin traducir. Ayuda a traducirlo
-
Peel back the aluminum EMI tape from the two vertical edges of the display.
-
-
Este paso está sin traducir. Ayuda a traducirlo
-
Remove the four 8 mm with 2 mm thick head coarse-thread T10 Torx screws securing the display to the rear case.
-
-
Este paso está sin traducir. Ayuda a traducirlo
-
Lift the display from its lower edge and pull it toward yourself to peel off the EMI shield attached to its top edge.
-
-
Este paso está sin traducir. Ayuda a traducirlo
-
Remove the 30 mm T10 Torx screw securing the left speaker to the rear case.
-
-
-
Este paso está sin traducir. Ayuda a traducirlo
-
Remove the 17 mm T10 Torx screw from the right speaker.
-
-
Este paso está sin traducir. Ayuda a traducirlo
-
Pull the SATA data cable connector away from its socket on the logic board.
-
-
Este paso está sin traducir. Ayuda a traducirlo
-
Disconnect the CPU fan by pulling its connector up off the logic board.
-
-
Este paso está sin traducir. Ayuda a traducirlo
-
Disconnect the hard drive power cable by pulling its connector up off the logic board.
-
-
Este paso está sin traducir. Ayuda a traducirlo
-
Use the flat end of a spudger to pry the AirPort Extreme antenna connector up off the AirPort Extreme card.
-
-
Este paso está sin traducir. Ayuda a traducirlo
-
Lift the left and right speakers out of the rear case.
-
-
Este paso está sin traducir. Ayuda a traducirlo
-
Disconnect the speaker cable connector by pulling its connector away from the socket on the logic board.
-
-
Este paso está sin traducir. Ayuda a traducirlo
-
Pull the power button cable connector up off its socket on the logic board.
-
-
Este paso está sin traducir. Ayuda a traducirlo
-
Disconnect the ambient light sensor by pulling its connector up off the socket on the logic board.
-
-
Este paso está sin traducir. Ayuda a traducirlo
-
Disconnect the following four connectors by pulling them straight away from their sockets:
-
Camera cable.
-
Microphone cable.
-
Optical drive fan cable.
-
Hard drive fan cable.
-
-
Este paso está sin traducir. Ayuda a traducirlo
-
Disconnect the optical drive thermal sensor cable from its socket on the logic board.
-
-
Este paso está sin traducir. Ayuda a traducirlo
-
Remove the two 7 mm fine thread T10 Torx screws securing the optical drive clip to the logic board.
-
Remove the optical drive clip.
-
-
Este paso está sin traducir. Ayuda a traducirlo
-
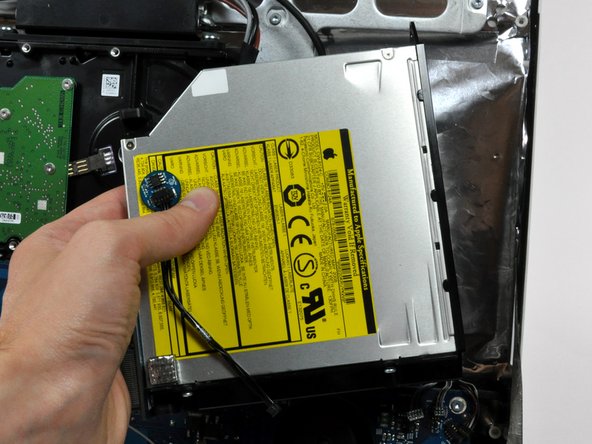
Squeeze the two optical drive bracket ears together while pulling the drive up toward yourself.
-
Pull the optical drive away from the side of the rear case and remove it from the iMac.
-
-
Este paso está sin traducir. Ayuda a traducirlo
-
De-route the bundle of power supply cables from behind the hard drive bracket.
-
-
Este paso está sin traducir. Ayuda a traducirlo
-
Press the hard drive bracket down to free it from the rear case, then rotate the top of the drive toward yourself.
-
-
Este paso está sin traducir. Ayuda a traducirlo
-
Lift the hard drive (with cables attached) straight up off its lower pins and remove it from the rear case.
-
-
Este paso está sin traducir. Ayuda a traducirlo
-
Unplug the power supply cable bundle from the logic board by simultaneously depressing the locking mechanism (toward yourself) with a spudger and pulling the connector away from its socket.
-
-
Este paso está sin traducir. Ayuda a traducirlo
-
Remove the following six screws securing the logic board to the rear case:
-
Three fine-thread 7 mm T10 Torx.
-
Three coarse-thread 7 mm T10 Torx.
-
-
Este paso está sin traducir. Ayuda a traducirlo
-
Grab the logic board from its left edge and rotate it out from the rear case, using your other hand to press the RAM arms in enough to clear the rear case.
-
-
Este paso está sin traducir. Ayuda a traducirlo
-
Pull the logic board straight out of the rear case, minding any cables that may get caught.
-
-
Este paso está sin traducir. Ayuda a traducirlo
-
Pull the optical drive fan off the posts protruding from the rear case and lift it out of rear case, de-routing cables as necessary.
-
-
Este paso está sin traducir. Ayuda a traducirlo
-
Use a pair of tweezers to pull the AC-in cable out from underneath the chassis.
-
-
Este paso está sin traducir. Ayuda a traducirlo
-
Disconnect the AC-in connector by simultaneously squeezing the lock mechanism and pulling the connector away from its socket.
-
-
Este paso está sin traducir. Ayuda a traducirlo
-
Use a spudger to peel back the EMI tape covering the AC power inlet.
-
-
Este paso está sin traducir. Ayuda a traducirlo
-
Remove the four T10 Torx screws securing the AC power inlet and its ground cable to the rear panel.
-
Three course-thread 7mm screws.
-
One fine-threaded 5mm screw.
-


Cancelar: No complete esta guía.
4 personas más completaron esta guía.
