Esta versión puede contener ediciones incorrectas. Cambie a la última instantánea verificada.
Qué necesitas
-
Este paso está sin traducir. Ayuda a traducirlo
-
The iMac G3. This was a great computer for the time, and had plenty of features.
-
-
Este paso está sin traducir. Ayuda a traducirlo
-
Start by flipping the iMac upside-down. It may help to lay it on a towel, so you don't damage the screen, or scratch the face.
-
-
Este paso está sin traducir. Ayuda a traducirlo
-
Remove this Phillips screw.
-
Using a flathead screwdriver, work your way around the bottom cover, until it comes off.
-
Then, lift the bottom cover up and out, and set it aside.
-
-
Este paso está sin traducir. Ayuda a traducirlo
-
Now, remove the DB-15 Video connector from the logic board.
-
It may be helpful to use a Phillips screwdriver to remove the thumbscrews.
-
-
Este paso está sin traducir. Ayuda a traducirlo
-
Remove the power cable from the logic board assembly.
-
-
-
Este paso está sin traducir. Ayuda a traducirlo
-
Remove the front panel connector. (You may also need to remove an additional screw that connects the front panel connector to the logic board assembly).
-
-
Este paso está sin traducir. Ayuda a traducirlo
-
Now, remove these Phillips screws.
-
Now, grab the logic board assembly by the piece of plastic, and lift it out.
-
-
Este paso está sin traducir. Ayuda a traducirlo
-
The logic board assembly. This is the heart of the computer, it contains the motherboard, CPU, RAM, V-RAM, PRAM battery, the hard drive, and the optical drive.
-
-
Este paso está sin traducir. Ayuda a traducirlo
-
Now, remove these screws.
-
Now, lift the bottom cover off.
-
-
Este paso está sin traducir. Ayuda a traducirlo
-
Removing the front bezel:
-
There isn't a great position to put the iMac in to remove the front bezel. I recommend flipping it so it it like it would normally be positioned.
-
Remove these two Phillips screws.
-
Now, work your way around the bezel with a flathead screwdriver, and then, pivot it up towards the top, and remove it.
-
-
Este paso está sin traducir. Ayuda a traducirlo
-
Removing the translucent plastic:
-
Removal of the front bezel will reveal two screw covers on the top, pop them off with a Phillips screwdriver.
-
Now, use a Phillips screwdriver to remove the screws.
-
You can now remove the plastic.
-
-
Este paso está sin traducir. Ayuda a traducirlo
-
Removing the EMI Shield:
-
Remove all 10 of these screws, and lift the EMI Shield off.
-
-
Este paso está sin traducir. Ayuda a traducirlo
-
Power Supply:
-
Removal of the EMI shield will reveal two major circuit boards.
-
The Display Driver:
-
The Power Supply:
-
-
Este paso está sin traducir. Ayuda a traducirlo
-
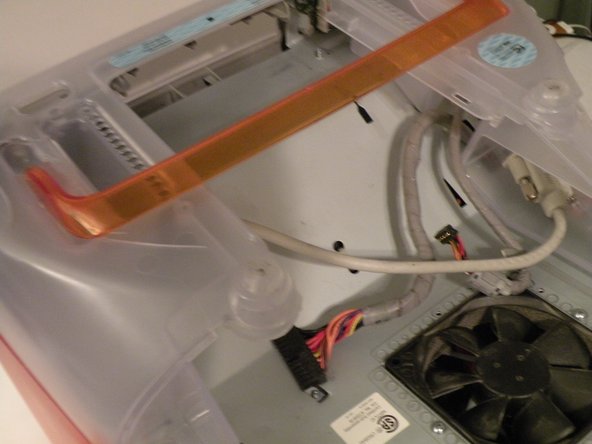
Now, swing the board out, and remove the following connectors:
-
AC Power
-
To System Fan
-
Don't remove this. It comes free with the logic board power.
-
To Display Driver
-
The connector that is attatched to the logic board; to remove it, simply thread it through the hole in the metal:
-
Now, you should be able to remove the power supply.
-


Cancelar: No complete esta guía.
6 personas más completaron esta guía.

Equipo

Un comentario
i have exactly this problem with my vintage imac g3 took it to repair shop they said could not find it do you know where i can get this power supply and pay to have it installed