Saltar al contenido principal

iBook G4 14" 933 MHz-1.33 GHz LCD Replacement

Qué necesitas

  1. iBook G4 14" 933 MHz-1.33 GHz LCD Replacement, Battery: paso 1, imagen 1 de 1
    • Use a coin to rotate the battery locking screw 90 degrees clockwise.

  2. iBook G4 14" 933 MHz-1.33 GHz LCD Replacement: paso 2, imagen 1 de 1
    • Lift the battery out of the computer.

  3. iBook G4 14" 933 MHz-1.33 GHz LCD Replacement, Rear Display Bezel: paso 3, imagen 1 de 2 iBook G4 14" 933 MHz-1.33 GHz LCD Replacement, Rear Display Bezel: paso 3, imagen 2 de 2
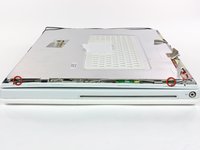
    • Use a 1.5 mm hex screwdriver to remove the two hex screws on either side of the display (four screws total).

    • If you don't have a 1.5 mm hex driver, you can probably get these screws out with a T6 Torx screwdriver. However, if you use a T6 Torx driver you'll be more likely to strip the screws.
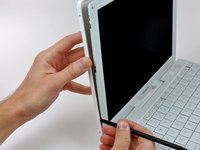
  4. iBook G4 14" 933 MHz-1.33 GHz LCD Replacement: paso 4, imagen 1 de 2 iBook G4 14" 933 MHz-1.33 GHz LCD Replacement: paso 4, imagen 2 de 2
    • Insert the flat end of a spudger perpendicular to the face of the display into the gap between the front and rear bezels near the upper left corner of the display.

    • Rotate the spudger away from the display to pry the rear bezel off the front bezel.

  5. iBook G4 14" 933 MHz-1.33 GHz LCD Replacement: paso 5, imagen 1 de 1
    • Run your spudger along the top edge of the front display bezel to evenly separate the two bezels.

  6. iBook G4 14" 933 MHz-1.33 GHz LCD Replacement: paso 6, imagen 1 de 2 iBook G4 14" 933 MHz-1.33 GHz LCD Replacement: paso 6, imagen 2 de 2
    • Working down from the upper left corner, use the flat end of a spudger to pry the rear bezel away from the left edge of the display.

  7. iBook G4 14" 933 MHz-1.33 GHz LCD Replacement: paso 7, imagen 1 de 1
    • Use the flat end of a spudger to pry the rear bezel away from the right edge of the display.

    • If necessary, pry along the bottom edge of the rear bezel to separate it from the display assembly.

  8. iBook G4 14" 933 MHz-1.33 GHz LCD Replacement: paso 8, imagen 1 de 1
    • Lift the rear bezel off the display assembly.

  9. iBook G4 14" 933 MHz-1.33 GHz LCD Replacement, LCD: paso 9, imagen 1 de 2 iBook G4 14" 933 MHz-1.33 GHz LCD Replacement, LCD: paso 9, imagen 2 de 2
    • Close the display.

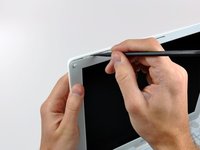
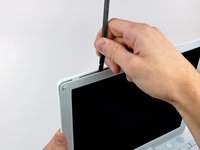
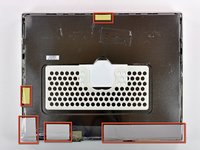
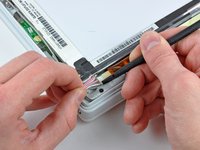
    • Remove the several pieces of tape securing the thin metal LCD cover to the display.

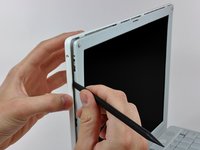
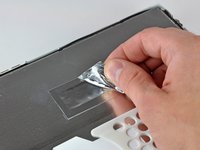
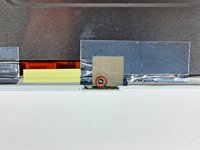
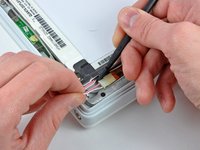
    • Carefully remove the piece of foil tape covering the display data cable connection.

  10. iBook G4 14" 933 MHz-1.33 GHz LCD Replacement: paso 10, imagen 1 de 2 iBook G4 14" 933 MHz-1.33 GHz LCD Replacement: paso 10, imagen 2 de 2
    • Remove the Phillips screw near the right display hinge.

    • Use the tip of a spudger to remove the small spacer under the screw you just removed.

  11. iBook G4 14" 933 MHz-1.33 GHz LCD Replacement: paso 11, imagen 1 de 1
    • Pull the foil/braided pieces of tape off the aluminum frame of the clutch hinges.

    • Leave the tape attached to the thin steel LCD cover.

  12. iBook G4 14" 933 MHz-1.33 GHz LCD Replacement: paso 12, imagen 1 de 2 iBook G4 14" 933 MHz-1.33 GHz LCD Replacement: paso 12, imagen 2 de 2
    • Remove the two Phillips screws securing the left and right sides of the LCD to the frame of the clutch hinges (four screws total).

  13. iBook G4 14" 933 MHz-1.33 GHz LCD Replacement: paso 13, imagen 1 de 1
    • Carefully remove the thin steel LCD cover.

  14. iBook G4 14" 933 MHz-1.33 GHz LCD Replacement: paso 14, imagen 1 de 1
    • Disconnect the display data cable by pulling the cable away from the socket on the LCD.

  15. iBook G4 14" 933 MHz-1.33 GHz LCD Replacement: paso 15, imagen 1 de 1
    • Remove the strip of yellow tape securing the display data cable to the metal LCD frame.

  16. iBook G4 14" 933 MHz-1.33 GHz LCD Replacement: paso 16, imagen 1 de 2 iBook G4 14" 933 MHz-1.33 GHz LCD Replacement: paso 16, imagen 2 de 2
    • Disconnect the backlight cable from the inverter.

    • It is helpful to use a spudger to push the backlight connector away from its socket while you lightly pull its cables away from the inverter.

  17. iBook G4 14" 933 MHz-1.33 GHz LCD Replacement: paso 17, imagen 1 de 1
    • Lift the LCD out of the display assembly.

    • It may be helpful to press the latch release button and open your display slightly to push the LCD out of the display assembly.

Conclusión

To reassemble your device, follow these instructions in reverse order.

5 personas más completaron esta guía.

Documentos Adjuntos

0 comentarios

Agregar Comentario

Ver Estadísticas:

Ultimas 24 horas: 2

Ultimos 7 días: 5

Ultimos 30 días: 9

Todo El Tiempo: 7,629