Introducción
Replacing the plastic bottom case.
Qué necesitas
-
-
Lay your iBook upside down on a flat surface.
-
Use a coin to rotate the battery locking screw 90 degrees clockwise.
-
Lift the battery out of the computer.
-
-
-
Use a spudger or small flathead screwdriver to remove the three rubber feet from the lower case.
"Close the display and flip the computer over." ...Seems like this instruction ought to be at the beginning of step 1 rather than step 2. In step one, the display is already closed and the computer flipped over. In step 2, you just keep it in this position and proceed from taking the battery out to removing the rubber feet.
Well, if you've had an iBook G4 this long, odds are the little rubber feet are falling off just from being looked at. Except the battery mounted one. That sucker is the Devils' Tower of little rubber feet.
-
-
-
Remove the three Torx screws using a T8 Torx screwdriver.
it seems a little bit weird to be using a Torx Screwdriver (T8 or T9 as the case may be) to remove hex screws. My machine has Torx screws in these locations.
Definitely haha- I checked the picture and those are definitely hex screws.
-
-
-
-
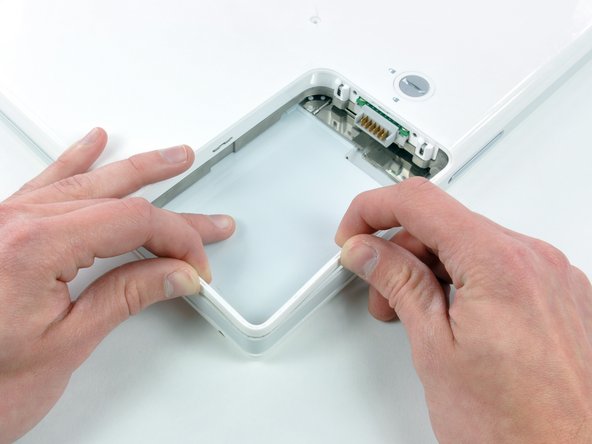
Push the thin rims of the lower case surrounding the battery compartment in, bending them past the tabs, and then lift up to free that corner of the lower case.
I find that a stiff nylon guitar pick will work if you don't have a spudger.
Definitely read the rest of the instructions now. I struggled at first... I was using my ipad with the step by step instructions and didnt scroll down past this photo, so I didnt see the sequence of how to loosen the tabs. in fact I didn't know where the tabs might be... Only discovered that part when I reassembled it. The spudger didn't work for me. Too soft, I used mostly a thin very small screwdriver.
-
-
-
Run a spudger along the seam between the lower case and upper case on the front of the computer to free the tabs locking the lower case. Pull up on the lower case and continue to use the spudger as necessary until you hear three distinct clicks.
-
-
-
There are three tabs over the optical drive that must be released before the lower case can come off. Slide the spudger into the lower case above the optical drive and run it toward the back of the computer until you hear three distinct clicks.
try using the spudger at the back near the vents. To be specific, on the left side of the hinge when faced upside-down. It's easier this way and it's described on Apple's official repair manual.
then put a library card or something between the outer enclosure and the optical drive enclosure then pull from the other side to free the casing
-
-
-
Turn the computer so that the back is facing you and pull the lower case up and toward you until the back tabs pop free.
Removing the back cover at this final step was had for me; I had to use a flathead screwdriver to separate the back edge of the cover away…I was not able to separate the lower case all the way by pulling the lower case up and toward me as shown in the photo.
-


To reassemble your device, follow these instructions in reverse order.
To reassemble your device, follow these instructions in reverse order.
Cancelar: No complete esta guía.
3 personas más completaron esta guía.
