Saltar al contenido principal

Zeal Optics iON Viewfinder Lens Assembly Replacement

Sólo Prerrequisito
Esta guía solo debería usarse como prerrequisito para otras guías. Por tanto, estará incompleta.

Qué necesitas

  1. Zeal Optics iON Viewfinder Lens Assembly Replacement, Viewfinder Lens Assembly: paso 1, imagen 1 de 2 Zeal Optics iON Viewfinder Lens Assembly Replacement, Viewfinder Lens Assembly: paso 1, imagen 2 de 2
    • Remove the two 7.5 mm Phillips screws on the front of the viewfinder housing.

    • Flip the viewfinder housing over 180 degrees.

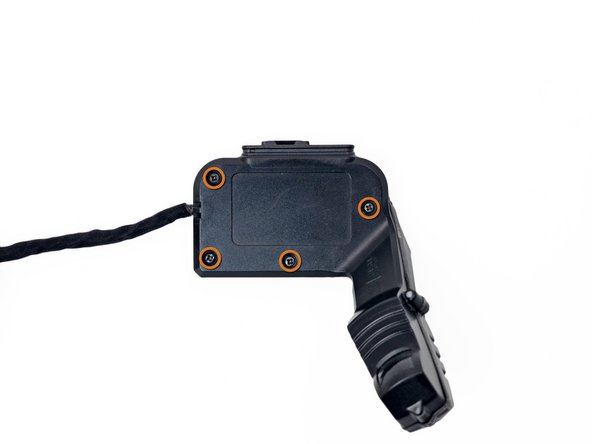
    • Remove the four 7.1 mm Phillips screws from the back of the viewfinder housing.

  2. Zeal Optics iON Viewfinder Lens Assembly Replacement: paso 2, imagen 1 de 2 Zeal Optics iON Viewfinder Lens Assembly Replacement: paso 2, imagen 2 de 2
    • Pull the two halves of the viewfinder housing apart.

  3. Zeal Optics iON Viewfinder Lens Assembly Replacement: paso 3, imagen 1 de 2 Zeal Optics iON Viewfinder Lens Assembly Replacement: paso 3, imagen 2 de 2
    • Use the tip of a spudger to flip up the retaining flap on the LCD ribbon cable ZIF connector.

    • Be sure to pry up on the hinged flap, not the connector itself.

  4. Zeal Optics iON Viewfinder Lens Assembly Replacement: paso 4, imagen 1 de 2 Zeal Optics iON Viewfinder Lens Assembly Replacement: paso 4, imagen 2 de 2
    • Use the tip of a spudger to push out the retaining clip on the viewfinder backlight ribbon cable ZIF connector.

  5. Zeal Optics iON Viewfinder Lens Assembly Replacement: paso 5, imagen 1 de 2 Zeal Optics iON Viewfinder Lens Assembly Replacement: paso 5, imagen 2 de 2
    • Using your fingers or tweezers, gently pull out the backlight ribbon cable from its connector on the button board.

  6. Zeal Optics iON Viewfinder Lens Assembly Replacement: paso 6, imagen 1 de 2 Zeal Optics iON Viewfinder Lens Assembly Replacement: paso 6, imagen 2 de 2
    • Using your fingers or tweezers, remove the LCD ribbon cable from its connector on the button board.

  7. Zeal Optics iON Viewfinder Lens Assembly Replacement: paso 7, imagen 1 de 2 Zeal Optics iON Viewfinder Lens Assembly Replacement: paso 7, imagen 2 de 2
    • Remove the viewfinder lens assembly from the viewfinder housing.

Conclusión

To reassemble your device, follow these instructions in reverse order.

Eric Flores

Miembro Desde 07/31/12

128 Reputación

9 Guías creadas

0 comentarios

Agregar Comentario

Ver Estadísticas:

Ultimas 24 horas: 0

Ultimos 7 días: 0

Ultimos 30 días: 0

Todo El Tiempo: 240