Saltar al contenido principal

ZTE Quest n817 Power/Volume Button Replacement

Qué necesitas

  1. ZTE Quest n817 Power/Volume Button Replacement, Battery: paso 1, imagen 1 de 3 ZTE Quest n817 Power/Volume Button Replacement, Battery: paso 1, imagen 2 de 3 ZTE Quest n817 Power/Volume Button Replacement, Battery: paso 1, imagen 3 de 3
    • Ensure that the phone is turned off before starting.

    • Orient the device so that the inset on the right side of the device is facing you.

    • Insert the spudger into the inset and carefully remove the back panel.

  2. ZTE Quest n817 Power/Volume Button Replacement: paso 2, imagen 1 de 2 ZTE Quest n817 Power/Volume Button Replacement: paso 2, imagen 2 de 2
    • Use the ribbon to remove the exposed battery.

  3. ZTE Quest n817 Power/Volume Button Replacement, Motherboard: paso 3, imagen 1 de 1
    • Use the JIS #000 screwdriver to remove the six 3.0mm screws placed in the back of the ZTE Quest.

  4. ZTE Quest n817 Power/Volume Button Replacement: paso 4, imagen 1 de 1
    • Carefully pry open the back panel with the plastic opening tool.

  5. ZTE Quest n817 Power/Volume Button Replacement: paso 5, imagen 1 de 1
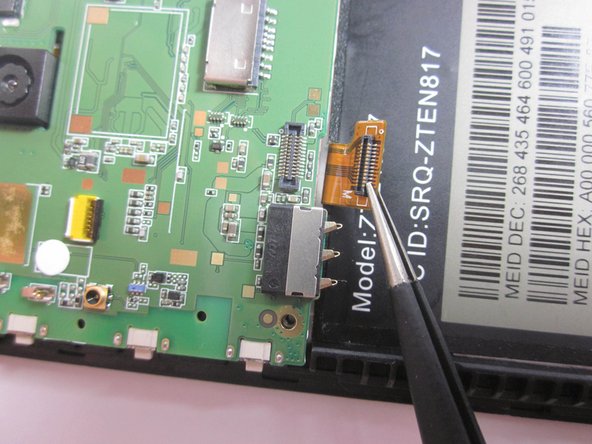
    • Use a pair of tweezers to gently disconnect the ribbon cable connector from its socket.

  6. ZTE Quest n817 Power/Volume Button Replacement: paso 6, imagen 1 de 1
    • Pull back the tape encasing the brown ribbon cable connector.

    • Remove the ribbon cable from its socket.

  7. ZTE Quest n817 Power/Volume Button Replacement: paso 7, imagen 1 de 1
    • Unplug the flat-top connector by using a pair of tweezers to pry up each side before removing the connector from its socket.

  8. ZTE Quest n817 Power/Volume Button Replacement: paso 8, imagen 1 de 2 ZTE Quest n817 Power/Volume Button Replacement: paso 8, imagen 2 de 2
    • Disconnect the coaxial connector in the bottom right corner of the motherboard.

  9. ZTE Quest n817 Power/Volume Button Replacement, Power/Volume Button: paso 9, imagen 1 de 1
    • Each of these buttons can be removed using micro-soldering techniques around either side of the button.

    • Instructions for how to do so can be found at iFixit's How to Solder and Desolder Connections guide.

Conclusión

To reassemble your device, follow these instructions in reverse order.

Una persona más ha completado esta guía.

Eric Loureiro

Miembro Desde 10/26/18

582 Reputación

5 Guías creadas

Equipo

UMass Dartmouth, Team S3-G6, Peak Fall 2018 Miembro de UMass Dartmouth, Team S3-G6, Peak Fall 2018

UMASSD-PEAK-F18S3G6

3 Miembros

10 Guías creadas

0 comentarios

Agregar Comentario

Ver Estadísticas:

Ultimas 24 horas: 0

Ultimos 7 días: 0

Ultimos 30 días: 3

Todo El Tiempo: 265