Saltar al contenido principal

XtremeMac Luna Dissasembly

Qué necesitas

  1. XtremeMac Luna Dissasembly, Bottom Panel: paso 1, imagen 1 de 3 XtremeMac Luna Dissasembly, Bottom Panel: paso 1, imagen 2 de 3 XtremeMac Luna Dissasembly, Bottom Panel: paso 1, imagen 3 de 3
    • Flip the device over so that the batteries are closest to you.

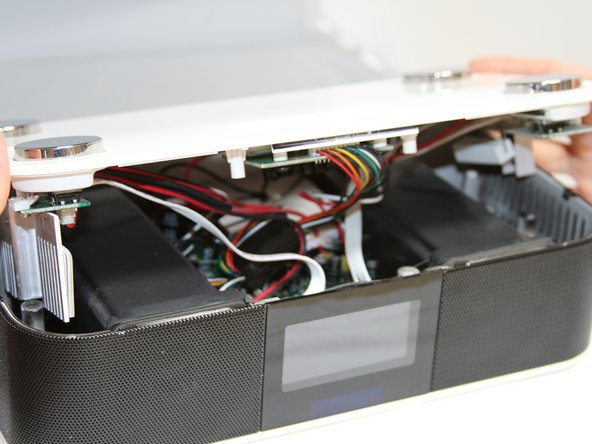
    • Remove the battery lid by pressing the battery cover's tab and pulling it away from the device.

    • Push the battery against the spring and lift it out of the casing.

    • Repeat with the other battery.

  2. XtremeMac Luna Dissasembly: paso 2, imagen 1 de 1
    • Unscrew all eight 12mm Phillips head screws with a Philips #1 screwdriver.

    • The iFixit 26 bit screwdriver kit will not reach the screws. Make sure to use a screwdriver that is thin enough to not get stuck in the screw holes.

  3. XtremeMac Luna Dissasembly: paso 3, imagen 1 de 2 XtremeMac Luna Dissasembly: paso 3, imagen 2 de 2
    • Flip the Luna back over so that the buttons are facing upward and the LCD screen is facing you.

    • Gently tilt the lid back 45 degrees so that the inside is exposed.

    • Be mindful of the wires inside of the Luna. It is easy to break a connection if a wire gets caught.

Conclusión

To reassemble your device, follow these instructions in reverse order.

Daniel Johnson

Miembro Desde 04/14/13

1 Reputación

1 Guía escrita

Equipo

Cal Poly, Team 3-47, Amido Spring 2013 Miembro de Cal Poly, Team 3-47, Amido Spring 2013

CPSU-AMIDO-S13S3G47

4 Miembros

8 Guías creadas

0 comentarios

Agregar Comentario

Ver Estadísticas:

Ultimas 24 horas: 0

Ultimos 7 días: 0

Ultimos 30 días: 1

Todo El Tiempo: 410