Saltar al contenido principal

Xbox 360 Wireless Controller 3D Analog Sensor Replacement

Guía Archivada
Esta guía se mantiene únicamente para fines históricos. Utiliza la última versión de la guía para llevar a cabo tu reparación.

Qué necesitas

  1. Xbox 360 Wireless Controller 3D Analog Sensor Replacement, Battery: paso 1, imagen 1 de 2 Xbox 360 Wireless Controller 3D Analog Sensor Replacement, Battery: paso 1, imagen 2 de 2
    • Depress the battery release button on the top of the controller.

    • Remove the battery holder from the controller.

    • The standard option for Xbox 360 Wireless Controllers Battery Packs is AA batteries. A rechargeable battery is also available, but both battery options are removed from the controller in the same way.

  2. Xbox 360 Wireless Controller 3D Analog Sensor Replacement, Rear Case: paso 2, imagen 1 de 1
    • Use a pair of tweezers to peel the barcode sticker from the battery compartment.

  3. Xbox 360 Wireless Controller 3D Analog Sensor Replacement: paso 3, imagen 1 de 1
    • Remove the seven 9.3 mm T8 Security Torx screws securing the rear case to the front case.

  4. Xbox 360 Wireless Controller 3D Analog Sensor Replacement: paso 4, imagen 1 de 2 Xbox 360 Wireless Controller 3D Analog Sensor Replacement: paso 4, imagen 2 de 2
    Herramienta utilizada en este paso:
    Spudger
    $2.99
    Comprar
    • Insert a Spudger between the front and rear cases along the left edge of the controller.

    • Rotate the spudger toward the front of the controller, prying the two cases apart.

  5. Xbox 360 Wireless Controller 3D Analog Sensor Replacement: paso 5, imagen 1 de 2 Xbox 360 Wireless Controller 3D Analog Sensor Replacement: paso 5, imagen 2 de 2
    • Insert a spudger between the front and rear cases, near the headphone jack.

    • Rotate the spudger toward the front of the controller to pry the two cases apart.

  6. Xbox 360 Wireless Controller 3D Analog Sensor Replacement: paso 6, imagen 1 de 2 Xbox 360 Wireless Controller 3D Analog Sensor Replacement: paso 6, imagen 2 de 2
    • Grasp the controller by the battery compartment and the headphone jack.

    • Lift the battery compartment away from the headphone jack, separating the rear case from the front case and logic board.

    • The battery contact springs are held in place by slots in the battery housing in the rear case. Be sure to realign them properly during reassembly.

  7. Xbox 360 Wireless Controller 3D Analog Sensor Replacement, Vibration Motors: paso 7, imagen 1 de 2 Xbox 360 Wireless Controller 3D Analog Sensor Replacement, Vibration Motors: paso 7, imagen 2 de 2
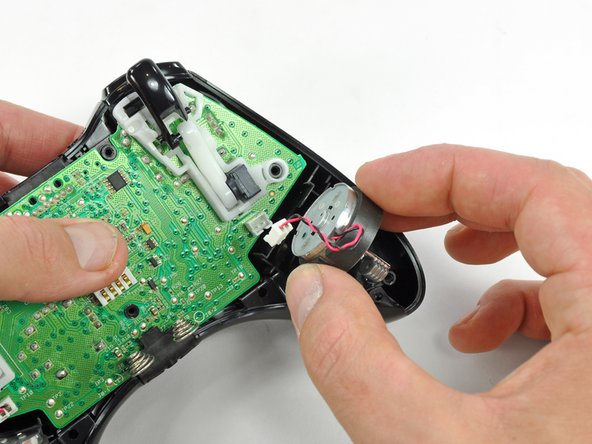
    • Use the flat end of a spudger to remove the vibration motor cable, moving it upward from its socket on the logic board.

    • Lift the vibration motor out of the front case.

  8. Xbox 360 Wireless Controller 3D Analog Sensor Replacement: paso 8, imagen 1 de 2 Xbox 360 Wireless Controller 3D Analog Sensor Replacement: paso 8, imagen 2 de 2
    • Remove the vibration motor from the other side of the controller using the same method previously described.

    • The left motor has significantly more counterweight than the right motor.

  9. Xbox 360 Wireless Controller 3D Analog Sensor Replacement, Logic Board: paso 9, imagen 1 de 2 Xbox 360 Wireless Controller 3D Analog Sensor Replacement, Logic Board: paso 9, imagen 2 de 2
    • Lifting from the headphone jack and power plug, remove the logic board from the front case.

  10. Xbox 360 Wireless Controller 3D Analog Sensor Replacement, Triggers: paso 10, imagen 1 de 3 Xbox 360 Wireless Controller 3D Analog Sensor Replacement, Triggers: paso 10, imagen 2 de 3 Xbox 360 Wireless Controller 3D Analog Sensor Replacement, Triggers: paso 10, imagen 3 de 3
    • Using your thumb and forefinger, push the left trigger toward the right side of the controller. Simultaneously push the trigger control arm in the opposite direction.

    • The trigger has a peg that fits into a slot in the trigger arm. Be sure to push far enough so that the peg clears the slot.

    • Push the trigger arm downward.

  11. Xbox 360 Wireless Controller 3D Analog Sensor Replacement: paso 11, imagen 1 de 3 Xbox 360 Wireless Controller 3D Analog Sensor Replacement: paso 11, imagen 2 de 3 Xbox 360 Wireless Controller 3D Analog Sensor Replacement: paso 11, imagen 3 de 3
    • Insert the edge of a spudger in between the trigger and the trigger assembly near the left edge. Pry the housing away from the catch on the trigger.

    • Using the previously described technique, pry the housing on the right edge away from the trigger.

    • Rotate the trigger away from the logic board, past its housing.

  12. Xbox 360 Wireless Controller 3D Analog Sensor Replacement: paso 12, imagen 1 de 3 Xbox 360 Wireless Controller 3D Analog Sensor Replacement: paso 12, imagen 2 de 3 Xbox 360 Wireless Controller 3D Analog Sensor Replacement: paso 12, imagen 3 de 3
    • Using a spudger, pry the trigger spring off its peg on the trigger housing.

    • Pull the trigger spring out of the trigger.

  13. Xbox 360 Wireless Controller 3D Analog Sensor Replacement: paso 13, imagen 1 de 3 Xbox 360 Wireless Controller 3D Analog Sensor Replacement: paso 13, imagen 2 de 3 Xbox 360 Wireless Controller 3D Analog Sensor Replacement: paso 13, imagen 3 de 3
    • Slide the trigger toward the right side of the logic board, and rotate it clockwise.

    • Remove the right trigger from the logic board.

    • To remove the left trigger from the logic board, follow the procedure previously described for the right trigger.

    • To remove the trigger control, only one has to be removed as it is over the analog sensor (left side).

    • Optional: It is easier to remove both, so as to avoid burning or melting the plastic while working.

    • The part should easily slide out once the solder is properly removed. If not, go back and check for solder left in the joints.

    • Heat and suck up the solder.

    • Remove analog sensor and place new part.

    • The part should easily slide out once the solder is properly removed. If not, go back and check for solder left in the joints.

    • Hold part in place and make a quick solder to hold it up in place.

    • Now solder all joints and follow in reverse.

Conclusión

To reassemble your device, follow these instructions in reverse order.

Una persona más ha completado esta guía.

_Z_

Miembro Desde 03/18/12

9,668 Reputación

2 Guías creadas

Equipo

Master Techs Miembro de Master Techs

Community

322 Miembros

2,519 Guías creadas

Un comentario

this guide will be finished as soon as i have time.

_Z_ - Contestar

Agregar Comentario

Ver Estadísticas:

Ultimas 24 horas: 0

Ultimos 7 días: 0

Ultimos 30 días: 0

Todo El Tiempo: 2,616