Saltar al contenido principal

Wahl Professional Designer Motor Replacement

Qué necesitas

  1. Wahl Professional Designer Motor Replacement, Motor: paso 1, imagen 1 de 2 Wahl Professional Designer Motor Replacement, Motor: paso 1, imagen 2 de 2
    • Unscrew the 12 mm Phillips head screws located at the top of the cover and at the bottom two corners, using a Phillips #1 Screwdriver.

  2. Wahl Professional Designer Motor Replacement: paso 2, imagen 1 de 3 Wahl Professional Designer Motor Replacement: paso 2, imagen 2 de 3 Wahl Professional Designer Motor Replacement: paso 2, imagen 3 de 3
    • Remove the wires connected to the motor by firmly grasping both sides of a wire and wiggling until it is released.

  3. Wahl Professional Designer Motor Replacement: paso 3, imagen 1 de 3 Wahl Professional Designer Motor Replacement: paso 3, imagen 2 de 3 Wahl Professional Designer Motor Replacement: paso 3, imagen 3 de 3
    • Unscrew the two 20.5 mm Phillip head screw located on the motor using a Phillip's #1 screwdriver.

  4. Wahl Professional Designer Motor Replacement: paso 4, imagen 1 de 2 Wahl Professional Designer Motor Replacement: paso 4, imagen 2 de 2
    • Gently remove the motor from the device.

Conclusión

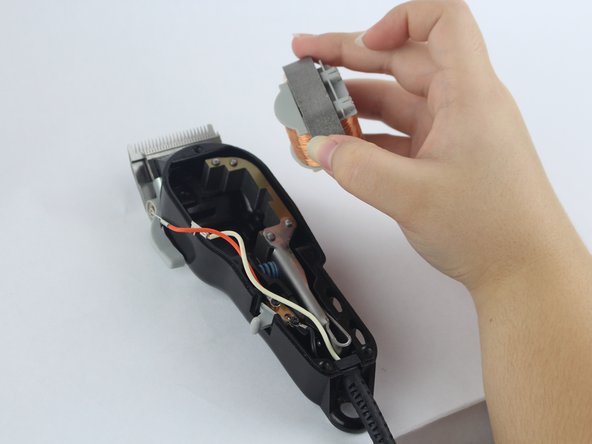
To reassemble your device, follow these instructions in reverse order.

Una persona más ha completado esta guía.

Equipo

USF Tampa, Team S14-G5, Boczar Fall 2017 Miembro de USF Tampa, Team S14-G5, Boczar Fall 2017

USFT-BOCZAR-F17S14G5

2 Miembros

5 Guías creadas

0 comentarios

Agregar Comentario

Ver Estadísticas:

Ultimas 24 horas: 0

Ultimos 7 días: 3

Ultimos 30 días: 7

Todo El Tiempo: 1,166