Introducción
Esta guía te mostrará cómo quitar y reemplazar la batería de iones de litio de los auriculares inalámbricos Crossfade. Si bien los auriculares cuentan con un diseño de hardware duradero, los aspectos eléctricos son muy escasos y la batería de tamaño insuficiente se desgasta rápidamente. Puedes usar el "programa inmortal" de V-Moda para obtener un descuento en un nuevo par de auriculares, pero aún son muy caros.
Si estás reemplazando la batería porque los auriculares no funcionan en modo Bluetooth, verifica si la batería es realmente la culpable. Si puedes cargar la batería (el botón de encendido se ilumina), lo más probable es que algo más esté roto, posiblemente el interruptor de palanca.
Si bien acceder es fácil, la batería está soldada a una placa pequeña. Tienes que desoldar y volver a soldar dos cables para reemplazar la batería.
Puedes reemplazar la batería con cualquier otra estándar de polímero de litio de dos hilos, siempre que quepa en los auriculares.
Qué necesitas
-
-
Sujeta la almohadilla del auricular izquierdo con los dedos y tira suavemente hacia el centro del auricular. Esto liberará el cojín de las lengüetas que lo mantienen en su lugar.
-
Tira con cuidado del auricular del resto de las lengüetas que lo mantienen en su lugar.
-
Retira la almohadilla del auricular.
-
-
-
Retira los seis tornillos Phillips de 10,1 mm que sujetan la placa del altavoz del auricular izquierdo.
-
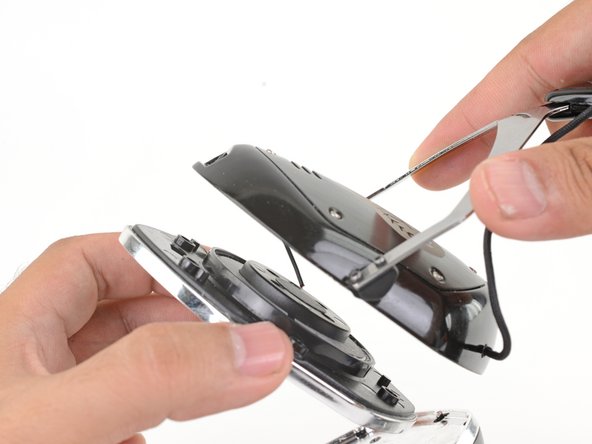
Inserta una púa de apertura en la costura entre la carcasa de plástico del auricular izquierdo y el borde de metal.
-
Desliza la púa a lo largo de la costura y gírala suavemente para aflojar la placa del altavoz.
-
-
-
-
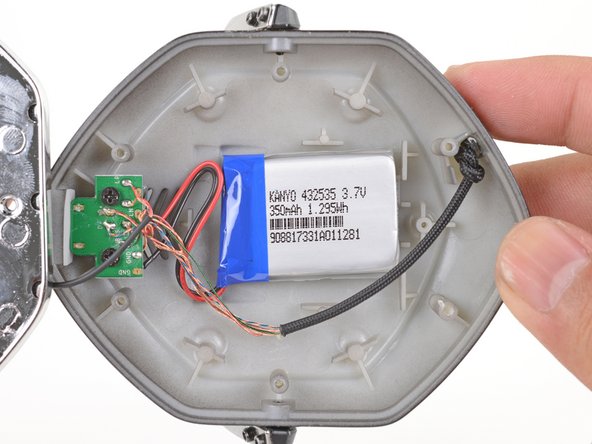
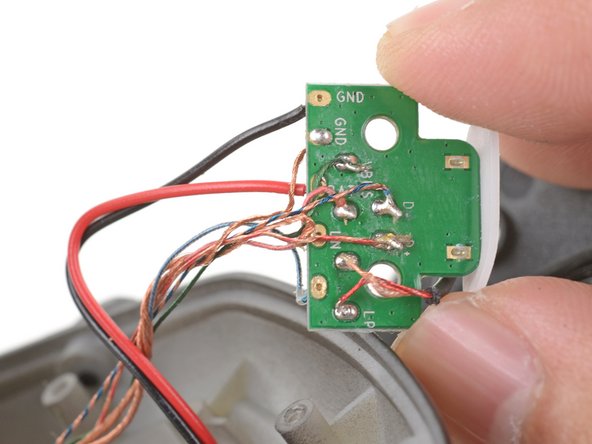
Voltea cuidadosamente la placa y observa las dos uniones soldadas conectadas a los cables de la batería.
-
Desuelda las dos juntas de soldadura y reemplaza la batería. Deberás volver a soldar la batería a estos puntos de contacto.
-
La parte posterior de la placa se muestra como referencia.
Rather than loosening the USB plate to de-solder the two wires, just cut the wires near to the battery and then strip and connect the new battery wires to the old wires. It just needs connecting up! No need to mess about with a soldering iron!
I would at least solder the new wires together to ensure a secure connection, much better than twisting wires together and its really easy to do this. I wish they had a nice strong battery replacement to directly recommend
-


Para volver a armar tu dispositivo, sigue estas instrucciones en orden inverso.
Para volver a armar tu dispositivo, sigue estas instrucciones en orden inverso.
Cancelar: No complete esta guía.
9 personas más completaron esta guía.
Un agradecimiento especial a estos traductores:
100%

¡ Francisco Javier Saiz Esteban nos está ayudando a reparar el mundo! ¿Quieres contribuir?
Empezar a traducir ›


14 comentarios
any link to get the right battery Mr. Arthur?
I have not tried it, but a li-po pack like this should work, while even giving you a battery capacity boost. Again, you would need to solder the battery contacts on.
Hey just finished completing my battery replacement with flying colors thx for the guide and link to the replacement battery my man.
I’m glad to hear it worked out for you!
I need to clean the underside of the grill that’s over the speaker… Is there any way to remove the grill without damaging it??
Hi Gabriel,
The grille is unfortunately heavily glued in. There is no easy way to remove it for cleaning.
Great write up! I dodged the tiny soldering portion by carefully cutting the wires (negative first, don’t let it touch positive) on both the existing pack and the new pack. Then braided the wires together and used heat shrink tubing to hold it all together. I replaced the original battery adhesive with a small square of 3M automotive double sided tape. It was a little tricky getting the wires to sit in the right place for closing things back up but everything is working great. Used the same Adafruit part the author suggested as well.
Would it make sense to solder on wires w/ JST connectors or cut the existing ones and splice JST connectors on so future battery replacement would be simpler? Is there room inside the earpiece for something like that?
There is definitely room for that in the headphones! The wires are of pretty thin gauge, so they’ll be a little delicate.
worked the first time, the second battery now it doent charge :(
I changed the battery still not working. Could there be a board problem?
The headphone light glows while set to charge, but as soon as I switch on the knob, it won't work (light won't glow)
The left side of the speaker wont work when wired. The right side works tho. The headphones wont charge, the indicator light wont come on. I noticed on the left ear cup that the wire coming out that goes around the headband into the next ear cup is actually pulled out a bit. What do you think is the problem? Maybe the wires came off the board?